AccXES Account Management Tool Administrator’s Guide
29
Printers Tab
Overview
A TCP/IP connection is needed for the AccXES Account Management Tool's
(AMT) host computer to have bi-directional communication with the defined
printers from which accounting data will be collected. The Printers Tab displays a
Printers List of the currently defined printers. Column boxes will be checked to
flag your attention to the fact that changes need to be transmitted to the printer
that were already made to the AMT Master Database
.
You can add, delete, edit, or find a printer. When a printer is deleted from the
Raw Accounting Job Accounting Database, the database references to that
printer are removed. Deleting the printer does not affect job accounting
operations on the indicated printer.
Associating defined printers with specific accounts and users is done on the Edit
Account Associations Tab.
The maximum number of printers supported by the AccXES AMT is 999. For
system performance reasons it is recommended that the AMT Administrator limit
the number of printers to 100.
How to Use the Printers Tab
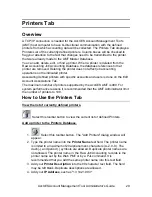
View the list of currently defined printers.
Select this toolbar button to view the current list of defined Printers.
Add a printer to the Printers Database.
1.
Select this toolbar button. The "Add Printers" dialog window will
appear.
2. Type the printer name into the
Printer Name
text field. The printer name
is limited to a maximum of 20 alphanumeric characters (A-Z, 0-9). The
dash (-) and period (.) symbols are allowed. Duplicate printer names are
not allowed. The printer name i n the Raw Job Accounting records is the
printer name set by the Web PMT or by a PJL command. It is
recommended that you add the same printer name into this text field.
3. Add your
Printer Description
into the 80-character text field. The field
may be left blank. Duplicate descriptions are allowed.
4. Add your
IP Address
, such as "13 142 199 3".


