background image

DocuColor 8000/7000 System Administration Guide

1-34

1. Tools Mode

Non-Standard Paper Size

You can run non-standard sized paper from any paper tray by 

entering the paper size on the Non-Standard Paper Size screen 

for the tray being used.

KEY POINT:

Be sure to select Non-Standard Size on the top front 

of the tray, and use the Paper Weight Indicator at the right side of 

the tray to select the paper weight being used.
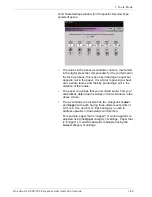
1. Touch the 

Non-Standard Size Paper

 button on the 

Machine 

Defaults 1 

screen.

2. Touch the desired Paper Tray button on the 

Non-Standard 

Paper Size

 screen.

3. Use the up or down arrow buttons on the screen to enter the X 

and Y dimensions of the paper being used in the tray. The 

dimensions shown on the screen above the X and Y boxes 

indicate the minimum and maximum sizes you can enter.

4. Touch the 

Close

 button to return to the 

Machine Defaults 1


screen.

5. To use these settings, exit the Tools Mode and ensure that 

Non-Standard Size

 has been selected on the top/front of the 

tray.

Summary of Contents for C8 - DocuPrint Color Inkjet Printer

Page 1: ...DocuColor8000 7000 System Administration Guide Version 3 1 March 2007...

Page 2: ...ion are trademarks of XEROX CORPORATION Copyright protection claimed includes all forms and matters of copyrightable material and information now allowed by statutory or judicial law or hereinafter gr...

Page 3: ...EU and other markets x Maintenance safety xi Operational safety xi Ozone safety xii Notices xiii Radio frequency emissions xiii FCC in the USA xiii In Canada ICES 003 xiii Regulatory information for...

Page 4: ...ctivity Setting 1 22 Productivity charts 1 23 Productivity Setting procedure 1 25 Auto Tray Switching 1 26 Oversize Paper Offset 1 28 Set Date Time 1 30 Setting the Date 1 30 Setting the Time 1 31 Dua...

Page 5: ...ttings Chart Type E1 Charts 1 E Table Settings Chart Type E2 Charts 2 E Table Settings Chart Type E3 Charts 3 E Table Settings Chart Type E4 Charts 4 E Table Settings Chart Type E5 Charts 5 E Table Se...

Page 6: ...DocuColor 8000 7000 System Administration Guide iv Table of contents...

Page 7: ...are software or result in the loss of data WARNING Warnings mark alert users to areas of the machine where there is a possibility of personal injury WARNING This symbol identifies an area on the machi...

Page 8: ...icates the beginning of a task or work process you should use to complete a procedure and is followed by the first step of a numbered procedure task or work process NOTE This symbol calls your attenti...

Page 9: ...es may impact the product certification Please contact your authorized local dealer for more information Electrical safety Use only the power cord supplied with this equipment Plug the power cord dire...

Page 10: ...d Xerox service representative to correct the problem The machine emits unusual noises or odors The power cord is damaged or frayed A wall panel circuit breaker fuse or other safety device is tripped...

Page 11: ...e with CDRH regulations and must be attached to laser products marketed in the United States This product does not emit hazardous laser radiation CAUTION Use of controls or adjustments or performance...

Page 12: ...iation exposure This product contains laser warning labels These labels are intended for use by the Xerox Service Representative and are placed on or near panels or shields that require special tools...

Page 13: ...safety Your Xerox equipment and supplies were designed and tested to meet strict safety requirements These include safety agency examination approval and compliance with established environmental stan...

Page 14: ...s may be very hot and should not be touched If you need any additional safety information concerning the machine or materials contact your Xerox representative Ozone safety This product produces ozone...

Page 15: ...led and used in accordance with the instruction manual may cause harmful interference to radio communications Operation of this equipment in a residential area is likely to cause harmful interference...

Page 16: ...rty accessories that are attached to the press must meet or exceed the requirements previously listed All modules that require external connection must be installed per the installation procedure Cert...

Page 17: ...which includes the addition of new functions or the connection of external devices may impact this certification Please contact your local Xerox Limited representative for a list of approved accessor...

Page 18: ...ies of the government such as FHA etc Bonds U S Savings Bonds may be photographed only for publicity purposes in connection with the campaign for the sale of such bonds Internal Revenue Stamps If it i...

Page 19: ...s Foreign Passports may be photographed 7 Immigration Papers 8 Draft Registration Cards 9 Selective Service Induction Papers that bear any of the following Registrant s information Earnings or IncomeD...

Page 20: ...brands seals wrappers or designs used by or on behalf of the Government of Canada or of a province the government of a state other than Canada or a department board Commission or agency established by...

Page 21: ...Choice guidelines for energy efficiency Environment Canada established the Environmental Choice program in 1988 to help consumers identify environmentally responsible products and services Copier pri...

Page 22: ...our Xerox sales representative 1 800 ASK XEROX to determine whether this Xerox product is part of the program For more information about Xerox environmental programs visit www xerox com environment Fo...

Page 23: ...liance with agreed national procedures In accordance with European legislation end of life electrical and electronic equipment subject to disposal must be managed within agreed procedures Prior to dis...

Page 24: ...DocuColor 8000 7000 System Administration Guide xxii Notices...

Page 25: ...efault settings for scanner features image quality settings and more Entering and exiting Tools Mode KEY POINT Keep the following in mind as you learn about the Tools Mode If you attempt to access the...

Page 26: ...to enter and exit the Tools Mode 1 Press the Access button on the Control Panel The Access Password Screen appears 2 Use the keypad to enter the Tools Mode password The default password is five ones 1...

Page 27: ...ge the Tools password as soon as possible after installing the digital press in order to prevent unauthorized access to the Tools Mode The procedure for changing the password is in Chapter 2 of this m...

Page 28: ...esult Tabs Allows you to view the options available on that screen Enter Saves any changes you made on the screen System Default Returns the settings on the screen to the factory default settings Clos...

Page 29: ...1 Tools Mode Machine Defaults Two Machine Defaults screens are available for changing default settings Each of the features shown on the below screen is described throughout the remainder of this cha...

Page 30: ...n and include the following as shown in the illustration The default settings procedures on the following pages are accessed from The Machine Defaults 1 screen NOTE The D MAX Setup feature may or may...

Page 31: ...isplays when the digital press is powered on You can choose from two screens Job Status Machine Status NOTE The Machine Status screen is the factory default setting Use the following procedure to chan...

Page 32: ...s screen the screen below appears when the machine is powered on If you change the default setting to the Job Status screen the screen below appears when the machine is powered on This screen displays...

Page 33: ...s are coated with several functional coatings which promote the image transfer through the form set and enable the form sets to separate appropriately after padding with a special adhesive Each suppli...

Page 34: ...Enablement is 700 920 NOTE For the purpose of this procedure the following screens show the Chain Link Number Current Value and New Value for Special Media Setting for Drilled Papers The Current Value...

Page 35: ...VM Read Write and switch off the feature that is currently on Follow the steps outlined in this procedure and use these settings for the New Value number To switch off the Special Media Setting for Dr...

Page 36: ...procedure to set the priority for each paper tray 1 Touch the Tray Priority button on the Machine Defaults 1 screen The Tray Priority screen appears 2 Touch the desired Priority button in the Priorit...

Page 37: ...the factory default settings for the timers in the digital press To access the various timers touch the System Timers button on the Machine Defaults 1 screen The System Timers screen appears From thi...

Page 38: ...xits the Power Saver mode when a job is sent to be printed or the Touch Screen is activated 1 Touch the Power Saver button on the System Timers screen 2 Use the up or down arrow buttons to change the...

Page 39: ...time 1 Touch the Screen Saver button on the System Timers screen 2 Use the up or down arrow buttons to change the time The range available is ten to sixty minutes To use the system default time of te...

Page 40: ...to allow seven seconds to unload prints from a finishing device before the next job starts printing 1 Touch the Job Spacing button on the System Timers screen 2 Touch the 7 Seconds button to enable t...

Page 41: ...etwork will queue but will not print while the Tools Mode is active 1 Touch the Tools Off button on the System Timers screen 2 Use the up or down arrow buttons to change the time The range available i...

Page 42: ...instruction 1 Touch the Auto Resume Print button on the System Timers screen 2 Use the up or down arrow buttons to change the time The range available is one to ten minutes To use the system default t...

Page 43: ...er instruction 1 Touch the Auto Resume Stop button on the System Timers screen 2 Use the up or down arrow buttons to change the time The range available is one to ten minutes To use the system default...

Page 44: ...n type of fault 1 Touch the Auto Resume Hold button on the System Timers screen 2 Use the up or down arrow buttons to change the time The range available is one to ten minutes To use the system defaul...

Page 45: ...on on the Machine Defaults 1 screen 2 Touch the button for the desired volume setting for each tone To deactivate a tone touch the Off button for that tone 3 Touch the Reset button to restore the fact...

Page 46: ...perature Use this setting to optimize the throughput speed for the type of paper you run most frequently Productivity Setting options are shown and explained in the following illustration Single Paper...

Page 47: ...ease in productivity ppm from the second feeder module to the first feeder module NOTE 3 Transparency is only available for 1 Sided A4 or 8 5 x 11 LEF Single Paper Weight Mode Paper Weight Paper Size...

Page 48: ...or DocuColor 7000 Min Max Simplex Duplex Simplex Duplex 60 105 g m2 182 0 216 0 80 40 70 35 216 1 297 0 60 30 60 30 297 1 458 0 40 20 35 17 5 458 1 488 0 30 15 30 15 106 135 g m2 182 0 216 0 60 30 60...

Page 49: ...for choosing the setting which is best for your environment 1 Touch the Productivity Setting button on the Machine Defaults 1 screen 2 Select the button for the type of paper you use most frequently i...

Page 50: ...ting What the Default Does Auto Tray Switching ATS Allows the digital press to automatically select another paper tray containing the appropriate paper if the selected paper tray becomes unusable Auto...

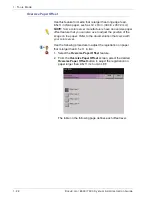
Page 51: ...4 To instruct the digital press to bypass one or more of the paper trays touch the desired Paper Tray button in the Inhibited Tray column To deselect a paper tray touch that Paper Tray button again T...

Page 52: ...t you can also use to adjust the position of the image on the paper Refer to the documentation that came with your color server Use the following procedure to adjust the registration on paper that is...

Page 53: ...rsize Paper Offset level Paper Size Level 1 Level 2 Level 3 Level 4 310mm 10 0mm 10 0mm 10 0mm 10 0mm 311mm 9 5mm 9 5mm 9 5mm 9 5mm 312mm 9 0mm 9 0mm 9 0mm 9 0mm 313mm 8 5mm 8 5mm 8 5mm 8 5mm 314mm 8...

Page 54: ...time for the system The date and time is displayed on the Error Log screen and on the Date and Time screens Setting the Date 1 Touch the Set Date Time button on the Machine Defaults 1 screen The Set D...

Page 55: ...n the screen to save your selections The next time you enter the Tools Mode the date that you set is displayed Setting the Time 1 Touch the Set Date Time button on the Machine Defaults 1 screen The Se...

Page 56: ...up or down arrow buttons to set the correct hour and minutes If you selected the 12 Hour Clock touch the AM or PM button 5 Touch the Enter button on the screen to save your selections The next time yo...

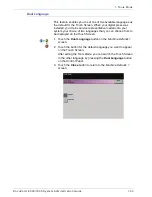
Page 57: ...o your system your choice of two languages that you can choose from to be displayed on the Touch Screen 1 Touch the Dual Language button on the Machine Defaults 1 screen 2 Touch the button for the def...

Page 58: ...r weight being used 1 Touch the Non Standard Size Paper button on the Machine Defaults 1 screen 2 Touch the desired Paper Tray button on the Non Standard Paper Size screen 3 Use the up or down arrow b...

Page 59: ...you through the Machine Defaults 2 screen Select the Machine Defaults 2 tab and one of the following screens appears If your system has an optional finishing device attached this screen may reflect a...

Page 60: ...humidity and temperature to determine the amount of pressure needed at the different decurlers to reduce output curl With some print jobs the output prints still may be curled more than you desire In...

Page 61: ...ry running the job from a different tray If curl is still a problem refer to the Decurler Settings A D table on the next page for your market area to change the default Decurler settings Decurler Spec...

Page 62: ...es toner area coverages and environments The outcome of this testing is the preset parameters shown in the table and the parameters refer to how particular papers interact with the digital press decur...

Page 63: ...pe A through Type D If the problem continues additional decurler settings are available and identified as Decurler Paper Types E1 through E6 NOTE Before using the E1 E6 Decurler Types you must set up...

Page 64: ...d or Coated 5 Select the desired Paper Weight range 6 Select an alternative Paper Type The default Paper Type automatically applied by the printer is displayed after adjusting the Tray Coating and Pap...

Page 65: ...rler Settings and repeat steps 3 through 8 Insure an alternate Paper Type selected from Paper Type A through Paper Type D has been selected each time these steps are repeated 9 Touch the Reset button...

Page 66: ...n you select the Decurler E Table Settings feature the following window opens NOTE As stated previously before using a Decurler E Type you must first set up the Decurler E Type setting or settings Whe...

Page 67: ...referring to the latest Recommended Materials List RML for your digital press 2 Check your output prints in the exit area of the digital press for paper curl determine if they are curled upward cupped...

Page 68: ...llimeters on a sheet of paper 5 Try eliminating the curl by using one of the Decurler Paper Type Settings specifically Types A D a Perform the Using the Decurler Setup procedure earlier in this chapte...

Page 69: ...or curl d If the curl is still persistent try another Decurler Paper Type A D e If the curl continues after each Decurler Paper Type A D setting is tried continue to the Using the Decurler E Table Set...

Page 70: ...en touch the Deculer E Table Settings button The Deculer E Table Settings window opens KEY POINT The digital press retains the last set values for all the E Table Settings options Therefore before you...

Page 71: ...setting if your output is Single sided face up Simplex In Reverse Select this setting if your output is Single sided face down Duplex Side 1 to Side 2 Select this setting if your output is 2 Sided an...

Page 72: ...DocuColor 8000 7000 System Administration Guide 1 48 1 Tools Mode 6 After you select the Decurler Type touch the E Table Settings button...

Page 73: ...adius and thereby producing a curl in the direction of the radius The paper curl values that you recorded earlier from your calculations determine the values in the six windows in the above screen The...

Page 74: ...use the appropriate Upper or Lower windows of the E Table Settings screen For example if your paper is curling upwards use the Upper windows as indicated the following screen in red 8 Select the page...

Page 75: ...1 51 1 Tools Mode 11 Touch the Close button to save these settings and return to the Decurler E Table Settings window 12 Touch the Close button to save the selections and return to the Machine Defaul...

Page 76: ...DocuColor 8000 7000 System Administration Guide 1 52 1 Tools Mode 14 From the Decurler Setup window touch the appropriate Paper Tray and Coating buttons 15 Select the appropriate Paper Weight...

Page 77: ...o save these settings and return to the Machine Defaults 2 screen 18 Exit Tools Mode 19 Print five pages of each representative image as determined in Step 8 For example run five pages of a sample pag...

Page 78: ...l is eliminated in one stack but not the other additional adjustments are required proceed to Step 29 21 Perform Steps 2 8 in Step 4 select the same Paper Type E1 through E6 as used previously and the...

Page 79: ...ted in one stack but not the other additional adjustments are required proceed to Step 29 25 Perform Steps 2 8 in Step 4 select the same Paper Type E1 through E6 as used previously and then proceed wi...

Page 80: ...d previously then Step 29a a If the 10 mm 6 mm and 2 mm values are 100 reduce the 2 mm value to 50 b Do not change the other values KEY POINT The above illustration is an example only Your actual E Ta...

Page 81: ...s of media and jobs such as outlined in the above example These profiles may be used at point of need in order to ensure optimum output quality of your prints jobs By setting custom paper profiles for...

Page 82: ...ing modifying a Custom Paper Profile KEY POINT Before creating or modifying Custom Paper Profiles copy and use the chart at the back of this book to record your Custom Paper Profile settings This will...

Page 83: ...ration Guide 1 59 1 Tools Mode 2 The Custom Paper Setup window opens 3 Select the specific Paper Tray for which the Custom Paper Profile will be created If you have a SFM attached this screen reflects...

Page 84: ...etting is Off The Paper Type Switches correspond with the media buttons switches on the paper trays Selecting a Paper Type Switch informs the digital press that custom paper is loaded in the tray and...

Page 85: ...an example only Do not perform these steps at this time 3 Select the 1 The Paper Type Switch corresponds with the selections on the paper tray 2 Select a Custom Paper Profile 4 The digital press will...

Page 86: ...e actual type of paper you are loading in the tray When creating a Custom Paper Profile select a Paper Type that is rarely or never used as your Paper Type Switch This ensures that when running common...

Page 87: ...s on the right are selectable KEY POINT Important information about this feature includes the following You can create and store up to ten different Custom Paper Profiles Only one custom profile is en...

Page 88: ...64 1 Tools Mode 7 From the Modify Review area select the Custom Paper Profile button The Custom Paper Profile window opens These options allow you to further fine tune your custom paper profile and ar...

Page 89: ...DocuColor 8000 7000 System Administration Guide 1 65 1 Tools Mode These options include Base Range of Paper Type This is the actual type of paper you are loading in the paper tray...

Page 90: ...ide 1 and Side 2 are both 100 Adjust Side 1 for all simplex jobs If defects remain in a printed job perform the following steps to determine if Side 1 or Side 2 adjustments are appropriate If the job...

Page 91: ...refer to the below illustration No Mottle Mottle If mottle exists and it is heavy weight paper increase one or both of the 2nd BTB values If mottle exists and it is light weight paper increase one or...

Page 92: ...olors are much different than what you desire refer to the below illustration This test pattern represents an This test pattern represents output with the desired colors an output with a shift in colo...

Page 93: ...Decurler Penetration Amount Use this feature to compensate for paper curl in your output prints This is the same as the Decurler Setup feature For specific Decurler information refer to the Decurler S...

Page 94: ...e for the slippage and skewing Some light weight papers may have too much NIP pressure applied to them thereby causing edge damage to the output prints In this case you may to decrease the NIP pressur...

Page 95: ...nt the digital press to decide whether or not to switch on or off the fans for a paper tray NOTE The default setting is Auto Examples If the digital press is producing multifeeds try setting this opti...

Page 96: ...elect or create an Alignment Adjustment Profile for this Custom Paper Profile NOTE For information on the Alignment Adjustment feature refer to the section later in this chapter entitled Alignment Adj...

Page 97: ...nt to ensure that the output is satisfactory 12 If the output is not satisfactory perform Steps 1 10 again to readjust the parameters for this Custom Paper Profile Run another Test Print to ensure tha...

Page 98: ...creen 14 Select the Close button to return to the Custom Paper Setup screen 15 Select the Close button to save and close these settings for this Custom Paper Profile If you do not want to save this pr...

Page 99: ...ur new Custom Paper Profile 17 To switch off the Custom Paper Profile without going into or deleting it in Tools Mode simply open the paper tray and select different paper type information weight coat...

Page 100: ...ature allows you to create and store a maximum of twenty different Alignment Adjustment Profiles These profiles allow you to accommodate different media types and how the image is registered aligned o...

Page 101: ...f the images on Sides 1 and 2 are the same size the stretching of the paper may cause the image on Side 1 to be slightly larger than the image on Side 2 Creating an Alignment Profile for these types o...

Page 102: ...s copy and use the chart at the back of this book to record your Alignment Profile settings This will ensure that you select the correct profile for a custom job NOTE If you require a Custom Paper Pro...

Page 103: ...h a Custom Paper Profile and have arrived here from the Custom Paper Setup procedure then this screen will not reflect any Paper Tray information The Paper Tray information was selected earlier in you...

Page 104: ...DocuColor 8000 7000 System Administration Guide 1 80 1 Tools Mode 3 Select a Profile number from 1 20 by touching the desired button The Modify Review button is now selectable as shown above...

Page 105: ...DocuColor 8000 7000 System Administration Guide 1 81 1 Tools Mode 4 Touch the Alignment Profile buttons the Alignment Profile window opens...

Page 106: ...to check the registration for 1 Sided prints only touch the 1 Sided button b Select 10 test prints by touching the Up arrow button to change the number of test prints generated c Touch the Pattern Ge...

Page 107: ...mine that the registration between Side 1 and Side 2 is significant and needs adjusting proceed to the Step 7 b If the registration between Side 1 and Side 2 is okay stop now Touch the Close button to...

Page 108: ...2 registration The factory default setting is zero 0 The arrows on the right side of the illustration show the paper feed direction The sign the left pointing arrow and the red lines shows the direct...

Page 109: ...the side edge of the image for Side 1 and or Side 2 registration The factory default setting is zero 0 The sign the up arrow and the red lines shows the direction the image will move on the paper when...

Page 110: ...per for both Side 1 and Side 2 The factory default setting is zero 0 The arrows on the right side of the illustration show the paper feed direction The sign the left pointing arrow and the red lines s...

Page 111: ...but aligned with each other The factory default setting is zero 0 The arrows on the right side of the illustration show the paper feed direction The sign the right curved arrow and the red lines shows...

Page 112: ...ds for Fast Scan and it enlarges or reduces the image in the direction shown in the illustration above The factory default setting is zero 0 The arrows on the right side of the illustration show the p...

Page 113: ...and it enlarges or reduces the image in the direction shown in the illustration above The factory default setting is zero 0 The arrows on the right side of the illustration show the paper feed direct...

Page 114: ...ther set of Test Prints and evaluate the registration on that output If you want multiple Alignment Profile features selected individually select each feature run Test Prints for that feature and eval...

Page 115: ...eve your output test prints from the digital press e Discard the first few prints as inconsistency tends to be greater with these images 10 Evaluate the test prints by holding your 2 Sided output at e...

Page 116: ...ve all the settings for this Alignment Profile and return to the Machine Defaults 2 screen 13 Close out of Tools Mode KEY POINT The Alignment Profile you just created modified is now in affect for the...

Page 117: ...Chart where you recorded the selections made for the profile you want to switch off deactivate 4 Select the Paper Tray for the profile you want to switch off deactivate The Profile number button selec...

Page 118: ...s Mode Finishing System Module Profile DFA device If your digital press has a third party Digital Finishing Architecture DFA device connected enabled and powered on the option entitled Finishing Syste...

Page 119: ...odule Profile button to display the Profile List To view the settings for a Timing Tab or a Finishing System Profile touch that button The settings for a DFA device can only be viewed on the digital p...

Page 120: ...DocuColor 8000 7000 System Administration Guide 1 96 1 Tools Mode...

Page 121: ...d Establish a separate password for access to the Auditron Mode View the number of prints sent through the color server Use the following procedure to access the Auditron Administration screens 1 Pres...

Page 122: ...up with print limits color limits a password and copy volume limits The Initialization screen allows you to reset information in User Accounts The Initialization screen allows you to Select a total nu...

Page 123: ...eturns the Tools Mode password to the factory default of five ones 11111 Whether you initially setting up the Auditron changing the total number of user accounts or resetting the Auditron a message ap...

Page 124: ...xisting account privileges You are also able to change the default password for entering the Tools Pathway and to create a new password for the Auditron Mode if so desired Account 1 is reserved for th...

Page 125: ...is returned to its previous value 1 Touch the Create Modify User Accounts button on the Auditron Administration screen The Create Modify User Accounts screen appears 2 Select the next open account by...

Page 126: ...s for the individual using the account by touching the Access Rights button 4 Touch one of the following buttons Key Operator Access Auditron Administrator Technical Key Operator Access NOTE The optio...

Page 127: ...nter the unique five digit password for this account b Touch the Enter button in the center of the screen The password you enter is displayed in the User Password field 7 Touch the Enter button in the...

Page 128: ...on the Auditron Administration screen The Create Modify User Accounts screen appears 2 Review Steps 2 9 in Creating a User Account on for information on how to change specific settings on this screen...

Page 129: ...on the Auditron Administration screen The Create Modify User Accounts screen appears Account 1 is displayed on the next screen with the default password of five 1s 11111 2 Touch the Input Password bu...

Page 130: ...The Create Modify User Accounts screen appears 2 Touch the Next Open Account button The number 2 is displayed in the Account Number field You can use any open account number for the Auditron Pathway...

Page 131: ...f the screen The Access Rights screen appears 6 Touch the Auditron Administrator Access button 7 Touch the Close button 8 Touch the Enter button on the Create Modify User Accounts screen 9 Touch the C...

Page 132: ...show volumes for the following copy types Depending on your digital press configuration you may or may not have an additional printing volume meter on this screen To reset these meters to zero touch t...

Page 133: ...n enter the number for each E Type Table Setting in the E Table Settings columns above E Table Settings Chart Type E1 Paper Type E Table Decurler Type E Table Settings Lower 10 mm Lower 6 mm Lower 2 m...

Page 134: ...nter the number for each E Type Table Setting in the E Table Settings columns above E Table Settings Chart Type E2 Paper Type E Table Decurler Type E Table Settings Lower 10 mm Lower 6 mm Lower 2 mm U...

Page 135: ...nter the number for each E Type Table Setting in the E Table Settings columns above E Table Settings Chart Type E3 Paper Type E Table Decurler Type E Table Settings Lower 10 mm Lower 6 mm Lower 2 mm U...

Page 136: ...nter the number for each E Type Table Setting in the E Table Settings columns above E Table Settings Chart Type E4 Paper Type E Table Decurler Type E Table Settings Lower 10 mm Lower 6 mm Lower 2 mm U...

Page 137: ...nter the number for each E Type Table Setting in the E Table Settings columns above E Table Settings Chart Type E5 Paper Type E Table Decurler Type E Table Settings Lower 10 mm Lower 6 mm Lower 2 mm U...

Page 138: ...nter the number for each E Type Table Setting in the E Table Settings columns above E Table Settings Chart Type E6 Paper Type E Table Decurler Type E Table Settings Lower 10 mm Lower 6 mm Lower 2 mm U...

Page 139: ...coated 106 135 g m2 Uncoated 136 186 g m2 Uncoated 187 220 g m2 Uncoated 221 300 g m2 Uncoated Transparency 60 80 g m2 Coated 81 105 g m2 Coated 106 135 g m2 Coated 136 186 g m2 Coated 187 220 g m2 Co...

Page 140: ...coated 106 135 g m2 Uncoated 136 186 g m2 Uncoated 187 220 g m2 Uncoated 221 300 g m2 Uncoated Transparency 60 80 g m2 Coated 81 105 g m2 Coated 106 135 g m2 Coated 136 186 g m2 Coated 187 220 g m2 Co...

Page 141: ...coated 81 105 g m2 Uncoated 106 135 g m2 Uncoated 136 186 g m2 Uncoated 187 220 g m2 Uncoated 221 300 g m2 Uncoated Transparency 60 80 g m2 Coated 81 105 g m2 Coated 106 135 g m2 Coated 136 186 g m2 C...

Page 142: ...coated 81 105 g m2 Uncoated 106 135 g m2 Uncoated 136 186 g m2 Uncoated 187 220 g m2 Uncoated 221 300 g m2 Uncoated Transparency 60 80 g m2 Coated 81 105 g m2 Coated 106 135 g m2 Coated 136 186 g m2 C...

Page 143: ...egistration Perpendicularity Side Skew FS Direction Image Magnification SS Direction Image Magnification Side 1 2 0 to 2 0 ____________mm Side 2 2 0 to 2 0 ____________mm Side 1 2 0 to 2 0 ___________...

Page 144: ...egistration Perpendicularity Side Skew FS Direction Image Magnification SS Direction Image Magnification Side 1 2 0 to 2 0 ____________mm Side 2 2 0 to 2 0 ____________mm Side 1 2 0 to 2 0 ___________...

Page 145: ...Registration Side Registration Perpendicularity Side Skew FS Direction Image Magnification SS Direction Image Magnification Side 1 2 0 to 2 0 ____________mm Side 2 2 0 to 2 0 ____________mm Side 1 2...

Page 146: ...Registration Side Registration Perpendicularity Side Skew FS Direction Image Magnification SS Direction Image Magnification Side 1 2 0 to 2 0 ____________mm Side 2 2 0 to 2 0 ____________mm Side 1 2...

Page 147: ......

Page 148: ......

Reviews: