background image

DocuMate 262i Scanner User’s Guide

45

Scanning

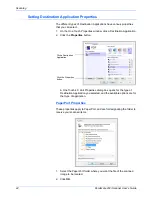
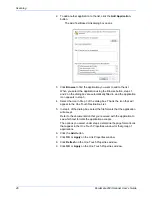
3. Click 

OK

 or 

Apply

 on the One Touch Properties window.

When PaperPort opens after you finish scanning, the thumbnails of 
your scanned documents are on the Desktop in that folder. 

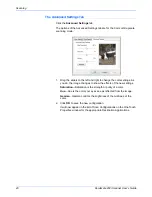
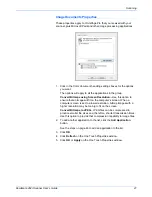
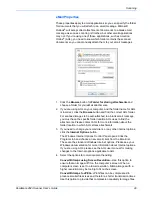
Text Documents Properties

These properties apply to Microsoft Word, Microsoft Excel

®

, and the other 

applications indicated by their icons in the list. The properties apply to the 
OCR settings for the applications.

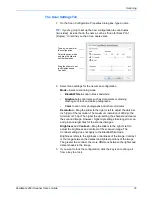
1. Click in the OCR settings boxes for the options you want.

The options will apply to all the applications in the group. 

Always send a file, even when no text was found

—The scanned 

file is sent to the OCR reader even if the image does not appear to 
contain text. This could occur if you scanned a photograph with a One 
Touch button set for text applications.

Show message if text recognition failed

—A message will open on 

the screen if the OCR reader does not detect text in the image.

Summary of Contents for DOCUMATE DocuMate 262i

Page 1: ...DocuMate 262 user s guide scanner i ...

Page 2: ...DocuMate 262i scanner user s guide ...

Page 3: ...arePoint is a registered trademark of Microsoft Corporation ZyINDEX is a registered trademark of ZyLAB International Inc ZyINDEX toolkit portions Copyright 1990 1998 ZyLAB International Inc All Rights Reserved All other products mentioned herein may be trademarks of their respective companies Information is subject to change without notice and does not represent a commitment on the part of Visione...

Page 4: ...Front Feed Tray Down 23 Scan from the Input Tray with the Front Feed Tray Down 26 Auto Scan from the Front Feed Tray 28 Using the One Touch Button Panel 31 Scan from the One Touch Button Panel 31 The Default One Touch Settings on Your Scanner 32 Configuring the One Touch Buttons 33 About the One Touch Properties Window 33 Selecting New Settings for a Button 35 Creating a New Scan Configuration 36 ...

Page 5: ...ent Feeder 85 Clearing Paper Jams 86 Replacing the ADF Pad Assembly 87 Troubleshooting 88 Status Light Troubleshooting Codes 89 Uninstalling Your Scanner 91 To Install Another Driver 92 Xerox DocuMate 262i Scanner Specifications 93 Xerox DocuMate 262i Scanner Parts List 94 Notices 95 Section 1 Safety Introduction 95 Section 2 EMC 95 Section 3 Operational Safety Information 96 Section 4 Electrical ...

Page 6: ...on your computer What s in the Box Before proceeding check the contents of the box If items are missing or damaged contact the dealer where you purchased the scanner DocuMate 262i Scanner Power Supply Paper Guide Output Tray Replacement ADF Pad Power Cord USB Cable Installation DVD Quick Install Guide Technical Support Card Buttons Label Front Feed Tray with Output Tray ...

Page 7: ...ws the scanner s status A steady blue light indicates the scanner is available to scan A rapidly flashing blue light indicates the scanner is preparing to scan Refer to the Troubleshooting section for additional details Front Feed tray Place an item between the guides and press down to feed items through the front of the scanner Output tray Holds documents after scanning through the Automatic Docu...

Page 8: ...it or True Color 24 bit or 32 bit Resolution set to at least 800 x 600 pixels To set your monitor s colors and resolution Open the Windows Control Panel Double click on Display then select the Settings tab Documentation The following documentation is provided with your scanner Quick Install Guide Abbreviated installation instructions Xerox DocuMate 262i Scanner User s Guide On the Installation DVD...

Page 9: ...ation to proceed Although the messages will differ based on the software your computer is running in each case you should allow the installation to proceed Alternatively you can turn off the AntiVirus or AntiSpyware software before installing your scanner But if you do make sure to turn it back on again when installation is finished If you already have a scanner connected to your computer you may ...

Page 10: ...nd open the Automatic Document Feeder cover 3 Carefully remove any foam particles that may have gotten inside the document feeder and close the cover 4 Align the slots on the paper guide with the ridges on the scanner and slide it down until it snaps into place 5 Select either the Front Feed with Output Tray or the standard Output Tray 6 Insert the pins on each side of the output tray into the hol...

Page 11: ...OTE If the DVD does not start check the following Make sure the DVD drive s door is completely shut Make sure the DVD was inserted in the drive in the proper direction label side up To launch the DVD manually Open the Windows option for My Computer You can do this by double clicking on the My Computer icon on your desktop Double click the icon for your DVD ROM drive The Installation menu for the D...

Page 12: ...s 4 Make sure the boxes for Nuance PaperPort and Scanner Driver are checked 5 Click Install Now 6 The Select Language window opens Click the drop down menu arrow and select the language to use Click OK NOTE The software provided with your scanner may differ slightly from the list shown in the window ...

Page 13: ...be installed 3 On the Customer Information window accept the current values or enter new information then click Next 4 On the Setup Type window keep the default Setup Type and click Next 5 Click Install to begin the installation 6 On the Product Registration window do one of the following Select Register online click OK then follow the registration instructions Select Print registration form click...

Page 14: ...Touch 4 0 Monitor will not run and you cannot use the One Touch features You can use the Xerox DocuMate 262i TWAIN driver to scan from applications with a TWAIN interface You can also scan from applications that use the ISIS driver You will not be able to scan with the buttons on the scanner TWAIN only The TWAIN driver is installed without the One Touch 4 0 software or the ISIS driver You can use ...

Page 15: ... window asking you to select one of the images for your Color Space setting 6 Select the option that looks best to you and click Next 7 STOP when you see the Complete the installation by connecting your hardware window Do NOT click OK yet Leave the window open and proceed to the next section ...

Page 16: ...power supply into the power port on the scanner 2 Plug the power cord into the power supply and into a wall outlet NOTE Only use the power supply HEG42 240200 7L made by HiTron included with your scanner Connecting any other type of power supply may damage your scanner and will void its warranty ...

Page 17: ...ed the USB cable into a USB 1 1 port an information bubble may open explaining that A HI SPEED USB device is plugged into a non HI SPEED USB hub Plug the USB cable into a USB 2 0 port if available or just disregard the message If you leave it plugged into the USB 1 1 port your scanner may scan a bit slower than the 33 pages per minute and 66 images per minute available with a USB 2 0 port Your com...

Page 18: ...K You can also click More to see a quick overview about accessing and navigating the One Touch Button Panel When you re finished reading the additional information click OK The scanner s status light is blue when the scanner and computer are communicating properly 6 Click Close on the Installation Complete window to close and exit the software installer You can now install additional applications ...

Page 19: ... 1 Reinsert the installation DVD into the DVD ROM drive The Installation menu opens The free Adobe Acrobat Reader software is located on the DVD with the User Guides 2 Click Install Products You will see the screen that shows the applications Applications already installed have Installed next to them 3 See the following table to decide which software you would like to install ...

Page 20: ... automatically enhances scanned documents from less than perfect originals It is an additional scanning interface that uses patented VRS VirtualReScan technology and ensures your scanning is as efficient and easy as possible while also improving both the quality of the scanned images Kofax VRS uses an ISIS certified driver for scanning This software provides an additional method to scan from your ...

Page 21: ...uides window and repeat the process to open view and save all the other User Guides you want The Scanner Readme file has late breaking news about your scanner The SharePoint Mini Guide has information about a new feature in the One Touch 4 0 software to link to Microsoft s SharePoint application This brief Mini Guide explains how to setup the SharePoint link and use the SharePoint features when ch...

Page 22: ... the bottom right corner of the screen 2 Choose Check for Online Updates from the pop up menu 3 Follow the instructions on the screen and register your scanner by entering your scanner s serial number and your email address The serial number is located on the underside of the scanner After registration is complete you will receive an email message with your RegID 4 After receiving your RegID write...

Page 23: ... the icon on the One Touch panel Also use this One Touch method of scanning if you want to access the advanced features of Optical Character Recognition OCR available from the OmniPage Pro application See Scan from the One Touch Button Panel on page 31 TWAIN Interface This option uses your scanner s TWAIN interface to scan Select scanning options before scanning put the document in the scanner the...

Page 24: ... are fully extended 2 Load the documents face down with their tops into the Automatic Document Feeder NOTE Always remove any staples or paper clips from documents before inserting them into the scanner s Automatic Document Feeder Staples and paper clips can jam the feed mechanism and scratch the internal components Also remove any labels stickers or Post It notes that may come off during the scann...

Page 25: ...Duplex button 3 A scan progress window opens and the image s are sent to the selected application from the One Touch utility In this example the Destination Application is the PaperPort desktop If you have the front feed tray attached all pages in the ADF will feed out underneath the front feed tray Press the Destination Selector to cycle through the scan settings to select the one you want The cu...

Page 26: ...e scanning 2 Place a single item face up with the top pointing into the scanner between the paper guides on the front feed tray 3 Press down on the tray and guide the item to the front of the scanner 4 The scanner pulls the item in from the front and the front feed tray springs back up NOTE Do not attempt to load documents into the input tray while you have an item in the scanner fed in from the f...

Page 27: ...m press the Duplex button 7 The scanner scans the item and ejects it out underneath the front feed tray A scan progress window opens and the image s are sent to the selected application from the One Touch utility In this example the Destination Application is the PaperPort desktop Press the Destination Selector to cycle through the scan settings to select the one you want The current scan setting ...

Page 28: ...ont slot of the scanner Any items you scan are ejected over the front feed tray when scanning is complete To lock the Front Feed Tray down 1 Locate the arm levers on either side of the front feed tray 2 Gently pull the arm levers away from the scanner and fold them down 3 The front feed tray is now in the down position aligned with the front slot of the scanner ...

Page 29: ...2 Place a single item face up with the top pointing into the scanner between the paper guides on the front feed tray 3 The scanner pulls the item in from the front 4 Check the LED number to make sure you re using the scan setting you want Press the Destination Selector to cycle through the scan settings to select the one you want The current scan setting ...

Page 30: ... To scan a two sided item press the Duplex button 6 The scanner scans the item and ejects it out over the front feed tray A scan progress window opens and the image s are sent to the selected application from the One Touch utility In this example the Destination Application is the PaperPort desktop ...

Page 31: ...e down position 1 Adjust the paper guide for the paper width and make sure the input and output trays are fully extended 2 Load the documents face down with their tops into the Automatic Document Feeder 3 Check the LED number to make sure you re using the scan setting you want Press the Destination Selector to cycle through the scan settings to select the one you want The current scan setting ...

Page 32: ...ton To scan a two sided document press the Duplex button 5 A scan progress window opens and the images are sent to the selected application from the One Touch utility In this example the Destination Application is the PaperPort desktop The pages are ejected out of the scanner over the front feed tray ...

Page 33: ... is inserted into the scanner from the front To Set the Front Feed Scan Event 1 Right click on the One Touch icon located on the Windows task bar and select Show Hardware from the menu The scanner s Hardware Properties window opens 2 Click on the Properties button The scanner s Device Configuration window opens 3 In the Control section select the option Front Feed Scan Event ...

Page 34: ...ouch Buttons on page 33 for details on configuring the 9 scanning functions for your scanner Current Select this option to have the auto scanning event always use the scanning function that is currently selected on the scanner s display For instance if the LED on the scanner is set to 6 then the scanner will auto scan from the front feed with the settings of function 6 5 Select Duplex to indicate ...

Page 35: ...ace a single item face up with the top pointing into the scanner between the paper guides on the front feed tray 3 The scanner pulls in the item scans and ejects it out of the front A scan progress window opens and the image s are sent to the selected application from the One Touch utility In this example the Destination Application is the PaperPort desktop ...

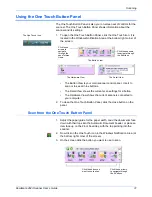
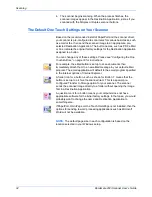
Page 36: ...connected to your computer 2 To close the One Touch Button Panel click the close button on the panel Scan from the One Touch Button Panel 1 Adjust the paper guide for the paper width Load the documents face down with their tops into the Automatic Document Feeder or place an item face up on the Front Feed tray with the top pointing into the scanner 2 Now click on the One Touch icon in the Windows N...

Page 37: ...an documents then immediately attach them to a new eMail message in your default eMail program The email application will default to the email program specified in the internet options of Internet Explorer A folder icon for a button such as shown for Button 7 means that the button is set up to archive the scanned item This is a special pre configured Transfer to Storage option for your scanner The...

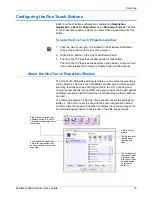
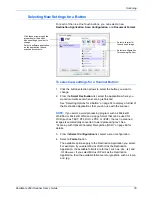
Page 38: ...you can select new settings for the buttons The One Touch Properties window also contains special scanning features such as scanning and burn to a CD scanning and converting text directly into an HTML web page and scanning with optical character recognition OCR that turns a scanned image into text that you can edit The following example of the One Touch window shows the settings for Button 2 The b...

Page 39: ...led information about the selected configuration See Editing or Deleting Scan Configurations on page 42 Select Format A set of file formats for the scanned image for the selected button The formats are based on the type of destination application you select The button names indicate their file types See Selecting Page Format Options on page 50 Options tab Displays a window for selecting options re...

Page 40: ...ions apply to the Destination Application you select For example if you select Microsoft Word as the Destination Application the available formats are for text such as doc txt and rtf However if you select Microsoft Paint as the Destination Application then the available formats are for graphics such as bmp and jpg Select a software application as the destination to send scanned documents Select a...

Page 41: ... button Creating a New Scan Configuration The scan configurations are where you select the scanning resolution brightness mode color black white or grayscale and a number of other settings 1 Open the One Touch Properties window and make sure the Multi Function tab is selected 2 Scroll through the applications in the Select Destination list and click the type of application for which you want to cr...

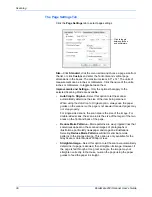
Page 42: ...oduce larger files for the scanned images Brightness and Contrast Drag the sliders to the right or left to adjust the brightness and contrast of the scanned image The Contrast setting does not apply to the Black White mode Brightness refers to the lightness or darkness of the image Contrast is the range between the darkest and lightest portions of the image The greater the contrast the more differ...

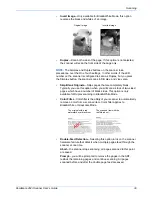
Page 43: ... the page is not skewed Skewed pages may not crop properly For single sided scans the scan area is the size of the image For double sided scans the scan area is the size of the larger of the two areas on the front and back of the page Reduce Moire Patterns Moire patterns are wavy rippled lines that sometimes appear on the scanned images of photographs or illustrations particularly newspaper and ma...

Page 44: ... filter applies to Black White or Grayscale Mode Double Feed Detection Selecting this option turns on the scanner hardware feature that detects when multiple pages feed through the scanner at one time Abort the scanner stops scanning all pages scanned to this point are saved Prompt you will be prompted to remove the pages in the ADF restack the remaining pages and continue scanning All pages scann...

Page 45: ...e color settings As you do the image changes to show the effects of the new settings Saturation Saturation is the strength or purity of a color Hue Hue is the color your eyes see as reflected from the image Gamma Gamma controls the brightness of the midtones of the color 2 Click OK to save the new configuration It will now appear in the list of Scan Configurations on the One Touch Properties windo...

Page 46: ...image will automatically be cropped around its edges to fit on the page Center image on page The image will be printed in the center of the page instead of at the top right corner Maintain aspect ratio The aspect ratio is the length to width relationship of the image s dimensions Select this option so the image s relative proportions remain constant AutoRotate image for best fit If the image is a ...

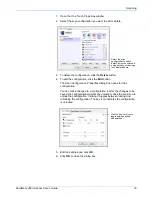
Page 47: ...d the scanned documents are saved in those folders By default the location of the archived documents is at My Documents My OneTouch Archive and then in a folder based on your selection for the Storage Location 3 Click the Browse button to specify the location to store the scanned documents or type a location directly into the box 4 Click OK or Apply Editing or Deleting Scan Configurations NOTE You...

Page 48: ...u can make changes to a configuration but for the changes to be saved the configuration must first be unlocked Click the Lock icon to unlock the configuration Clicking it toggles between locking and unlocking the configuration The key icon indicates the configuration is unlocked 5 Edit the settings and click OK 6 Click OK to close the dialog box Select the scan configuration to edit or delete It m...

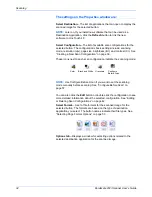
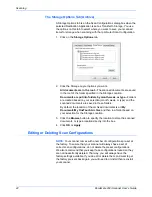
Page 49: ...e Properties button A One Touch 4 0 Link Properties dialog box opens for the type of Destination Application you selected and the available options are for that type of application PaperPort Properties These properties apply to PaperPort and are for designating the folder to receive your scanned items 1 Select the PaperPort folder where you want the file of the scanned image to be located 2 Click ...

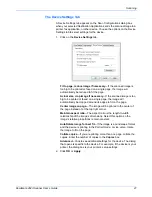
Page 50: ...ons in the list The properties apply to the OCR settings for the applications 1 Click in the OCR settings boxes for the options you want The options will apply to all the applications in the group Always send a file even when no text was found The scanned file is sent to the OCR reader even if the image does not appear to contain text This could occur if you scanned a photograph with a One Touch b...

Page 51: ...3 of the dialog box That is the icon that will appear in the One Touch Destination List 5 In step 4 of the dialog box select the file formats that the application will accept Refer to the documentation that you received with the application to see which text formats the application accepts The options you select under step 4 determine the page format icons that appear in the One Touch Properties w...

Page 52: ...hat an image will fit on the computer s screen When a computer screen is set to a lower resolution bitmap images with a higher resolution may be too big to fit on the screen Convert Bitmaps to JPEG JPEG files can be compressed to produce smaller file sizes and therefore shorter transmission times Use this option to provide that compression capability to image files 2 To add another application to ...

Page 53: ...re created based on your selection month week or type and the scanned documents are saved in those folders New folders are created for each month and week so you can keep track of when you scanned the documents 2 Click the Browse button to specify the location to store the scanned documents or type a location directly into the box 3 If you have a CD burner attached to your computer the option Show...

Page 54: ... AOL uses to find the attachments Please contact AOL for more information about the folder location in which AOL stores attachments 3 If you need to change your email client or any other internet options click the Internet Options button The Windows Internet Options Control Panel opens Click the Programs tab and choose a new email client from the Email list These are the standard Windows Internet ...

Page 55: ...cally selected and disabled if you have selected a format that only supports single pages such as BMP or JPG Image Formats Select an image file format for photos artwork or other documents that you want to save as images BMP and TIFF are standard image file formats generally used if you want to do additional image processing such as photo touch up or color correction Both of those file formats ten...

Page 56: ...selected as the Page Format are not affected so you can set the JPEG or PDF file size image quality independently for each button 4 Click OK or Apply on the One Touch Properties window Text Formats Selecting the text format option also selects OCR processing as an automatic step for scanning Therefore when you scan a document with the text format selected the text portions of the document are auto...

Page 57: ...he txt file format Text with no formatting used by the standard Microsoft Notepad application Rich Text Format The rtf file format Text that retains formatting when converted Available with Microsoft Wordpad and Word Word Document The doc file format used by Microsoft Word Comma Delimited The csv file format used for database or spreadsheet data with fields separated by commas When the document is...

Page 58: ...capabilities you can edit the text in an nPDF image if a PDF editing program is installed See Scanning with sPDF or nPDF and Searching for Text on page 62 for details 4 To change the OCR settings choose OCR Options The OCR Options provide a series of selections for the OCR feature when you scan text This menu option is only available if you have the One Touch OmniPage Module or OmniPage Pro instal...

Page 59: ...pe a new name 4 Click OK or Apply The button is now renamed Selecting Options for a Button The One Touch Options determine the types of Destination Applications available for a button as well global settings for choosing the location of the files for your scanned items 1 Open the One Touch Properties window and click the Options tab 2 Click the Select Button menu arrow and select the button for ne...

Page 60: ... Character Recognition OCR on page 60 for more about OCR PDF applications are for documents scanned to the PDF format Email includes Microsoft Outlook and other email applications See eMail Properties on page 49 for details about attaching scanned documents to your email messages Storage and CD R W is for either storing scanned documents in a folder or sending them to a CD burner to create a CD co...

Page 61: ... in the Folder Copy Options section This option is not available if either Document Management or Storage and CD R W are selected because by default file copies for those types of Destination Applications are already automatically saved in the folder for copies Folder Copy Options This section of the dialog box sets the location for copies of your scanned documents and how you want to group them C...

Page 62: ...he button that you want to set to configure before scanning 3 Select the scan configuration Configure Before Scan 4 Right click on Configure Before Scan and choose an interface to use for scanning TWAIN The TWAIN Interface opens for you to make changes prior to scanning See Accessing the TWAIN Interface on page 75 WIA The Windows Image Acquisition Interface WIA opens for you to make changes prior ...

Page 63: ...t to use Configure Before Scan 3 The TWAIN interface will open 4 Choose the Options applicable to your scan batch 5 Click on the Scan button in the TWAIN interface 6 Your documents will be scanned and sent to the Destination Application specified in the One Touch 4 0 Properties In the example shown on the previous page the Destination Application is Microsoft Paint Please see Scanning with the TWA...

Page 64: ...lete any scanned pages then select the correct Picture Type and restart the scanning No scanning stops but all pages scanned in this batch up to this point are not deleted and the TWAIN interface remains open You can place a new page in the ADF adjust the TWAIN settings for the new page then click on the Scan button in the TWAIN interface to continue scanning At the end of the scanning batch all p...

Page 65: ...r scanner The One Touch OmniPage Module and the OmniPage Software can both be installed on your computer at the same time however the features in the One Touch OmniPage Module will take precedence over the OmniPage software features when using One Touch 4 0 The One Touch OmniPage Mini Guide is available on the installation disc With the One Touch OmniPage Module or OmniPage Pro software installed ...

Page 66: ...ton 6 then click Button 6 Your scanned pages appear in the Destination Application with their text ready for editing and other text processing NOTE One Touch Button 6 is preset as your OCR button But you can also set up any other button to scan and OCR the text NOTE Please refer to the One Touch OmniPage Mini Guide on the installation Disc that you received with your scanner for detailed instructi...

Page 67: ...s with different image quality so you may want to experiment with them to determine which is better for your scanned documents sPDF and nPDF are only available as page format options if you have the One Touch OmniPage module or the OmniPage Pro software installed on your computer To scan with sPDF or nPDF 1 Open the One Touch Properties window 2 Using the arrows choose a One Touch button to use fo...

Page 68: ...he button 9 To search for the text open Adobe Acrobat Reader or Adobe Acrobat 10 From the Adobe Acrobat File menu choose Open and open the file you just scanned 11 From the Adobe Acrobat Edit menu choose Find The Find dialog box opens 12 Enter the text you want to find and click the Find button See the Adobe Acrobat user manual for more about finding text in a PDF file or about editing PDF text NO...

Page 69: ...can Configuration 5 Click OK The One Touch Properties window closes 6 Now start scanning using the button you selected to use to scan and burn to CD When scanning is finished a bubble message on the screen tells you that files are waiting to be burned to the CD 7 Open the One Touch window and make sure that theBurn to CD Destination Application is still selected and click the Properties button The...

Page 70: ... with event forwarding 1 Open the One Touch Properties window 2 Using the arrows choose a button to use for the event forwarding 3 Select Still Image Client as the Destination Application 4 Click OK 5 Start scanning using the button you selected for event forwarding A dialog box opens for you to select the application to use for scanning 6 Select the application in the box and click OK Now the app...

Page 71: ...as the Destination Application 4 Choose HTML as the Page Format 5 Choose a Scan Configuration that has the settings for the image on the HTML page 6 Click OK 7 Now on the One Touch Button Panel click Button 8 When scanning is finished the document is first converted to editable text using the OCR process then is converted into an HTML format Microsoft Internet Explorer then opens showing your conv...

Page 72: ...editable text and numbers before being stored 1 To scan using the buttons on the scanner press the Destination Selector until the LED is at 7 then press the Simplex or Duplex button 2 To scan from the One Touch Button Panel click the One Touch icon in the Windows Notification Area click the arrows to see Button 7 then click Button 7 Your scanned pages are stored in the location that you specified ...

Page 73: ... multiple folders for transfer to storage 1 Using Microsoft Windows create the folders that you want to use for storing scanned items 2 Open the One Touch Properties window 3 Select Transfer to Storage as the Destination Application 4 Click the New button The Scan Configuration Properties dialog box opens 5 To help you remember which folder it is give the new configuration a name that indicates th...

Page 74: ...Browse button 9 Select the folder you created for storing the scanned documents If you haven t created the folder yet you can click the Make New Folder button and type the name for the new folder 10 Click OK The selected folder will now be set as the Storage Location such as Business Receipts ...

Page 75: ... set up for the Transfer to Storage destination and each configuration scans documents to separate folders 14 Now click the arrow buttons to select a scanner button for each new configuration Click Apply to set that button for that configuration The following examples show that buttons 7 and 8 have been set to scan to each of the new configurations Note that the button names have also been changed...

Page 76: ...button to scan the documents When scanning is finished the two sets of documents are stored in two separate folders To Use OCR Before Transferring to Storage If the documents you want to transfer to storage are text documents or spreadsheets you can have them converted by the OCR process prior to being stored 1 Open the One Touch Properties window 2 Using the arrows choose Button 7 or any other bu...

Page 77: ...cified Checking the Hardware and Setting the Lamp Power Saving 1 Right click on the One Touch icon and choose Show Hardware from the pop up menu You can also click the scanner icon at the top of the One Touch Button Panel If the Hardware View of the panel is open you can also right click on the DM262i icon The Hardware Properties dialog box opens and shows information about your Xerox DocuMate 262...

Page 78: ...nute to a maximum of 4 hours 3 Click the arrows for the Lamp timeout setting and choose a time setting To turn the lamp on and off manually without turning off power to the scanner click the Lamp On or Lamp Off buttons To return the scanner to its factory settings click Reset Device See Auto Scan from the Front Feed Tray on page 28 for instructions on using the Front Feed Scan Event option 4 Click...

Page 79: ...and imaging applications and scan from them as well Because the TWAIN interface is the same regardless of the software you use to open it you can still use the instructions in this User s Guide for scanning with your Xerox DocuMate 262i scanner To access the TWAIN interface from other software please refer to their user s guides then return to this User s Guide for the steps to scan The PaperPort ...

Page 80: ...ny Microsoft Office applications can access the TWAIN interface from the Insert menu by choosing Picture then From Scanner or Camera Select Xerox DocuMate 262i from the drop down menu Then click Custom Insert Note that your scanner may be listed twice One listing is for choosing TWAIN Interface the other is usually for choosing the WIA Interface See Scanning with the WIA Interface on page 80 3 The...

Page 81: ... into the Automatic Document Feeder Scan from the Front Feed Tray Place an item face up with its top pointing into the scanner onto the tray 3 Adjust the settings in the TWAIN interface for the item you are scanning 4 Click on the Scan button in the TWAIN interface 5 When scanning is complete click Done to close the TWAIN interface The scanned images appear in the TWAIN software This example shows...

Page 82: ...arker Contrast refers to the difference between the lighter and darker portions of the image Increasing the contrast emphasizes the difference between the lighter and darker portions decreasing the contrast de emphasizes that difference Contrast is used in conjunction with brightness AutoCrop to Original Select this option to let the scanner automatically determine the size of the item being scann...

Page 83: ...ide The Define page size option cannot be used with AutoCrop to original AutoScan on document insertion Your Xerox DocuMate 262i scanner includes AutoLaunch technology that senses when an item is inserted into the paper feed and starts scanning immediately Select this option to turn on the AutoLaunch feature The item is scanned with the current settings on the TWAIN interface If this option is not...

Page 84: ...rmation about your scanner 2 Click the arrows for the Lamp timeout setting and choose a time setting To turn the lamp on and off manually without turning off power to the scanner click the Lamp On or Lamp Off buttons To return the scanner to its factory settings click Reset Device See Auto Scan from the Front Feed Tray on page 28 for instructions on using the Front Feed Scan Event option 3 Click O...

Page 85: ... digital cameras and other digital devices This section shows how to use Microsoft Paint to scan using the WIA interface but you can use PaperPort and other Windows applications as well To scan using WIA from Microsoft Paint 1 On the Windows taskbar click Start point to Programs point to Accessories and then click Paint The Paint window opens 2 From the File menu choose From Scanner or Camera NOTE...

Page 86: ...Change the button selection for the type of image Adjust the custom settings refer to the next section Fine Tuning Your Scans Change the size of the scanned image To do this click and hold the mouse pointer over one of the four sizing boxes on the corners of the previewed image Then drag the box to increase or decrease the size of the image 7 Preview the image again When you are satisfied with the...

Page 87: ...ppear in Microsoft Paint or other WIA application you re using Fine Tuning Your Scans You can select new settings before you scan an item to fine tune exactly how you want to scan it To select the scanner settings before you scan 1 On the scan window click Adjust the quality of the scanned picture ...

Page 88: ...solution DPI Click the menu arrow and choose the dots per inch dpi of the resolution The maximum resolution is 600 dpi the minimum is 75 dpi The higher the dpi setting the sharper and clearer the scanned image However higher dpi settings take longer to scan and produce larger files for the scanned images Picture type Click the menu arrow and choose the most appropriate type for the item you re sca...

Page 89: ...ns on scanning with the ISIS interface Accessing the ISIS interface in QuickScan Open the QuickScan software to access the ISIS driver scanning options Please note that you may see the following warning message 1 Please disregard this message and click Continue The Pixel Translations ISIS drivers were installed correctly during the installation of your Xerox DocuMate 262i scanner The Scanner Selec...

Page 90: ... the scanner body to open the Automatic Document Feeder cover 3 Wipe the feed roller from side to side Rotate the roller to clean its entire surface 4 Wipe the pad from top to bottom Be careful not to snag the cloth on the springs on either side of the pad 5 Close the cover when you re finished NOTE Please be careful when cleaning the roller The roller is designed to rotate in one direction only A...

Page 91: ...der a warning dialog box opens after a few moments To clear a paper jam 1 Press the ADF cover release on the top left of the scanner body to open the Automatic Document Feeder cover 2 Remove the jammed paper and close the cover To reduce the number of paper jams smooth and straighten the paper before scanning and adjust the guides to the paper size ...

Page 92: ...ion that the pad is wearing thin See the Xerox DocuMate 262i Scanner Parts List on page 94 for ordering information To replace the ADF Pad assembly 1 Press the ADF cover release on the top left of the scanner body to open the Automatic Document Feeder cover 2 Squeeze the plastic clamps that hold the pad assembly in place and lift the pad up and out 3 Reverse the procedure to replace the new pad in...

Page 93: ...lug the scanner into a USB hub If you re using a USB hub to connect the scanner the hub must have its own power supply If the hub does not have its own power supply plug the scanner into a USB port on the computer Did you select another scanning source in the PaperPort Scan Pane If you use multiple devices with your computer you may have selected another source for images Start the PaperPort softw...

Page 94: ...linking blue indicates the scanner is waking up from power saving and preparing to scan Steady blue indicates the scanner is ready to scan Error Codes If your scanner experiences hardware problems the status light blinks red and the LED flashes an E and then the error code number The E code number indicates what the hardware issue is Use the table listed on the next page as a reference for resolvi...

Page 95: ...roblem persists and your scanner s power is plugged into a surge protector or UPS battery backup try plugging the scanner power directly into a wall outlet 6 The scanner s cover is open Close the scanner cover and make sure it attaches completely 7 or 8 The lamp in the scanner body or the ADF portion of the scanner has malfunctioned Make sure that the lamp has not been turned off manually See the ...

Page 96: ...nt to remove these software programs 5 Follow these same steps to select and remove the Kofax VirtualReScan 4 10 and OneTouch 4 0 ScanSoft OmniPage OCR modules from the installed programs list 6 The One Touch 4 0 software is removed from your computer 7 Unplug the USB cable from the scanner 8 Close all open windows and restart your computer Uninstalling the PaperPort and OmniPage Software 1 On the...

Page 97: ... One Touch 4 0 then click on the Remove button d An Add or Remove message box opens and asks if you are sure you want to remove One Touch 4 0 from your computer Click Yes The One Touch 4 0 software is removed from your computer 2 Unplug the scanner USB cable 3 Reboot restart your computer 4 Follow the instructions in Step 2 Install the Software on page 6 of this User Guide and follow steps for ins...

Page 98: ... Light source Cold cathode fluorescent lamp Interface USB 2 0 High Speed Scanner dimensions Height 12 5 inches 31 75 cm Width 13 25 inches 33 66 cm Length 17 inches 43 18 cm Weight 8 6 pounds 3 91 kg Operating temperature 50 104 F 5 35 C without condensation Relative humidity 40 70 35 C without condensation Power adaptor DC Jack 24Vdc 2 0A 48W 100 240Vac Energy Star and RoHS compliant Scanner rati...

Page 99: ...llowing part names and numbers when ordering replacements for your scanner Part Name Part Number Paper Guide 57 0104 000 Output Tray 57 0105 000 Front Feed Tray with Output Tray 57 0121 000 ADF Pad 57 0103 000 USB Cable 35 0107 000 AC Power Cord 35 0103 000 Power Supply 37 0076 000 Buttons Label 09 0631 000 ...

Page 100: ...impact the product certification Please contact your Xerox representative for more information Section 2 EMC This equipment has been tested and found to comply with the limits for a Class B digital device pursuant to Part 15 of the FCC Rules These limits are designed to provide reasonable protection against harmful interference when the equipment is operated in a commercial environment This equipm...

Page 101: ...x Service Department to arrange relocation of the copier to a location outside of your building Always locate the machine on a solid support surface that has adequate strength to support the weight of the machine Always locate the machine in an area that has adequate ventilation and room for servicing Always unplug this equipment from the electrical outlet before cleaning Do Not Do These Never use...

Page 102: ... not place objects on the power cable 8 Do not override or disable electrical or mechanical interlock devices 9 Do not push objects into slots or openings on the machine Electrical shock or fire may result Electrical Supply 1 This product shall be operated from the type of electrical supply indicted on the product s data plate label If you are not sure that your electrical supply meets the require...

Page 103: ...duct 2 Do not carry out any maintenance on this product which is not described in the customer documentation 3 Do not use aerosol cleaners The use of cleaners that are not approved may cause poor performance of the equipment and could cause a dangerous condition 4 Use supplies and cleaning materials only as directed in this manual 5 Do not remove covers or guards that are fastened with screws Ther...

Page 104: ...out Xerox environmental programs visit www xerox com environment html If you are managing the disposal of your Xerox product please note that the product contains lamp s with mercury and may contain lead Perchlorate and other materials whose disposal may be regulated due to environmental considerations The presence of these materials is fully consistent with global regulations applicable at the ti...

Page 105: ...islation end of life electrical and electronic equipment subject to disposal must be managed within agreed procedures Energy Star for the USA Energy Program Compliance As an ENERGY STAR partner Xerox Corporation has determined that this product meets the ENERGY STAR guidelines for energy efficiency The ENERGY STAR and ENERGY STAR MARK are registered United States trademarks The ENERGY STAR Imaging...

Page 106: ...ear dimensions of the original Postal Money Orders Bills Checks or Drafts of money drawn by or upon authorized officers of the United States Stamps and other representatives of value of whatever denomination which have been or may be issued under any Act of Congress 2 Adjusted Compensation Certificates for Veterans of the World Wars 3 Obligations or Securities of any Foreign Government Bank or Cor...

Page 107: ...k 3 Exchequer bill paper or revenue paper 4 The public seal of Canada or of a province or the seal of a public body or authority in Canada or of a court of law 5 Proclamations orders regulations or appointments or notices thereof with intent to falsely cause same to purport to have been printed by the Queen s Printer for Canada or the equivalent printer for a province 6 Marks brands seals wrappers...

Page 108: ...k notes and cheques Bank and government bonds and securities Passports and identification cards Copyright material or trademarks without the consent of the owner Postage stamps and other negotiable instruments Note This list is not inclusive and no liability is assumed for either its completeness or accuracy In case of doubt contact your legal counsel Section 11 EH S Contact Information Contact In...

Page 109: ...104 DocuMate 262i Scanner User s Guide ...

Page 110: ...SV 52 D Define page size 78 Destination Application 19 20 22 33 34 51 Link Properties 44 OCR 35 Destination Selector 20 22 27 Device Settings Tab 41 DOC 52 Document Format 33 34 Options 50 Document Management 55 Documentation 3 Double Feed Detection 39 78 Duplex 39 71 77 Duplex button 2 18 20 22 27 E eMail Applications 55 America Online AOL 49 Microsoft Outlook 49 Properties 49 Error codes 89 Exce...

Page 111: ...55 Picture type 83 Power saving 73 R Reduce Moire Patterns 38 77 Resolution 37 77 83 Rich Text Format 52 RTF 52 S Saturation 40 Scan Front Feed tray 21 24 28 Input tray 26 Scan Configuration 33 34 40 Scan Settings Tab 37 Scanner Assembly 5 Components 2 Connect power 11 Full install 9 Hardware Properties 72 79 LED number 2 18 19 20 22 Parts List 94 Registration 17 Specifications 93 Troubleshooting ...

Page 112: ...t File Formats 51 TIFF 50 Transfer to Storage 67 File location 67 Multiple locations 68 Properties 48 Troubleshooting 88 TWAIN 9 18 57 65 Options 77 TWAIN standard 74 TXT 52 U Uninstall Software 91 USB port 12 Use enhanced folder browser 56 W WIA 80 Windows Image Acquisition WIA 9 18 57 80 Word Document 52 X XLS 52 ...

Page 113: ...05 0754 000 ...
Reviews: