background image

Scanner Setup

Xerox

®

 FD70 Scanner

Scanner User Guide

11

8.

Close the scanner lid when you are finished.

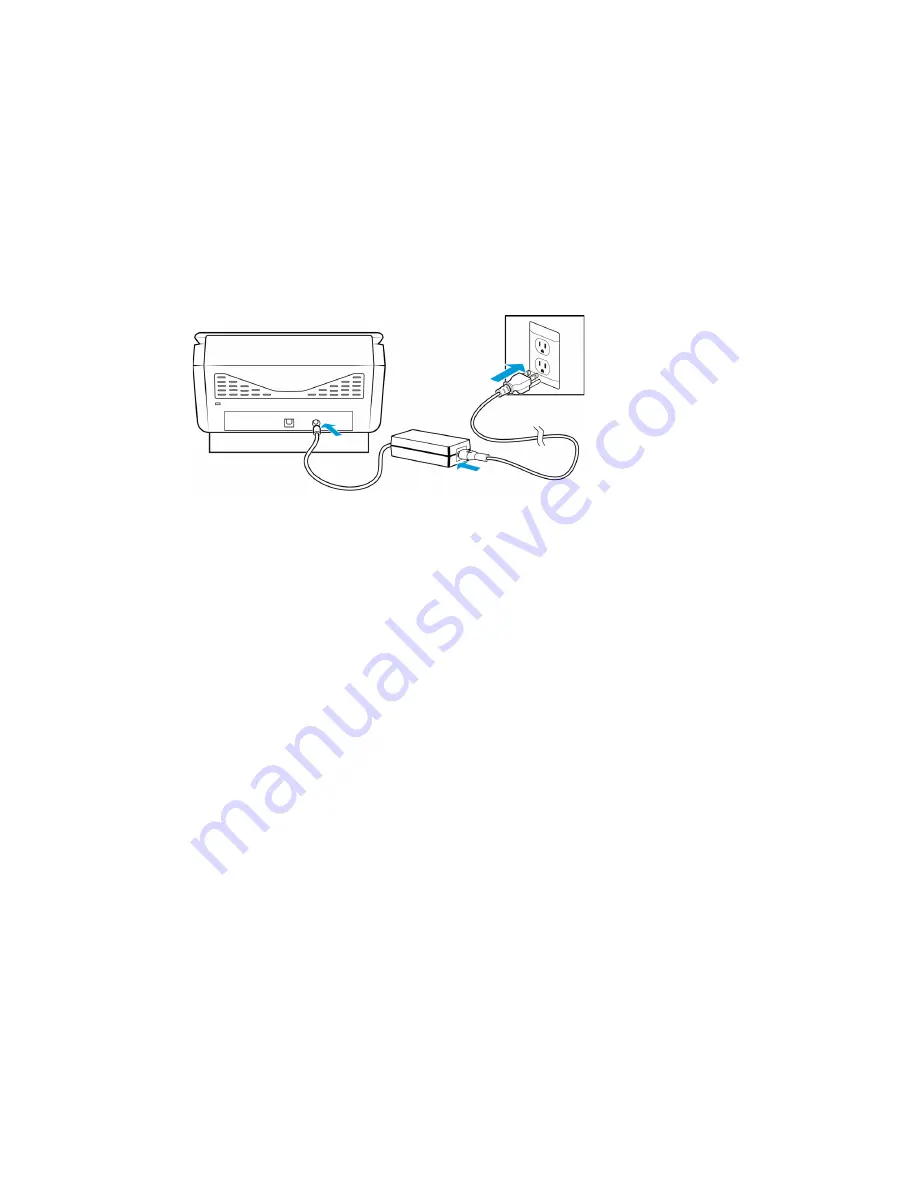
Connect the Power Cord

Note: 

Only use the power supply included with your scanner. Connecting any other type of power 

supply may damage your scanner, and will void its warranty.

1.

Plug the power supply into the power port on the scanner.

2.

Plug the power cord into the power supply and into a wall outlet.

Summary of Contents for FD70

Page 1: ...Xerox FD70 Scanner Scanner User Guide for Microsoft Windows JUNE 2022 05 1022 000...

Page 2: ...s is a trademark of USB Implementers Forum Inc USB IF All other products mentioned herein may be trademarks of their respective companies and are hereby acknowledged Changes are periodically made to t...

Page 3: ...e Scanner FD70 Features 2 6 3 Scanner Setup 3 9 Connect the Power Cord 3 11 3 11 4 Installation 4 13 Install the Software and Connect the Scanner 4 13 Installing the Scanner Driver 4 15 Connect the US...

Page 4: ...33 Driver Settings 7 34 HW IP Settings 7 34 Clearing Paper Jams 7 35 Cleaning the Scanner 7 35 Cleaning the Outside of the Scanner 7 35 Cleaning the LCD Touch Screen 7 35 Cleaning the Inside of the Sc...

Page 5: ...opean Union 8 54 Turkey RoHS Regulation 8 54 Copy Regulations 8 54 United States 8 54 Canada 8 56 Other Countries 8 56 9 Appendix B Compliance Information 9 57 Product Recycling Disposal 9 57 USA Cana...

Page 6: ......

Page 7: ...hese include safety agency examination approval and compliance with established environmental standards To ensure the continued safe operation of your Xerox FD70 Scanner equipment follow these safety...

Page 8: ...al power company or an electrician for advice 2 The socket outlet shall be installed near the equipment and shall be easily accessible 3 Use the power cable that is supplied with your machine Do not u...

Page 9: ...el circuit breaker fuse or other safety device has been tripped Liquid is spilled into the machine The machine is exposed to water Any part of the machine is damaged Maintenance Information 1 Any oper...

Page 10: ...d Safety Contacts Contact Information For more information on Environment Health and Safety in relation to this Xerox product and supplies please contact the following customer help lines North Americ...

Page 11: ...EN FR DE ES Technical Support and Warranty Information for Xerox Scanners Register Your Scanner and Review Card Simplex Duplex SS SS A5 A6 B5 A4 LGL LTR Download and run Visioneer Update Connect and p...

Page 12: ...s for configuring and scanning using OneTouch TWAIN scanning guide instructions for accessing and scanning using the TWAIN interface Patch code sheets use with an application that supports detection o...

Page 13: ...s power on off and indicates the scanner s status Note Hold the Simplex and Duplex buttons for more than two seconds to access the scanner s LCD menu The Duplex button confirms your selection whereas...

Page 14: ...Xerox FD70 Scanner Welcome 8 Scanner User Guide...

Page 15: ...strip that runs from the top to the bottom of the scanner 3 Remove the tape and slide the locking tab on the bottom of the scanner to its unlocked position The scanner will not scan when locked 4 Rem...

Page 16: ...the document tray 6 Open the automatic document feeder cover and remove any tape or protective foam from inside the feeder Close the feeder cover when you are finished 7 Lift the scanner lid Remove an...

Page 17: ...Connect the Power Cord Note Only use the power supply included with your scanner Connecting any other type of power supply may damage your scanner and will void its warranty 1 Plug the power supply i...

Page 18: ...Xerox FD70 Scanner Scanner Setup 12 Scanner User Guide...

Page 19: ...ased on the software your computer is running in each case you should allow the installation to proceed if that option is available Alternatively you can turn off the AntiVirus or AntiSpyware software...

Page 20: ...ur scanner may differ slightly from the list shown in the window 10 If a version of the software is already installed on the system the option will be greyed out However if there is a newer version av...

Page 21: ...come screen for the scanner driver Setup Wizard opens Click Next Note there may be an option in the installation window to remove any current scanning profiles You will see this prompt if you already...

Page 22: ...scanner stop and follow the instructions below CONNECT THE USB CABLE AND TURN ON THE POWER If you did not connect the scanner earlier proceed with the instructions below 1 Remove any tape from the USB...

Page 23: ...that a scanner has been plugged into the USB port and automatically loads the appropriate software to run the scanner 4 When you re certain that the software has completely loaded return to the Comple...

Page 24: ...er License Agreement window read the license agreement If you accept the terms select I Agree then click Next If you choose not to accept the license agreement the installation will terminate and OneT...

Page 25: ...uctions for configuring and scanning using OneTouch TWAIN scanning guide Instructions for accessing and scanning using the TWAIN interface Click on View software documentation to access the user guide...

Page 26: ...scanner for our customer service contact information 1 Open an Internet Explorer window or any other Internet browser you have installed on your computer 2 In the web address field type www xeroxscann...

Page 27: ...ANNER LCD AND BUTTON PANEL The Scanner LCD s Main Screen This screen will appear once driver installation is complete The LCD can by slightly different The example below appears once OneTouch is insta...

Page 28: ...e Versions Note These may not be present if the scanner is being used with the mobile apps only Driver This is the version of the currently installed driver Acuity This is currently installed Acuity v...

Page 29: ...t of paper in the input tray Approximately 100 pages of 20 lbs 80 g m2 new printer paper Document size Minimum size width x length 2 05 x 2 05 inches 52 x 52 mm Maximum size width x length 8 5 x 14 0...

Page 30: ...oss the page and cause the scanner to report a paper jam Carbonless copy paper may tear while being fed through the scanner and the pressure of the rollers may leave streaks on the page The chemical c...

Page 31: ...um for regular paper documents may skew excessively during scanning Preparing Documents for Scanning Fan the documents to make sure all pages in the stack are separated Bend and then flatten the docum...

Page 32: ...aper without removing the perforated sides from the page 1 Separate the pages so that you have a stack of single pages Do not place a stack of connected paper in the input tray The paper will tear whe...

Page 33: ...s scanner Document size Minimum size width x length 1 0 x 1 0 inches 25 4 x 25 4 mm Maximum size width x length 8 5 x 14 0 inches 216 mm x 356 mm LOADING DOCUMENTS Use the Flatbed glass to scan docume...

Page 34: ...scanner lid and place the page on the scanner glass f acedown 3 Align the paper with the marks on the scanner according to the size of paper you are using 4 Close the lid 5 You can now scan the docume...

Page 35: ...to scan from the computer screen Scanning from the on screen OneTouch Button Panel is the same as selecting a scanning option on the scanner except you click an icon that represents the function Plea...

Page 36: ...IN interface to scan Select scanning options before scanning put the document in the scanner then click the Scan button in the TWAIN interface window Please see the TWAIN Scanning Guide available onli...

Page 37: ...fore performing maintenance unless the maintenance instructions below specifically state to leave the scanner plugged in and powered on Always unplug the USB cable from the scanner before performing m...

Page 38: ...ware processor version number Serial number the scanner s unique identification number LLD version the scanner s base driver version This is not the OneTouch software revision TWAIN or WIA driver vers...

Page 39: ...onfirm your selection 6 You can now view the counters The Simplex button can be used as a Back button to navigate the LCD Scanner Menu Note You can only view the counters from the LCD Scanner Menu It...

Page 40: ...IP options Only advanced users should modify any of the options in this section Options that are not available for your scanner will be grayed out and disabled Click the check box to deselect disable...

Page 41: ...ure continual optimal performance Using a soft lint free cloth wipe down all plastic surfaces on the scanner CLEANING THE OUTSIDE OF THE SCANNER Excessive dust accumulation around and on the scanner w...

Page 42: ...ler cleaning paper Do not leave the roller cleaning paper or any of the cleaning supplies where children can access them Always turn off the scanner and unplug the scanner s power and USB cable prior...

Page 43: ...direction only Do NOT force the roller to rotate in the opposite direction Forcing the roller to rotate will damage it and cause the scanner to feed pages incorrectly CLEANING THE BACKGROUND PLATES T...

Page 44: ...ff the scanner prior to cleaning the sensors CLEANING THE ADF SENSORS 1 Pull on the scanner cover release and lift the lid to open the scanner 2 The following illustration shows the location of the se...

Page 45: ...t A worn roller can cause documents to feed in skewed at an angle or multiple pages to feed at the same time Before replacing the roller you should clean it as excessive dust on the roller will make i...

Page 46: ...ller 4 Carefully angle the roller up and out of the scanner 5 Remove the replaceable roller from the bar 6 Discard the roller it cannot be repaired or reused 7 Take the new roller out of its packaging...

Page 47: ...it will break during scanning and damage the scanner 11 Close the scanner when you re finished Replacing the Feed Roller The roller will wear out and is designed to be a user replaceable part A worn r...

Page 48: ...er User Guide 1 Open the Automatic Document Feeder cover 2 Locate and open the roller cover in the body of the scanner 3 Move the paper guides to the side and then pull the feed roller cover away from...

Page 49: ...n discard it it cannot be replaced 7 Take the new roller out of its packaging Clean any dust off the roller before installing it 8 Insert the left end of the new roller assembly into the hole in the r...

Page 50: ...to lock it in place Make sure everything is aligned properly and the cover is fully closed If the cover is not fully closed it will break during scanning and damage the scanner 12 Close the scanner w...

Page 51: ...you must close the application you were using before scanning with the buttons on the scanner This does not occur when scanning using the TWAIN interface Problem Why won t my scanner work after the co...

Page 52: ...Cleaning the Inside of the Scanner on page 36 If the problem persists the separation and or feed rollers may need to be replaced Please see Replacing the Feed Roller on page 41 Problem If the USB cab...

Page 53: ...te instructions If problem persists clean the rollers and paper sensors as described in the section Cleaning the Inside of the Scanner Multi feed Two pages have fed through the scanner at the same tim...

Page 54: ...led to pick paper Remove the paper from input tray Fan the documents Load the document with its edges slightly touching the paper guides Rescan ADF AFE R W Test Error Firmware checks whether the hardw...

Page 55: ...isioneer Acuity Visioneer Acuity is automatically installed when you install the scanner driver using the installation disc You can also download the Visioneer Acuity module from the support pages for...

Page 56: ...ite Output Bit Depth 24 bit color 8 bit grayscale 1 bit bitonal black white Scan Method Duplex Automatic Document Feeder ADF Image Sensor CIS Contact Image Sensor Light Source RGB LED lamp Certificati...

Page 57: ...PG8B9X3JG0A 05B RoHS EUR CEE 2P G 16A 250V L 1800mm PG8B9CIJG0A 05B RoHS Software Information Supported Operating Systems Microsoft Windows 32 bit or 64 bit 7 Service Pack 1 32 bit or 64 bit 10 64 bi...

Page 58: ...Xerox FD70 Scanner Maintenance 52 Scanner User Guide...

Page 59: ...m entt o oper at ei n cl os epr oxi m i t yt o I ndus t r i al Sci ent i f i cand M edi cal I SM equi pm ent t heext er nalr adi at i on f r om I SM equi pm entm ayhavet o bel i m i t ed ors peci alm...

Page 60: ...Environment Health and Safety Xerox NL Sint Jansweg 15 NL 5928 RC VENLO TURKEY ROHS REGULATION In compliance with Article 7 d We hereby certify It is in compliance with the EEE Regulation EEE y netme...

Page 61: ...permission of the copyright owner has been obtained or the reproduction falls within the fair use or library reproduction rights provisions of the copyright law Further information of these provisions...

Page 62: ...rnment of Canada or of a province or of a government of a state other than Canada 7 Impressed or adhesive stamps used for the purpose of revenue by the Government of Canada or of a province or by the...

Page 63: ...ance This product is compliant with RoHS Regulations of the European Parliament and Council Directive on the Restrictions of the Use of Certain Hazardous Substances in Electrical and Electronic Equipm...

Page 64: ...governments and the office equipment industry to promote energy efficient copiers printers fax multifunction machine personal computers and monitors Reducing product energy consumption helps combat sm...

Reviews: