background image

Xerox

®

 N60w Scanner

PC Installation

17-8

User Guide

Summary of Contents for N60w

Page 1: ...Xerox N60w Scanner Scanner User Guide for Microsoft Windows AUGUST 2020 05 0987 000...

Page 2: ...and or other countries Universal Serial Bus is a trademark of USB Implementers Forum Inc USB IF All other products mentioned herein may be trademarks of their respective companies and are hereby ackn...

Page 3: ...irements 2 1 Documentation 2 2 Xerox N60w Scanner 2 3 3 Scanner Setup 3 1 Connect the Scanner Power Cord 3 1 Setting up the LCD Language 3 2 Setting up the Date and Time 3 2 Date 3 3 Time 3 3 4 Wired...

Page 4: ...a Contact Group 8 3 Editing an Email Group 8 3 Deleting an Email group 8 4 Email Scanning 8 4 Basic tab 8 4 Email Options 8 5 9 File 9 1 10 Scancast 10 1 11 OneTouch 11 1 12 Hotspot 12 1 Setting Up th...

Page 5: ...File Default 15 2 File Profiles 15 2 Address Book 15 2 Shortcut 15 2 Account Management 15 2 Changing your Login Credentials 15 3 Web Interface only Customizable Configurations 15 3 exporting and impo...

Page 6: ...4 Installing Visioneer OneTouch 17 5 Installing Additional Applications 17 6 View the User Guides 17 6 Register Your Scanner 17 7 18 Appendix A Regulatory Information 18 1 Basic Regulations 18 1 Unit...

Page 7: ...examination approval and compliance with established environmental standards To ensure the continued safe operation of your Xerox Equipment follow these safety guidelines at all times Do these Always...

Page 8: ...or an electrician for advice 2 The socket outlet shall be installed near the equipment and shall be easily accessible 3 Use the power cable that is supplied with your machine Do not use an extension c...

Page 9: ...other safety device has been tripped Liquid is spilled into the machine The machine is exposed to water Any part of the machine is damaged Maintenance Information 1 Any operator product maintenance p...

Page 10: ...afety Contacts Contact Information For more information on Environment Health and Safety in relation to this Xerox Product and supplies please contact the following customer help lines North America E...

Page 11: ...ner System Requirements Intel i3 or equivalent CPU Internet access for installation and scanner standalone use An available Universal Serial Bus USB port for PC installation only Microsoft Windows ope...

Page 12: ...n for technical support and customer service and a brief overview of our standard product warranty Register Your Scanner and Review Card follow the instructions on the card to register your scanner Pl...

Page 13: ...Output Tray Holds documents after being scanned Paper Stop Flip up to keep regular documents stacked neatly in the output tray after scanning Extension Flip out to support various document lengths 5...

Page 14: ...Xerox N60w Scanner Welcome 2 4 User Guide...

Page 15: ...ustration s The above illustrations are for example purposes only Your scanner s packaging may vary slightly 3 Hold the ADF Paper Tray and insert two pins to the holes on the top of the scanner as sho...

Page 16: ...power off Setting up the LCD Language To select the LCD language follow these steps 1 On the LCD screen choose Settings Device Management Note Login to Settings with the default credentials Login Nam...

Page 17: ...ll down to locate the Date option 3 Tap the Date option 4 Scroll to the correct year month and day The highlighted blue values will be set as the current date 5 Tap Save to retain the settings Time 1...

Page 18: ...ighted blue values will be set as the current time It is a 24 hour clock 5 Tap Save to retain the settings Note Once you have set your time you can easily adjust the time to reflect any time zone Go t...

Page 19: ...In wireless mode your mobile devices and scanner are connected wirelessly through a wireless network When connecting the scanner to a wireless LAN you may need information for a wireless access point...

Page 20: ...r access point is set to not broadcast the SSID please follow these steps to manually add the SSID name network name 1 On the wireless page tap the More Settings button and then choose Add network The...

Page 21: ...ing your filing file name as test000105 Additional scans will be labeled with the same prefix and a numbering suffix such as _001 will be added File Format Define the scanned image s file format for t...

Page 22: ...document with photo or text Photo Suitable for document that contains photos Text Suitable for document contains that pure text Multifeed Detection Enable the Multifeed Detection via ultrasonic unit...

Page 23: ...h is installed the scanner Hotspot information and the Settings Note Login to Settings with the default credentials Login Name admin and Password admin See Changing your Login Credentials to customize...

Page 24: ...e Scan button This frequently used button will start scanning the document It is also used to confirm the scan after the Preview to send the scanned image s to its defined destination s The Bind butto...

Page 25: ...ft panel For example Email The Email screen will be displayed on the right panel 2 Enter or select from the Setting up the Address Book your frequently used email address es in the To CC BCC field in...

Page 26: ...Xerox N60w Scanner LCD Buttons and Shortcuts 6 4 User Guide...

Page 27: ...ile name prefix in the File Name field for the scanned document and adjust the Scan Settings 4 Press the Scan button to start scanning 5 The Preview window appears When satisfied with your scan press...

Page 28: ...Xerox N60w Scanner Cloud 7 2 User Guide...

Page 29: ...formation in the scanner settings 1 Go to Settings Network Mail Server Note Login to Settings with the Login Name admin Password admin See Changing your Login Credentials to customize these 2 In the M...

Page 30: ...Settings Network Address Book Note Login to Settings with the default credentials Login Name admin and Password admin See Changing your Login Credentials to customize these Adding a new contact 1 Touc...

Page 31: ...he Add a group icon 2 Enter the group name and description 3 Select a contact from the Contacts List The contact will be highlighted an arrow next to the contact email address will appear 4 Click the...

Page 32: ...ually enter an email address in the To CC and or BCC fields using the on screen keyboard Simply tap the field to enable Select a contact or group from the Address Book Touch the Address Book icon Touc...

Page 33: ...y To Enter a Reply to address if you wish to specify a reply address which is different from the From address Up to 60 characters can be entered in the field Message Type your email message here File...

Page 34: ...Xerox N60w Scanner Email 8 6 User Guide...

Page 35: ...ton to scroll from the list If Local is selected USB and Public Folder will be displayed If USB is selected make sure a USB flash drive has been inserted into either of the USB flash drive ports of th...

Page 36: ...Xerox N60w Scanner File 9 2 User Guide...

Page 37: ...er To From email address File Choose your network folder Local or Network If Network is selected the available network servers will be displayed If Local is selected USB and Public Folder will be disp...

Page 38: ...Xerox N60w Scanner Scancast 10 2 User Guide 8 Repeat step 5 to select a second destination Press the Scan button to send the scanned images to the destination Repeat as often as necessary...

Page 39: ...screen will be displayed on the right panel 2 Select a function to initiate a scan Note The functions that appear on the screen are associated to those that appear in the OneTouch button panel on you...

Page 40: ...Xerox N60w Scanner OneTouch 11 2 User Guide...

Page 41: ...r itself works as an AP 1 On the Home Screen of the LCD Touch Panel tap Hotspot The SSID and IP Address will be displayed 2 On your mobile devices make sure XeroxN60w XXXXXX XXXXXX indicates the last...

Page 42: ...Xerox N60w Scanner Hotspot 12 2 User Guide...

Page 43: ...wer off Range Never 15 4320 minutes Screen OFF Enter the length of time the product turns off the screen after the last action Select Never 3 min 5 min 10 min Device Email Address Enter device s email...

Page 44: ...ireless Client seeConnecting to the Network using a Wireless Client Wireless Turn to On to view available wireless networks or manually add a network Hotspot seeSetting Up the Scanner as a Hotspot Hot...

Page 45: ...ou need to first set up a few network folders including FTP FTPS or SMB to store the images Item Description EnableSecurity Management Turn On to implement security by setting up accounts and enabling...

Page 46: ...e list then tap Delete 3 A prompt will appear Click OK to confirm removing the file profile or Cancel to exit Address Book Create or edit your address book See Setting up the Address Book for detailed...

Page 47: ...or Cancel to return to the Shortcut screen Edit Edit an existing shortcut 1 Select a shortcut to edit 2 Tap on Edit 3 Change the Scan Settings 4 Tap Save to retain the new settings Delete Delete an e...

Page 48: ...s cannot be undone Run in Test For internal use only Save Log The log can be helpful for the technician to identify your problem You can either Save Log to USB Flash or Save Image to USB Flash if an i...

Page 49: ...ocument Size Minimum size width x length 2 x 2 inches 51 x 51 mm Maximum size width x length 9 5 x 14 inches 241 x 356 mm Note Maximum Image Size width x length 8 5 x 14 inches 216 x 356 mm Maximum le...

Page 50: ...the page and cause the scanner to report a paper jam Carbonless copy paper may tear while being fed through the scanner and the pressure of the rollers may leave streaks on the page The chemical coat...

Page 51: ...maximum for regular paper documents may skew excessively during scanning Preparing Documents for Scanning Fan the documents to make sure all pages in the stack are separated Bend and then flatten the...

Page 52: ...es Do not place a stack of connected paper in the input tray The paper will tear when the separation roller attempts to separate the current page from the rest of the stack If you want to scan a long...

Page 53: ...Touch button panel on your computer Press the desired function to initiate a scan OneTouch Button Panel Use this scan option when you want to scan from the computer screen Scanning from the on screen...

Page 54: ...s TWAIN interface to scan Select scanning options before scanning put the document in the scanner then click the Scan button in the TWAIN interface window Please see the TWAIN Scanning Guide for inst...

Page 55: ...browser 2 Locate your scanner s IP address you can view it on the scanner LCD home screen 3 Type the IP address of the scanner in the URL field of your browser and then press enter on your keyboard 4...

Page 56: ...t Management Please refer to Account Management for a detailed summary of each item Item Description Scanner Model Name Displays the scanner model name Host Name Displays the product s host name Seria...

Page 57: ...anner in the network For example the address book File Profiles and default systems settings of one Xerox N60w Scanner can be first exported to a file as a backup and then import these files to other...

Page 58: ...canned image temporarily to the product s memory and then access the scanned image through the product s web page To access the scanned image follow these steps 1 On the product s web page choose Publ...

Page 59: ...e performing maintenance unless the maintenance instructions below specifically state to leave the scanner plugged in and powered on Always unplug the USB cable from the scanner before performing main...

Page 60: ...ettings tab shows the hardware information for your scanner The options on the Device Settings tab will be available based on whether or not the scanner hardware supports the feature Some features des...

Page 61: ...timeout value USB off by default the value is set to match Sleep mode This temporarily turns off the functionality of the USB ports until the scanner is woken up by pressing a button or placing paper...

Page 62: ...sing only for the option listed When one of the options in this window is not selected software Visioneer Acuity will be used to perform that function while scanning Note if Visioneer Acuity is not en...

Page 63: ...he Automatic Document Feeder Cleaning the inside of the scanner helps to keep your scanner operating at optimum performance You should clean the inside of the scanner at least once a week or after 1 0...

Page 64: ...detection sensors 6 Close the scanner when you re finished Replacing the Reverse Separation Roller The roller will wear out and is designed to be a user replaceable part A worn roller can cause docume...

Page 65: ...chased from the Supplies Accessories page for your scanner at www xeroxscanners com 1 Open the scanner 2 Locate the roller cover in the ADF door 3 Pinch the sides of the roller cover and pull it down...

Page 66: ...e U shape of the bracket 10 Lift the roller cover and carefully push it closed to lock it in place Make sure everything is aligned properly and the cover is fully closed If the cover is not fully clos...

Page 67: ...the Supplies Accessories page for your scanner at www xeroxscanners com 1 Open the Automatic Document Feeder cover 2 Locate the roller cover in the body of the scanner 3 Move the paper guides to the s...

Page 68: ...end of the new roller assembly into the hole in the roller channel Angle the roller module into the roller channel Align the tab on the lock flange with the slot in the scanner Make sure that the gear...

Page 69: ...up or power strip try plugging the scanner directly to a wall outlet Did you restart the computer and scanner If the scanner gets a paper jam or looses connection because of an error try restarting y...

Page 70: ...g with the installation and OneTouch options and you need to remove those other drivers and re install your Xerox Scanner You can remove these programs from the Windows Control Panel Please refer to t...

Page 71: ...Codes Normal Operation Steady blue indicates the scanner is ready to scan Slow flashing blue indicates the scanner is in low power mode Rapid flashing blue indicates the scanner is waking up from low...

Page 72: ...rk administrator for further help 530440 SMTP 440 mail from account doesn t conform with authentication The account of from and login must be same 532450 533450 SMTP 450 Requested mail action not take...

Page 73: ...nt is larger than the mailbox quota 540001 540009 540010 540011 540012 540013 540014 543501 545501 545504 Device internal failure Reboot the machine and try later If the error persists contact technic...

Page 74: ...k environment 541003 542003 543003 544003 545003 546003 547003 548003 The command reply read fails Check network environment 541004 548004 542004 543004 544004 545004 546004 547004 The FTP server does...

Page 75: ...erver location The administrator of the remote server must provide you with permission to connect via FTP 546553 48553 Requested action not taken File name not allowed Change the file name or delete s...

Page 76: ...F DRAM read and write test error Restart the device If the error persists call service to replace the main board 002024 NVRAM read and write test error Restart the device If the error persists call se...

Page 77: ...chine and try later If the error persists contact technical service 153005 Insufficient Memory Reduce the scan resolution or select a different file format Alternatively reduce the number of pages to...

Page 78: ...nstructions to remove any of the other software you installed with your scanner Depending on the software provided with your scanner and which applications you installed during the scanner setup the a...

Page 79: ...Acuity make sure you select and uninstall Visioneer Acuity If you uninstall one of the entries labeled as an asset you will still need to uninstall the main Visioneer Acuity utility Xerox N60w Scanne...

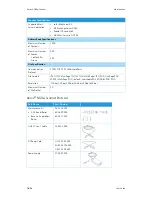
Page 80: ...fter 15 minutes without scanning 0 25 Watt power off Cable Information AC Power Cord US 3P 7A 125V L 1800mm 3C 18AWG BLACK LONGWELL PH8BIEDJF0AA05B RoHS EUR CEE 2P G BASE 16A 250V L 1800mm 3Cx0 75mm2...

Page 81: ...1n up to 72 2Mbps Output Power 802 11b 149 279mW 802 11g 360 579mW 802 11n HT20 345 939mW Antenna PCB antenna Security WEP 64 128 TKIP WPA WPA2 mixed 802 1x and 802 11i Wired Network Specification Con...

Page 82: ...mmunication Protocol FTPES FTP FTPS SMB SharePoint File Formats JPEG TIFF One Page TIFF M TIFF Multi Page TIFF PDF One Page PDF M PDF Multi Page PDF default Searchable PDF PDF A M PDF PNG Resolution 1...

Page 83: ...Maintenance Xerox N60w Scanner User Guide 16 25 Ethernet Cable 35 0265 000 Part Name Part Number...

Page 84: ...Xerox N60w Scanner Maintenance 16 26 User Guide...

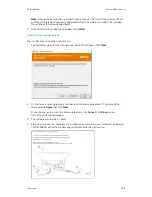
Page 85: ...based on the software your computer is running in each case you should allow the installation to proceed if that option is available Alternatively you can turn off the antivirus or antispyware softwa...

Page 86: ...your scanner may differ slightly from the list shown in the window 10 If a version of the software is already installed on the system the option will be greyed out However if there is a newer version...

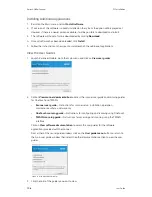
Page 87: ...The scanner driver installation will start first 1 The Welcome screen for the scanner driver Setup Wizard opens Click Next 2 On the Xerox License Agreement window read the license agreement If you ac...

Page 88: ...s recommended that the cable provided with the scanner is the one used 1 Remove any tape from the USB cable 2 Plug the USB cable into the USB port on the scanner then into a USB port on the computer C...

Page 89: ...ept the license agreement the installation will terminate and OneTouch will not be installed 3 Click Close on the Installation Complete window to close and exit the software installer 4 After OneTouch...

Page 90: ...u and click on View user guides 2 Click on View scanner documentation to access the scanner user guide and scanning guides for OneTouch and TWAIN Scanner user guide Instructions for scanner setup inst...

Page 91: ...act our customer service department to register the scanner Please refer to the Technical Support Card that you received with the scanner for our customer service contact information 1 Open an Interne...

Page 92: ...Xerox N60w Scanner PC Installation 17 8 User Guide...

Page 93: ...n outlet on a circuit different from that to which the receiver is connected Consult the dealer or an experienced radio TV technician for help This device complies with Part 15 of the FCC Rules Operat...

Page 94: ...s may be done provided the reproduction of the document is performed for lawful purposes Postage Stamps canceled or uncanceled For philatelic purposes Postage Stamps may be photographed provided the r...

Page 95: ...urrent bank notes or current paper money 2 Obligations or securities of a government or bank 3 Exchequer bill paper or revenue paper 4 The public seal of Canada or of a province or the seal of a publi...

Page 96: ...may be illegal in your country Penalties of fine or imprisonment may be imposed on those found guilty of making such reproductions Currency notes Bank notes and cheques Bank and government bonds and s...

Page 97: ...one or more Perchlorate containing devices such as batteries Special handling may apply European Union RoHS and WEEE Compliance This product is compliant with RoHS Regulations of the European Parliame...

Page 98: ...t Program is a team effort between U S European Union and Japanese governments and the office equipment industry to promote energy efficient copiers printers fax multifunction machine personal compute...

Reviews: