


20
Farbdrucker Phaser 840 und 850
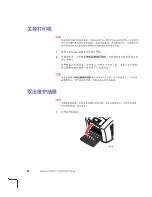
Ausschalten des Druckers
V
O
R
S
I
C
H
T
Um Beschädigungen im Inneren des Druckers zu vermeiden, schalten Sie den
Drucker immer über den Ein-/Aus-Schalter aus (dadurch wird der Druckkopf in
eine für den Transport sichere Position gebracht). Wird der Drucker nicht auf
diese Weise ausgeschaltet, kann es beim Transport zu Beschädigungen im
Inneren des Druckers kommen. Schalten Sie den Drucker niemals nur durch
Ziehen des Netzsteckers aus.
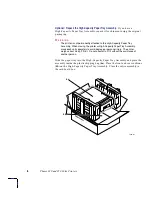
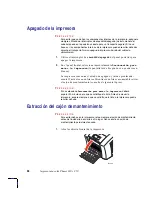
1.
Schalten Sie den Drucker aus, indem Sie an der Rückseite den
Ein-/Aus-Schalter
betätigen.
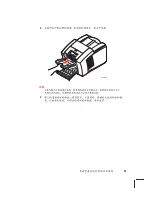
2.
Wählen Sie unmittelbar danach am vorderen Bedienfeld die Option
Abschaltung zum Transport des Druckers
(Sie haben hierzu
4 Sekunden Zeit; danach schaltet sich die Anzeige aus).
Der Drucker meldet nun den Abschaltstatus und benötigt ungefähr
15 Minuten zum Abkühlen. Es wird empfohlen, während der
Abkühlzeit das Wartungsfach zu entfernen (siehe nächster Punkt).
V
O
R
S
I
C
H
T
Wenn Sie die Option
Abschaltung zum Transport des Druckers
nicht
wählen, müssen Sie 30 Minuten warten, bis die Tinte nicht mehr flüssig ist.
Warten Sie vor dem Transport des Druckers immer, bis die Tinte fest geworden
ist. Ansonsten kann es zu Schäden am Drucker kommen.
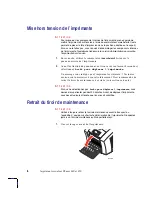
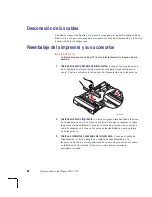
Entfernen des Wartungsfachs
V
O
R
S
I
C
H
T
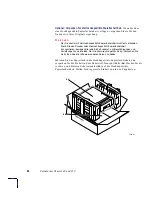
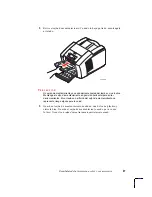
Um Beschädigungen des Druckers zu vermeiden, entfernen Sie vor jedem
Transport oder Bewegen des Druckers das Wartungsfach. Transportieren Sie
niemals ein teilweise verbrauchtes Wartungsfach.
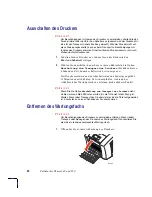
1.
Öffnen Sie die vordere Abdeckung des Druckers.
1239-58
Summary of Contents for Phaser 840
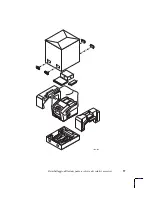
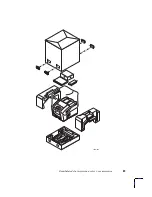
Page 7: ...Repacking the Color Printer and Its Accessories 5 1239 35b ...
Page 13: ...Emballage de l imprimante couleur et de ses accessoires 11 1239 35b ...
Page 19: ...Reimballaggio della stampante a colori e dei relativi accessori 17 1239 35b ...
Page 25: ...Verpacken des Farbdruckers und seines Zubehörs 23 1239 35b ...
Page 31: ...Reembalaje de la impresora a color y sus accesorios 29 1239 35b ...
Page 34: ...32 Phaser 840 850 1 On Off 2 4 15 30 1 1239 58 ...
Page 35: ...33 2 3 1239 59 ...
Page 36: ...34 Phaser 840 850 36 79 1 2 3 1239 38b ...
Page 37: ...35 1239 35b ...
Page 38: ...36 Phaser 840 850 36 79 4a 4b 1239 01 4a 4b ...
Page 40: ...38 Phaser 840 850 1 On Off 2 15 30 1 1239 58 ...
Page 41: ...39 2 3 1239 59 ...
Page 42: ...40 Phaser 840 850 36 79 1 2 3 1239 38b ...
Page 43: ...41 1239 35b ...
Page 44: ...42 Phaser 840 850 36 79 4a 4b 1239 01 4a 4b ...
Page 45: ...43 1 800 835 6100 www tek com Color_Printers support 1 2 3 4 ...
Page 46: ...44 Phaser 840 850 1 2 1 1239 58 ...
Page 47: ...45 2 3 1239 59 ...
Page 48: ...46 Phaser 840 850 1 2 3 1239 38b ...
Page 49: ...47 1239 35b ...


