


3 - 110
Phaser 840/850/860/8200 Color Printer - Service Manual
6.
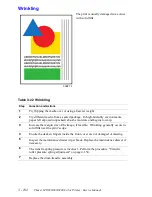
Perform the front panel
Clean
cycle
Eliminate Light Stripes
and check the PEAK
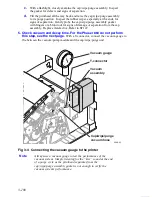
vacuum and DECAY time to determine if there is a problem with the vacuum system
(pump, solenoid valve or tubing) or cap/wipe/purge assembly gasket.
■
Normal operation.
In normal operation, the vacuum builds up a inside the
vacuum module. At the moment the solenoid valve opens (you should hear a
“click” as the valve opens), the PEAK vacuum of about 50 cm Hg (20 in Hg, 10
psi) +/- 10% is applied to the printhead faceplate (and the vacuum gauge).
Immediately, the vacuum should then drop to 25 cm Hg (10 in Hg, 5 psi) +/-
10%. The vacuum should then bleed off to 0 with a DECAY time of 4 to
6 seconds.
■
Low peak vacuum.
If the PEAK vacuum is less than 36 cm Hg (14.2 in. Hg, 7
psi), check the vacuum at vacuum module without the T- connector. Disconnect
the vacuum module’s tubing and connect the vacuum gauge directly to the
module. If PEAK vacuum is less than 40 cm Hg (15.7 in. Hg, 7.7 psi) replace
the vacuum module.
■
No vacuum.
Determine if the vacuum module’s pump is not running. It should
make a humming sound for 90 seconds as it creates a vacuum. It’s also possible
for the vacuum module’s solenoid valve to fail and not open in which case the
accumulated vacuum will not be applied to the printhead. Check the module’s
electrical connection, it runs on 40 VDC Inspect the vacuum module’s electrical
connector; in some cases the electrical connector can be partially seated,
allowing the pump to run, but not the solenoid valve.
■
Vacuum decay too long.
If the DECAY time is much longer than 6 seconds,
there may be kinked tubing or ink in the tubing to the vacuum module, or a
clogged cap/wipe/purge assembly orifice.
Inspect the tubing for kinks or crimps. To test the tubing for blockage,
disconnect it from the vacuum module. Blow through the tube to ensure the
cap/wipe/purge assembly’s tube orifice or the tubing is not blocked with ink
(there will be some natural resistance to the air you blow, a blocked tube will be
very difficult to blow air through). A defective or contaminated solenoid valve
can cause ink to be sucked into the tubing. If the tubing is blocked, replace the
vacuum module and any parts (cap/wipe/purge assembly, tubing, filter) that are
contaminated.
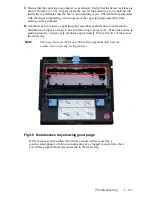
■
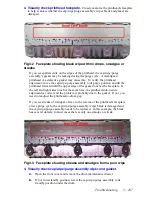
Vacuum decays too quickly
. Generally, if the vacuum decays too quickly or
immediately drops to zero, the cap/wipe/purge assembly is making poor contact
with the printhead faceplate. Look for improper cap/wipe/purge assembly belt
alignment, printhead-to-drum gap, or obstructions to the printhead tilt
mechanism that prevent the cap/wipe/purge assembly gasket from sealing
properly against the printhead faceplate. Also inspect the vacuum hoses for
leaks and proper fit. Ink build-up in the cap/wipe/purge assembly, due to poor
heating in the assembly can cause poor cap/wipe/purge sealing as detailed in the
next step.
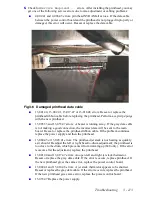
Alternately, the cap/wipe/purge assembly gasket is bad. With a flashlight,
closely examine the cap/wipe/purge assembly. Inspect the gasket for defects and
signs of separation.
Summary of Contents for Phaser 840
Page 2: ......
Page 12: ...vi Phaser 840 850 860 8200 Color Printer Service Manual ...
Page 52: ...1 36 Phaser 840 850 860 8200 Color Printer Service Manual ...
Page 88: ...2 72 Phaser 840 850 860 8200 Color Printer Service Manual Blank Page ...
Page 134: ...3 118 Phaser 840 850 860 8200 Color Printer Service Manual ...
Page 174: ...4 158 Phaser 840 850 860 8200 Color Printer Service Manual ...
Page 188: ......
Page 250: ...8 234 Phaser 840 850 860 8200 Color Printer Service Manual ...
Page 286: ...270 Phaser 840 850 860 8200 Color Printer Service Manual ...
Page 287: ...071 0723 00 ...


