


4 - 144
Phaser 840/850/860/8200 Color Printer - Service Manual
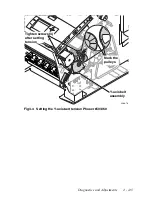
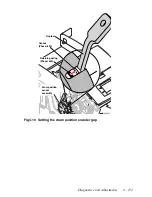
Y-axis belts tension adjustment (Phaser 850/860
printer)
Perform this procedure after loosening or removing the Y-axis belt drive assembly. Note
the additional steps you must perform for a new Y-axis drive assembly.
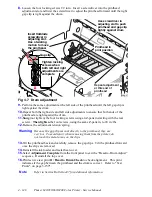
Warning
It is not necessary to remove the tensioning bracket for this
adjustment. However, if you do, follow the procedure "Y-axis belt
drive assembly (Phaser 850/860 printer)", on page 7-201".
Improperly removing the tension spring can cause the tension
bracket to flip off forcefully, causing injury.
1.
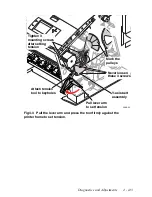
Ensure that the three mounting screws that secure the Y-axis drive assembly to the
chassis are 1 turn loose and that the Y-axis drive assembly slides freely with respect to
the chassis.
Note
If there is a situation in which diagnostics are not available when
installing a
new
Y-axis drive assembly or drum/transfix assembly,
then locate any previously placed index marks on the pulleys and
proceed as if re-using existing parts. Allow the system to cool as
long as feasible before mounting the Y-axis drive assembly onto
the chassis. Tensioning of the y-axis drive assembly without
diagnostics increases the risk of failures associated with low belt
tension (for example, a “growling” sound heard upon cold
power-ups).
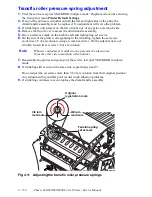
2.
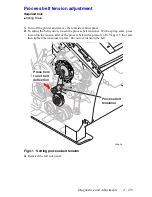
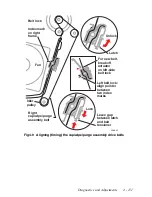
If not in place, attach the tension spring between the Y-axis drive assembly and the
tension spring bracket.
Note
A metal clip attaches the spring to the Y-axis drive assembly; the
spring DOES NOT attach directly to the plastic housing of the
Y-axis drive assembly. Refer to the illustration on page 7-201.
3.
While the belts are under tension, rotate the drum pulley 5 times to rotate the belts and
seat them in place. For an old Y-axis drive assembly, continue rotating the pulleys until
the index marks on each pulley align next to each other.
4.
Beginning with the upper-right screw, tighten the three mounting screws to 30 in.-lbs.
to secure the Y-axis drive assembly in place.
5.
For new Y-axis drive assembly (Phaser 850).
Using PC-based diagnostics, run the
test: “Position for Belt Tightening” in the “Y-Axis Group” test suite. This positions
the belts in the proper orientation for re-tensioning. Do not move the pulleys.
For the Phaser 860.
Use the adjustment from the service menus.
6.
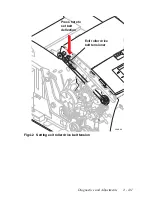
Place an index mark on the edge of each pulley: Mark the Y-axis drive pulley and the
drum pulley where the edges are closest to one another, disregarding previous marks.
Use a distinct color if the pulleys have been previously marked.
7.
Loosen the 3 mounting screws until the bracket slides freely on the chassis and then
re-tighten the screws to 30 in.-lbs.
8.
Reassemble the printer and make a test print.
Summary of Contents for Phaser 840
Page 2: ......
Page 12: ...vi Phaser 840 850 860 8200 Color Printer Service Manual ...
Page 52: ...1 36 Phaser 840 850 860 8200 Color Printer Service Manual ...
Page 88: ...2 72 Phaser 840 850 860 8200 Color Printer Service Manual Blank Page ...
Page 134: ...3 118 Phaser 840 850 860 8200 Color Printer Service Manual ...
Page 174: ...4 158 Phaser 840 850 860 8200 Color Printer Service Manual ...
Page 188: ......
Page 250: ...8 234 Phaser 840 850 860 8200 Color Printer Service Manual ...
Page 286: ...270 Phaser 840 850 860 8200 Color Printer Service Manual ...
Page 287: ...071 0723 00 ...


