


Diagnostics and Adjustments
4 - 155
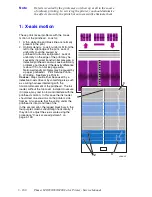
Vacuum check (Phaser 840/850 Only)
Use this check to verify the actions of the vacuum pump and the solenoid valve. In
addition, you can determine if the cap/wipe/purge assembly is sealing properly against the
printhead faceplate.
Note
Phaser 860 vacuum performance can be verified with the built-in
diagnostics “Cap Vacuum” test. Refer to step 5 of "Evaluating the
printhead and cap/wipe/purge system", on page 3-106".
1.
Turn off the printer.
2.
Remove the top and right-side covers.
3.
Turn on the printer. The cap/wipe/purge seal must be checked while the printhead is
hot.
4.
With a T-connector, connect the vacuum gauge to the between the vacuum/pump
module and the cap/wipe/purge unit.
5.
Turn on the printer and enable the diagnostics as explained in the topic, “PC-based
diagnostics” on the
Color Printer Service & Support Resources CD-ROM
.
Tools required:
■
Magnetic screwdriver
■
Vacuum gauge
■
T-20 TORX tip
■
T-15 TORX tip
■
PC diagnostics
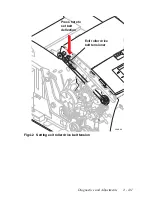
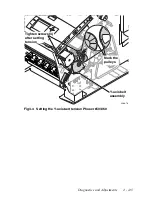
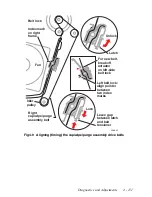
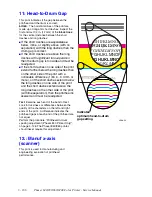
Fig 4-12 Connecting the vacuum gauge to the printer
0388-35
Vacuum guage
40
20
0
60
-76
Cap/wipe/purge
vacuum hose
T-connector
Vacuum
assembly
Summary of Contents for Phaser 840
Page 2: ......
Page 12: ...vi Phaser 840 850 860 8200 Color Printer Service Manual ...
Page 52: ...1 36 Phaser 840 850 860 8200 Color Printer Service Manual ...
Page 88: ...2 72 Phaser 840 850 860 8200 Color Printer Service Manual Blank Page ...
Page 134: ...3 118 Phaser 840 850 860 8200 Color Printer Service Manual ...
Page 174: ...4 158 Phaser 840 850 860 8200 Color Printer Service Manual ...
Page 188: ......
Page 250: ...8 234 Phaser 840 850 860 8200 Color Printer Service Manual ...
Page 286: ...270 Phaser 840 850 860 8200 Color Printer Service Manual ...
Page 287: ...071 0723 00 ...


