


7 - 198
Phaser 840/850/860/8200 Color Printer - Service Manual
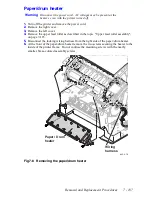
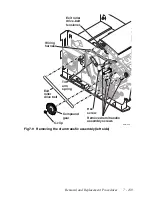
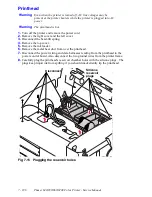
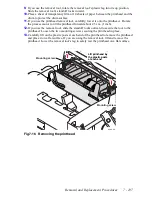
Installation.
If not already in place, install the printhead’s data ribbon cable to the
printhead.
1.
Using the printhead removal tool, reverse the removal steps to reinstall the printhead.
2.
Rotate the printhead to its print position and attach the head tilt spring.
3.
Torque the mounting screws to 20 in./lbs.
Caution
Be careful not to spill ink out of the hot printhead.
For the Phaser 840 only, refer to "Printhead-to-drum spacing adjustment (Phaser 840
Printer Only)", on page 4-146.
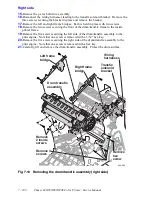
4.
Plug the printhead’s data ribbon cable and power wiring harness into the power control
board. Inspect both ends of the data ribbon cable to ensure they are properly seated.
Reconnect the two printhead ground wires to the printer frame.
5.
Install the ink loader.
6.
Plug in the printer and turn on.
Summary of Contents for Phaser 840
Page 2: ......
Page 12: ...vi Phaser 840 850 860 8200 Color Printer Service Manual ...
Page 52: ...1 36 Phaser 840 850 860 8200 Color Printer Service Manual ...
Page 88: ...2 72 Phaser 840 850 860 8200 Color Printer Service Manual Blank Page ...
Page 134: ...3 118 Phaser 840 850 860 8200 Color Printer Service Manual ...
Page 174: ...4 158 Phaser 840 850 860 8200 Color Printer Service Manual ...
Page 188: ......
Page 250: ...8 234 Phaser 840 850 860 8200 Color Printer Service Manual ...
Page 286: ...270 Phaser 840 850 860 8200 Color Printer Service Manual ...
Page 287: ...071 0723 00 ...


