


254
Phaser 840/850/860/8200 Color Printer - Service Manual
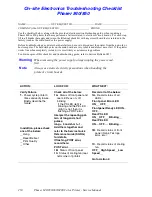
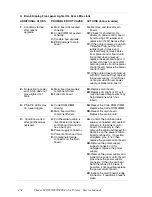
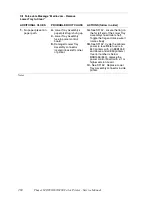
II. Blank Display, Front panel Lights ON, Rear LEDs static
ADDITIONAL CLUES
PROBABLE ROOT CAUSE
ACTIONS (follow in order)
1.
Condition started
after recent
upgrade.
A.
Main board not seated
correctly.
B.
Code DIMM not seated
correctly.
C.
Possible bad upgrade.
D.
ESD damage to main
board.
1A.
Remove and reseat main
board.
1B.
Check for shorted motor
drivers on power control board
by removing 40V jumper and
replace it with 40V Service Plug.
1C.
If the printer powers up with 40
V Service Plug, put the 40 V
jumper back in place and
systematically remove cables
from power control board until
the printer does power up;
replace the appropriate part. If
printer still does not work after
removing cables from the power
control board, replace the power
control board.
1D.
If the printer does not power up
with 40 V Service Plug, replace
the power supply. If it still does
not power up with new power
supply, replace main board.
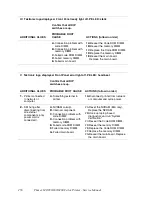
2.
No reaction to power
switch; fan does not
move lights don’t
blink.
A.
Main board secondary
component failed.
B.
Failed I/O board.
2A
,Replace main board.
2B.
Replace I/O Right or I/O Left
(Laptop-based diagnostics may
help determine which has
failed).
3.
PS & PE LEDs stay
on, never toggle.
A.
Code ROM DIMM
missing.
B.
Main board critical
component failed.
3A.
Reseat the Code ROM DIMM.
Replace the Code ROM DIMM
3B.
Reseat the main board.
Replace the main board.
4.
Condition started
after printhead was
replaced.
A.
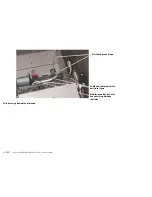
Printhead data cable is
disconnected or power
control board connector
has a bent pin.
B.
Power supply connector.
C.
Power control board pin.
D.
Contaminated edge
connector on the main
board.
4A.
Confirm the printhead data
cable is connected and seated
properly to the power control
board. If it already is, then
remove the cable and inspect for
bent pins on the power control
board's connector. If possible,
straighten pins. If not, then
replace the power control board.
4B.
Remove the power supply,
inspect connector. If it is
damaged, replace the power
supply.
4C.
Remove the power supply and
inspect the power control board
pins where the power supply
connects. If the pins are bent,
bend them back into place, if
possible. If not possible, replace
the power control board.
4D.
Inspect the main board's edge
connector. If residue is present,
clean.
Summary of Contents for Phaser 840
Page 2: ......
Page 12: ...vi Phaser 840 850 860 8200 Color Printer Service Manual ...
Page 52: ...1 36 Phaser 840 850 860 8200 Color Printer Service Manual ...
Page 88: ...2 72 Phaser 840 850 860 8200 Color Printer Service Manual Blank Page ...
Page 134: ...3 118 Phaser 840 850 860 8200 Color Printer Service Manual ...
Page 174: ...4 158 Phaser 840 850 860 8200 Color Printer Service Manual ...
Page 188: ......
Page 250: ...8 234 Phaser 840 850 860 8200 Color Printer Service Manual ...
Page 286: ...270 Phaser 840 850 860 8200 Color Printer Service Manual ...
Page 287: ...071 0723 00 ...


