background image

MEDIA

16

XES SYNERGIX 8850 PRINTER OPERATOR MANUAL

Using the cut sheet feed-in shelf

When the correct media size or type is not loaded in the printer,
you can bypass the media drawers and manually load cut sheets
into the printer.

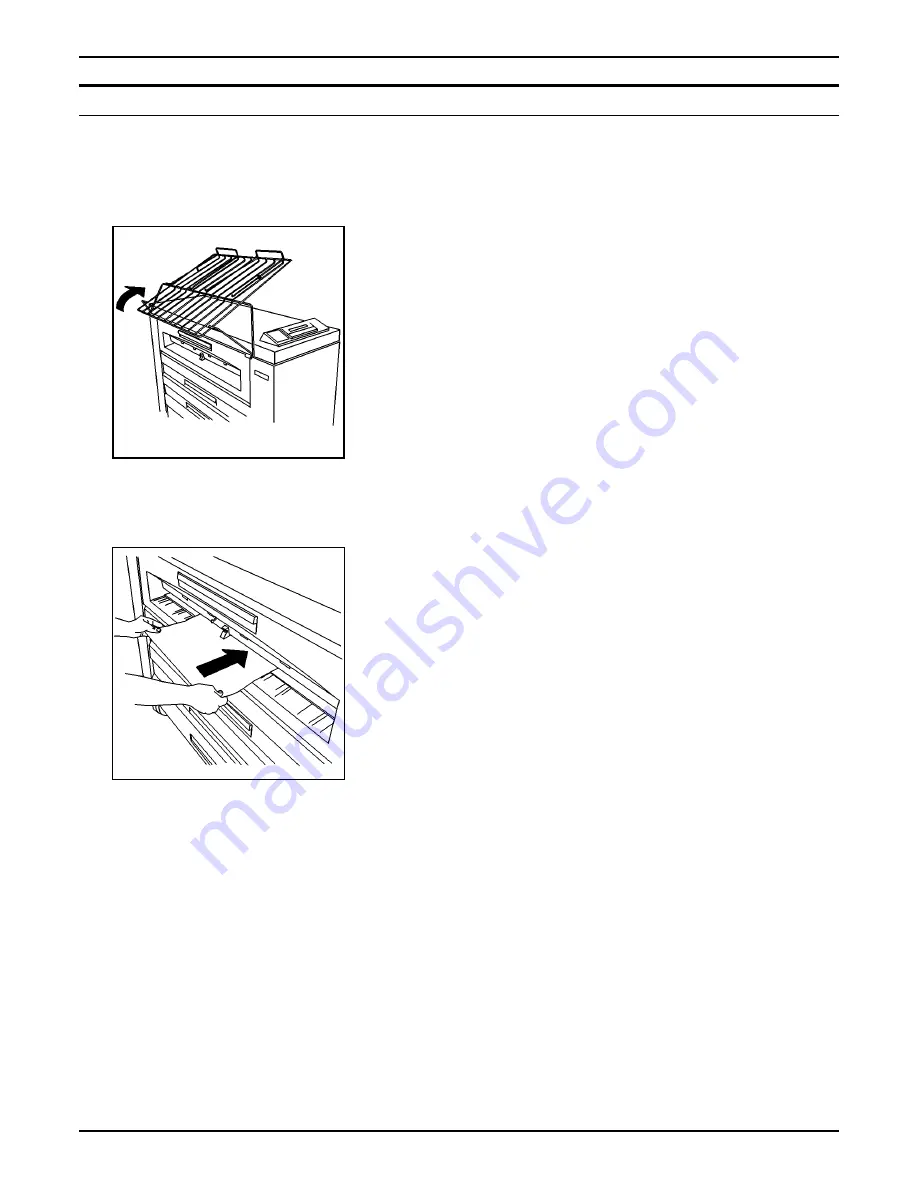
To manually feed cut sheets into the printer:

1.  Raise the output tray all the way until it rests on top of the

printer.

2.  Select the appropriate cut sheet for the print job.

NOTE:

  The minimum size for a cut sheet is 8-1/2 x 11 inches

(216 x 279 mm) fed short edge lead.

3.  Set the BYPASS media type on the printer control panel to the

correct one for the print job.  See "Changing the roll media
size and type" for further information.

NOTE:

  The printer will accept whatever media type you

manually feed into it, regardless of the media type you
specify.  You should ensure that the media type is correct,
however, as the printer uses the media type to determine
the fuser temperature.  The wrong fuser temperature could
cause poor print quality.  It could also result in a
maintenance service call, if any toner rubs off the media
onto the fuser roll.

4.  Center the media between the size indicators on the cut sheet

feed-in shelf.

5.  Feed the lead edge of the media squarely into the printer until

the printer grabs and advances the media.

6.  From the client workstation, specify Manual Feed as the media

source.

7.  Submit the print job.

8.  When you are finished manually feeding cut sheets, lower the

output tray.

Summary of Contents for Synergix 8850

Page 1: ...XES Synergix 8850 Printer Operator Manual 701P36587 July 2001...

Page 2: ...ding 845 17S Webster New York 14580 9791 USA XESystems Inc 2001 All rights reserved Printed in the United States of America XEROX 8850 XES Synergix 8850 Digital Solution Synergix Scan System the digit...

Page 3: ...ging the roll media size and type 14 Using the cut sheet feed in shelf 16 Automatic media roll switching 17 Media storage tips 17 4 Off line Setup Menu 19 Setup Menu options 19 Printer Menu 20 Accessi...

Page 4: ...solving 35 Clearing media jams 35 Fuser area jam 36 Cutter area jam 38 Roll media drawer jams 39 Status codes 42 Error messages 43 Problem solving table 44 Calling for service 45 7 Technical data 47...

Page 5: ...ich case the user may be required to take adequate measures Changes or modifications to this equipment not specifically approved by Xerox Europe may void the user s authority to operate this equipment...

Page 6: ...uipment has been tested and found to comply with the limits for a Class A digital device pursuant to Part 15 of the FCC Rules These limits are designed to provide reasonable protection against harmful...

Page 7: ...pplies and materials out of the reach of children Do not use the units near water wet locations or outdoors The components of this product are equipped with a three wire grounding type plug i e a plug...

Page 8: ...ator access to unsafe areas Covers guards and interlock switches are provided to ensure that the system will not operate with the covers opened Unplug the reprographic system from the wall outlet and...

Page 9: ...eed in shelf that enables you to bypass the media drawers It also has a standard catch tray that can accommodate up to 100 prints of all sizes Organization and content of this manual The XES Synergix...

Page 10: ...erminology used in this manual Printer Whenever the term printer appears in this manual it refers to the XES Synergix 8850 Printer Conventions used in this manual This manual uses the following conven...

Page 11: ...s and describes its main components as well as the elements of the control panel Printer orientation The illustration below shows the printer orientation You must be familiar with this orientation whe...

Page 12: ...oad paper rolls and to clear media jams in drawer 2 4 Drawer 3 Open to load paper rolls and to clear media jams in drawer 3 5 Front door Open to access the toner waste bottle and to view the product s...

Page 13: ...s in the cutter area 2 Printer on off switch white Press to switch the printer on or off 3 Power cord connection Connect the power cord here and to a suitable power outlet 4 Circuit breaker switch bla...

Page 14: ...modify the current width if applicable and type settings for the media sources drawer 1 drawer 2 drawer 3 and cut sheet feed in shelf This key is active from both on line and off line modes Pressing t...

Page 15: ...controller is lost From off line mode you can access the Setup Menu The Setup Menu allows you to perform a variety of utilities and diagnostics NOTE The Media key is functional from both on line and o...

Page 16: ...PRINTER OVERVIEW 6 XES SYNERGIX 8850 PRINTER OPERATOR MANUAL This page has been intentionally left blank...

Page 17: ...o the AccXES controller The AccXES controller does not have a separate power switch 2 Switch the printer power switch to the On I position This turns on power to the printer NOTE During the warm up cy...

Page 18: ...e printer is IDLE Power saver The printer enters this mode to reduce energy consumption after a specified period of inactivity since the completion of the last print This time period is user programma...

Page 19: ...printer can accommodate refer to the Technical data chapter of this manual When a media roll empties When a roll media drawer has less than 30 feet of media or is empty the printer alerts you in the f...

Page 20: ...locations high or low humidity affects the media and causes print quality problems To resolve the problems a sealed media drawer can be installed on the printer in place of one of the standard media...

Page 21: ...ll out of the drawer 7 Lay the media roll on a flat horizontal surface 8 Squeeze the lever at the end of the media roll support tube and remove the tube from the media roll 9 Lay the new media roll on...

Page 22: ...ew media roll into the media drawer so that the lead edge of the paper is on the underside of the roll and toward the printer 13 Position the media roll support tube so that the ends of the tube rest...

Page 23: ...ia roll until the lead edge of the media is centered in the registration window 19 Do one of the following If the drawer is a sealed media drawer close the Plexiglas cover If the drawer is not a seale...

Page 24: ...ns are ROLL1 ROLL2 ROLL3 and BYPASS SHELF cut sheet feed in shelf 3 When you scroll to the media source you want to change press the Enter key The message display instructs you to select the media wid...

Page 25: ...type selections are BOND VELLUM and FILM 7 When you scroll to the desired media type press the Enter key 8 Do one of the following Press the Media key or the Exit key to save your selections and retur...

Page 26: ...oll media size and type for further information NOTE The printer will accept whatever media type you manually feed into it regardless of the media type you specify You should ensure that the media typ...

Page 27: ...cified a particular roll e g roll 1 If both of the remaining media drawers contain the identical media size and type as the roll is in use the printer will select the lowest numbered drawer first If f...

Page 28: ...MEDIA 18 XES SYNERGIX 8850 PRINTER OPERATOR MANUAL This page has been intentionally left blank...

Page 29: ...e Setup Menu has the following options Utilities Setup I O Ports Setup Printers Processing Defaults System Administration Printer Menu Each of the Setup Menu options has a number of sub options This c...

Page 30: ...t ON READY TO POWER SAVER Controls the length of time the printer will remain idle before entering power saver mode Settings 5 to 50 minutes in 5 minute intervals Default 50 minutes NOTE A value of 0...

Page 31: ...representative and is password protected DIAGNOSTICS RECENT FAULT LOG Displays a record of the last 99 printer faults You may be asked to provide information from this log when placing a call for ser...

Page 32: ...bling the audible indicators To enable or disable the Audible Indicators 1 Access the PRINTER MENU See Accessing the Printer Menu in this chapter 2 Press the Enter key to select AUDIBLE INDICATORS The...

Page 33: ...u scroll to the desired value press the Enter key to save your selection 7 Press the On line Off line key to return to on line mode The on line off line indicator will light The display will indicate...

Page 34: ...DLE Performing printer diagnostics The DIAGNOSTICS option has two operator accessible sub options TEST PLOT and RECENT FAULT LOG NOTE A third DIAGNOSTICS option PRINTER DIAGNOSTICS is restricted to th...

Page 35: ...the On line Off line key to return to on line mode The on line off line indicator will light The display will indicate XES SYNERGIX 8850 IDLE Displaying the billing meter counts To display the billing...

Page 36: ...OFF LINE SETUP MENU 26 XES SYNERGIX 8850 PRINTER OPERATOR MANUAL This page has been intentionally left blank...

Page 37: ...ed tasks and for ordering supplies When the toner cartridge needs replacement When the toner cartridge is empty the following occur The toner supply access cover indicator on the graphic display flash...

Page 38: ...ge the printer 1 Open the replacement toner carton Remove the replacement toner cartridge Remove the replacement toner waste bottle Save all the replacement toner packaging for recycling the used tone...

Page 39: ...the used toner cartridge in the empty replacement toner carton Do not seal the carton until you have added the toner waste bottle to it as well Recycle the used cartridge and waste bottle according to...

Page 40: ...h until the cartridge locks into position CAUTION Remove the cover tape carefully Do not remove the clear perforated seal 15 Remove the cover tape from the toner cartridge Do not remove the seal under...

Page 41: ...he toner waste bottle as well To replace the toner waste bottle 1 Open the front door CAUTION Pull the toner waste bottle out gently to avoid spillage of toner 2 Carefully remove the toner waste bottl...

Page 42: ...aste bottle onto the mounting bracket Push the bottle forward until you feel it snap into place 8 Close the front door CAUTION Do not reuse the contents of the toner waste bottle Reuse of this materia...

Page 43: ...PRINTER OPERATOR MANUAL 33 Cleaning the printer surface As needed clean the outside surfaces of the printer Use a clean cloth dampened with mild soap and water Do not pour or spray liquid directly on...

Page 44: ...lowing part number United States 6R989 Europe 6R90302 Bond paper vellum tracing paper and film Xerox offers the above media in various sizes weights and grades to meet your printing needs Supply order...

Page 45: ...esolve the problem follow the procedure for calling for service at the end of the chapter Clearing media jams When the printer experiences a media jam the following occur The alarm beep if enabled sou...

Page 46: ...Do not touch the fuser roll while clearing media jams in the fuser area The fuser roll is very hot and can cause severe burns 2 Open the fuser drawer all the way 3 Do one of the following Turn the gr...

Page 47: ...t the latches on each side of the fuser drawer front and lower the fuser drawer front 5 Hold the drawer front all the way open and pull the jammed media out of the back of the fuser area 6 Close the f...

Page 48: ...jam in the cutter area WARNING The cutter blade is very sharp Do not touch the cutter blade when clearing media jams in the cutter area 1 Squeeze the latches on the cut sheet feed in drawer and open t...

Page 49: ...NOTE In some locations high or low humidity affects the media and causes print quality problems To resolve the problems a sealed media drawer can be installed on the printer in place of one of the st...

Page 50: ...the roll 6 Examine the lead edge of the media for tears If the lead edge of the media is torn folded creased or uneven trim the lead edge 7 Rotate the media roll to feed the media under the baffle and...

Page 51: ...roll until the lead edge of the media is centered in the registration window 10 Do one of the following If the drawer is a sealed media drawer close the Plexiglas cover If the drawer is not a sealed m...

Page 52: ...s a problem in the fuser area Follow the instructions on the message display E5 This code indicates an interlock problem Follow the instructions on the message display E6 This code indicates a problem...

Page 53: ...Press the On line Off line key to take the printer off line 2 Reset the value to NONE Refer to Specifying the finisher configuration type in this manual for instructions F2 01 CHECK FOLDER FOLDER COMM...

Page 54: ...ce Table 4 Problem solving table Condition Causes Suggested Solutions Portions of the prints are deleted The media may be damp Check the condition of the media If damp replace it The prints are light...

Page 55: ...nge for a customer service engineer to service your equipment Be prepared to provide the following information to the customer service representative Customer account number __________________________...

Page 56: ...PROBLEM SOLVING 46 XES SYNERGIX 8850 PRINTER OPERATOR MANUAL This page has been intentionally left blank...

Page 57: ...dity Maximum 80 F 27 C at 80 relative humidity Maximum elevation 10 000 feet 3048 meters Weight 575 lbs 261 kg Dimensions Width As delivered 23 inches 584 mm With output tray and AccXES controller ins...

Page 58: ...tes Less than 3 minutes Less than 4 minutes European Operations Common Market 230V 240V 16A 16 0A Less than 3 minutes United Kingdom 230V 240V 13A 13 0A Less than 3 5 minutes Switzerland 220V 10A 10 0...

Page 59: ...3 rolls 500 feet 152 meters each Standard manual bypass for cut sheets Media size Roll feed Width 11 to 36 inches 279 to 914 mm Core diameter 3 to 6 7 inches 76 to 170 mm Manual cut sheet feed Width...

Page 60: ...on of the printer after installation The height clearance from the floor to the nearest overhead obstruction within the floor space requirement is 78 inches 1981 mm NOTE Once installed this machine is...

Page 61: ......

Reviews: