


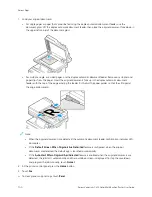


9.
To begin the scan, touch SSccaann.
The printer scans documents to the folder that you specified.
10.
If you are scanning from the document glass, when prompted, to finish, touch D
Doonnee, or to scan another page,
touch A
Adddd PPaaggee.
Note: If you are scanning a document from the automatic document feeder, a prompt does not appear.
11.
To return to the Home screen, press the H
Hoom
mee button.
Scanning to a Shared Folder on a Networked Computer
You can scan a document and save the scanned file to a folder on a networked computer. The Scan To App
produces scans in ..jjppgg, ..ppddff, ..ppddff ((aa)), ..xxppss, and ..ttiiff file formats.
Note: To scan to a user home folder, use the Workflow Scanning App. For details, refer to
Destination to an Address Book Entry
.
Before You Begin
Before scanning to a folder on a networked computer, perform these steps:
• Create a shared folder on your computer:
–
For Windows, refer to
Sharing a Folder on a Windows Computer
.
–
For Macintosh, refer to
Sharing a Folder in Macintosh OS X Version 10.7 and Later
.
• Configure an SMB Folder. For details, refer to the
System Administrator Guide
, at
.
• Use the Embedded Web Server to associate a Scan To destination with a Device Address Book contact. For
details, refer to
Adding a Scan To Destination to an Address Book Entry
Note: Ensure that the Address Book contains at least one contact with a scan-to destination.
Scanning to a Shared Folder on a Networked Computer
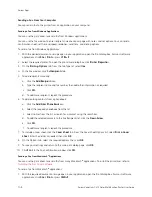
1.
Load the original document on the document glass or into the automatic document feeder.
2.
At the printer control panel, press the H
Hoom
mee button.
3.
Touch SSccaann TToo.
4.
To specify the destination of the scanned document, select one of the following options.
• To scan to an SMB folder on a networked computer, touch N
Neettw
woorrkk. Browse to the required folder, or enter
the network path name, then touch O
OKK.
Note: For information on configuring SMB folders, refer to the
System Administrator Guide
at
• To scan to a folder associated with a contact in the address book, touch D
Deevviiccee A
Addddrreessss B
Booookk. Select the
required contact, then touch the Scan To location.
Note: For details on how to associate a networked folder with an address book contact, refer to
Scan To Destination to an Address Book Entry
140
Xerox
®
VersaLink
®
C415 Color Multifunction Printer User Guide
Summary of Contents for VersaLink C415
Page 1: ...VERSION 1 0 JULY 2023 702P08981 Xerox VersaLink C415 Color Multifunction Printer User Guide...
Page 4: ...4 Xerox VersaLink C415 Color Multifunction Printer User Guide...
Page 220: ...220 Xerox VersaLink C415 Color Multifunction Printer User Guide Paper and Media...
Page 246: ...246 Xerox VersaLink C415 Color Multifunction Printer User Guide Maintenance...
Page 320: ...320 Xerox VersaLink C415 Color Multifunction Printer User Guide Recycling and Disposal...
Page 322: ...Apps Features 322 Xerox VersaLink C415 Color Multifunction Printer User Guide Apps Features...
Page 335: ......
Page 336: ......