background image

5

W

ARNING

If you cut off the moulded plug, get rid of it straight away.
You cannot rewire the plug and you may receive an electric 

shock if you plug it into a socket.

I

MPORTANT


WARNING

: You must earth this machine.

The wires in the mains lead have the following color code:
• Green and Yellow: Earth
• Blue:  Neutral
• Brown:  Live
If the wires in the mains lead do not match the colors marked in your plug, 
do the following:
You must connect the green and yellow wire to the pin marked by the letter 

“E” or by the safety ‘Earth symbol’ or colored green and yellow or green.
You must connect the blue wire to the pin which is marked with the letter “N” 
or colored black.
You must connect the brown wire to the pin which is marked with the letter 
“L” or colored red.
You must have a 13 amp fuse in the plug, adaptor, or at the distribution 

board.

Summary of Contents for WorkCentre 3119

Page 1: ...WorkCentre 3119 User Guide 705N00022 ...

Page 2: ...del names of Xerox Corporation Xerox and Xerox logo are trademarks of Xerox Corporation IBM and IBM PC are trademarks of International Business Machines Corporation PCL and PCL 6 are trademarks of Hewlett Packard company Microsoft Windows Windows 98 Windows Me Windows 2000 and Windows XP are registered trademarks of Microsoft Corporation TrueType LaserWriter and Macintosh are trademarks of Apple C...

Page 3: ...Printer software overview Supplied printer software 2 7 Printer driver features 2 7 System requirements 2 8 3 Loading original documents and paper Loading document 3 1 Selecting print materials 3 2 Loading paper 3 5 Setting the paper size and type 3 6 Selecting an output location 3 6 4 Copying Copying 4 1 Changing the settings for each copy 4 1 Changing the default settings 4 2 Using special copy ...

Page 4: ...er cartridge 8 3 Consumable and replacement parts 8 4 9 Troubleshooting Clearing paper jams 9 1 Understanding the Status LED 9 3 Understanding display messages 9 4 Solving other problems 9 4 10 Specifications General specifications 10 1 Scanner and copier specifications 10 1 Printer specifications 10 2 ...

Page 5: ...nician when repair work is required Opening or removing covers may expose you to dangerous voltages or other risks Incorrect reassembly could cause electric shock when the unit is subsequently used 14 Unplug the machine from the telephone jack PC and AC wall outlet and refer servicing to qualified service personnel under the following conditions When any part of the power cord plug or connecting c...

Page 6: ...user is encouraged to try to correct the interference by one or more of the following measures Reorient or relocate the receiving antenna Increase the separation between the equipment and receiver Connect the equipment into an outlet on a circuit different from that to which the receiver is connected Consult the dealer or experienced radio TV technician for help CAUTION Change or modifications not...

Page 7: ...rown Live If the wires in the mains lead do not match the colors marked in your plug do the following You must connect the green and yellow wire to the pin marked by the letter E or by the safety Earth symbol or colored green and yellow or green You must connect the blue wire to the pin which is marked with the letter N or colored black You must connect the brown wire to the pin which is marked wi...

Page 8: ...heets of A4 letter sized paper Create professional documents Print Watermarks You can customize your documents with words such as Confidential See the Software Section Print Posters The text and pictures of each page of your document are magnified and printed across the sheet of paper and taped together to form a poster See the Software Section a page per minute Save time and money You can print m...

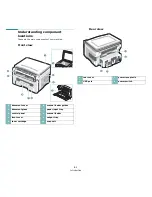
Page 9: ...components of your machine Front view 1 document cover 6 manual feeder guides 2 document glass 7 paper input tray 3 control panel 8 manual feeder 4 front cover 9 output tray 5 toner cartridge 10 scan unit Rear view 1 rear cover 3 power receptacle 2 USB port 4 power switch ...

Page 10: ...h the available menus 4 Scroll through the options available in the selected menu 5 Confirms the selection on the display 6 Sends you back to the upper menu level 7 Allows you to enter the number of copies 8 Stops an operation at any time In Standby mode clears cancels the copy options such as the resolution the document type setting the copy size and the number of copies 9 Starts a job ...

Page 11: ... the instructions in the guide to get the machine ready Online User s Guide Provides you with step by step instructions for using your machine s full features and contains information for maintaining your machine troubleshooting and installing accessories This user s guide also contains the Software Section providing you with information on how to print documents with your machine on various opera...

Page 12: ...tion Right 100 mm enough space for ventilation Left 100 mm enough space for ventilation Installing the toner cartridge 1 Open the front cover 2 Remove the toner cartridge from its bag Do not use a knife or other sharp object as it might scratch the drum of the toner cartridge 3 Roll the toner cartridge 5 or 6 times to distribute the toner evenly inside the toner cartridge Thoroughly rolling the to...

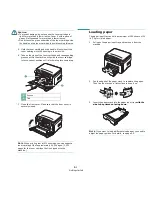
Page 13: ...til it locks into place completely 7 Close the front cover Make sure that the front cover is securely closed NOTE When printing text at 5 coverage you can expect a toner cartridge life of approximately 3 000 pages 1 000 pages for the toner cartridge that is shipped with the machine 1 Groove 2 Tab Loading paper The paper input tray can hold a maximum of 250 sheets of 20 lb 75 g m2 plain paper 1 Pul...

Page 14: ... the settings on the control panel Changing the size of the paper in the paper input tray To load longer sizes of paper such as Legal sized paper you need to adjust the paper guides to extend the paper input tray 1 After pressing and unlatching the guide lock slide the paper length guide out completely to extend the paper input tray to its full length 2 After inserting paper into the paper input t...

Page 15: ...low Fast is the default mode Some PC users may experience poor USB function in the default mode If this occurs select Slow mode to achieve successful results For details about changing the USB mode see page 9 7 Turning the machine on 1 Plug one end of the supplied power cord into the power receptacle on the machine and the other end into a properly grounded AC outlet 2 Press the power switch to tu...

Page 16: ...e modes Toner save mode Toner save mode allows your machine to use less toner on each page Activating this mode extends the life of the toner cartridge beyond what one would experience in the normal mode but it reduces print quality 1 Press button until Toner Save appears on the top line of the display 2 Press the scroll button or until On appears and press button NOTE When PC printing you can als...

Page 17: ...s You can also update the firmware of the machine Linux driver You can print and scan in Linux using your machine For information about installing the MFP driver in Linux see the Software Section Macintosh printer driver You can print and scan in Macintosh using your machine For information about installing the printer driver in Macintosh see the Software Section Printer driver features Your print...

Page 18: ...ware Item Requirements Recommended Operating system Windows 98 Me 2000 XP CPU Windows 98 Me 2000 Pentium II 400 MHz or higher Pentium III 933 MHz Windows XP Pentium III 933 MHz or higher Pentium IV 1 GHz RAM Windows 98 Me 2000 64 MB or more 128 MB Windows XP 128 MB or more 256 MB Free disk space Windows 98 Me 2000 300 MB or more 1 GB Windows XP 1 GB or more 5 GB Internet Explorer 5 0 or higher ...

Page 19: ...d open the document cover 2 Place the document face down on the document glass and align it with the registration guide at the top left corner of the glass 3 Close the document cover Be careful not to move the document NOTES Leaving the document cover open while copying may affect copy quality and toner consumption Dust on the document glass may cause black spots on the printout Always keep it cle...

Page 20: ...tisfactory results This may be the result of improper handling unacceptable temperature and humidity levels or other variables over which Xerox has no control Before purchasing large quantities of paper ensure that the paper meets the requirements specified in this user s guide CAUTION Using paper that does not meet these specifications may cause problems requiring repairs Such repairs are not cov...

Page 21: ...loading paper envelopes or other print materials keep these guidelines in mind Always use paper and other materials that conform with the specifications listed on page 3 2 Attempting to print on damp curled wrinkled or torn paper can cause paper jams and poor print quality For the best print quality use only high quality copier grade paper specifically recommended for use in laser printers Avoid u...

Page 22: ...ncies used in the machine must be able to withstand 208 C 406 4 F the machine s fusing temperature Place them on a flat surface after removing them from the machine Do not leave them in the paper tray for long periods of time Dust and dirt may accumulate on them resulting in spotty printing To avoid smudging caused by fingerprints handle them carefully To avoid fading do not expose printed transpa...

Page 23: ...dversely affect printer rollers Forms and letterhead should be sealed in a moisture proof wrapping to prevent changes during storage Before you load preprinted paper such as forms and letterhead verify that the ink on the paper is dry During the fusing process wet ink can come off preprinted paper reducing print quality Paper Type Guidelines In the manual feeder Use the manual feeder to print tran...

Page 24: ... the paper size and type in the application program you use on your PC 1 Press button until Paper Setting appears on the top line of the display 2 Press button when Paper Size appears 3 Press the scroll button or to select the paper tray you want to use and press button 4 Press the scroll button or to find the paper size you are using and press button 5 Press button to return to the upper level 6 ...

Page 25: ...e careful not to touch the surface and especially keep children away from the surface The output tray can hold up to 50 sheets of paper Remove the pages so that tray is not overloaded Printing to the rear cover Face up Using the rear cover paper comes out of the machine face up Printing from the manual feeder to the rear cover provides a straight paper path Using the rear cover might improve the o...

Page 26: ... the document glass To select from the predefined copy sizes 1 Press button then Reduce Enlarge appears 2 Press the scroll button or to select the size setting you want and press button To fine tune the size of copies 1 Press button then Reduce Enlarge appears 2 Press the scroll button or until Custom 50 200 appears and press button 3 Press the scroll button or to enter the copy size you want Pres...

Page 27: ...opying This feature automatically reduces or enlarges the original image to fit on the paper currently loaded in the machine NOTE When the size of the document you want to copy is not same as the size of the paper loaded this function automatically adjusts the size of the document to fit the paper You can not adjust the copy size manually 1 Load the document to be copied on the document glass and ...

Page 28: ...You can paste the printed pages together to make one poster sized document 1 Place the document to be copied on the document glass and close the cover 2 Press button until Special Copy appears on the top line of the display 3 Press the scroll button or until Poster appears and press button 4 Customize the copy settings including copy size darkness and original type by using the control panel butto...

Page 29: ...g in a print queue or print spooler such as the printer group in Windows delete the job as follows 1 Click the Windows Start button 2 For Windows 98 2000 Me select Settings and then Printers For Windows XP select Printers and Faxes 3 Double click the Xerox Workcentre 3119 Series icon 4 From the Document menu select Cancel Printing Windows 98 Me or Cancel Windows 2000 XP NOTE You can also access th...

Page 30: ...e WIA driver Scanning basics Your machine offers the following ways to scan an image From TWAIN compliant software You can use other software including Adobe Photoshop Deluxe and Adobe Photoshop From the Windows Images Acquisition WIA driver Your machine supports the WIA driver for scanning images NOTE To scan with your machine you must install the software For details about installing the softwar...

Page 31: ...you can order the following type of toner cartridges for your machine How to purchase To order Xerox authorized toner cartridges contact your local Xerox dealer or the retailer where you purchased your machine or visit www xerox com and select your country region for information on calling for technical support Type Yielda a ISO 19752 5 coverage Part number Standard 3 000 pages 013R00625 ...

Page 32: ... setting is cleared 5 Repeat steps 3 through 4 to clear another setting 6 Press button to return to Standby mode Cleaning your machine To maintain print and scan quality follow the cleaning procedures below each time the toner cartridge is replaced or if print and scan quality problems occur CAUTION Cleaning the cabinet of the machine with cleaning materials containing large amounts of alcohol sol...

Page 33: ...drum of the toner cartridge may require cleaning 1 Before starting the cleaning procedure make sure that paper is loaded in the machine 2 Press button until Maintenance appears on the top line of the display 3 Press button when Clean Drum appears The machine prints out a cleaning page Toner particles on the drum surface are affixed to the paper 4 If the problem remains repeat steps 1 through 3 Cle...

Page 34: ...E The 1 000 pages and 3 000 pages toner cartridge have different shapes Redistributing the toner cartridge When the toner cartridge is near the end of its life White streaks or light printing occurs The warning message Toner Low displays on the control panel The Smart Panel program window appears on the computer telling you that the toner cartridge is low on toner The Status LED blinks red If this...

Page 35: ... handle on the toner cartridge to avoid touching this area 5 Hold the toner cartridge by the handle and slowly insert the toner cartridge into the opening in the machine 6 Tabs on the sides of the toner cartridge and corresponding grooves within the machine will guide the toner cartridge into the correct position until it locks into place completely 7 Close the front cover Make sure that the cover...

Page 36: ...Maintenance 8 5 trained service professional except for the toner cartridge see page 8 4 ...

Page 37: ...r does not exit continue to step 2 2 Pull the paper input tray out Message Location of Jam Go to Paper Jam 0 Open Close Door In the paper input tray below and page 9 1 Paper Jam 1 Open Close Door In the fuser area or around the toner cartridge In the manual feeder page 9 2 Paper Jam 2 Check Inside In the paper exit area page 9 2 3 Remove the jammed paper by gently pulling it straight out If there ...

Page 38: ...not exit continue to step 2 2 Gently pull the paper out of the output tray Skip to step 9 If you cannot see the jammed paper in the output tray continue to the next step 3 Lift the scan unit 4 Pull the jammed paper out gently 5 Close the scan unit by pushing a tab to the left and hold it down and lowering the cover carefully until the cover is holding down the tab If there is any resistance and th...

Page 39: ...tus Description Off The machine is off line The machine is in Power Save mode When data is received or any button is pressed it switches to on line automatically Green On The machine is on line and can be used Blinking When the backlight slowly blinks the machine is receiving data from the computer When the backlight normally blinks the machine is scanning the loaded document When the backlight fa...

Page 40: ...er in the paper input tray See page 2 3 Open Heat Error There is a problem in the fuser unit Unplug the power cord and plug it back in If the problem persists please call for service Over Heat There is a problem in the fuser unit Unplug the power cord and plug it back in If the problem persists please call for service Solving other problems The following chart lists some conditions that may occur ...

Page 41: ...ne Envelopes skew or fail to feed correctly Ensure that the paper guides are against both sides of the envelopes Condition Suggested solutions Printing problems Condition Possible cause Suggested solutions The machine does not print The machine is not receiving power Check the power cord connections Check the power switch and the power source The machine is not selected as the default printer Sele...

Page 42: ... print job that you have already printed successfully If possible attach the cable and the machine to another computer and try a print job that you know works Finally try a new printer cable The wrong printer driver was selected Check the application s printer selection menu to ensure that your machine is selected The software application is malfunctioning Try printing a job from another applicati...

Page 43: ...page 3 2 The paper lot is bad The manufacturing processes can cause some areas to reject toner Try a different kind or brand of paper If these steps do not correct the problem contact a service representative Vertical lines If black vertical streaks appear on the page The drum inside the toner cartridge has probably been scratched Remove the toner cartridge and install a new one See page 8 4 If wh...

Page 44: ...and humidity can cause paper curl See page 3 2 Turn over the stack of paper in the tray Also try rotating the paper 180 in the tray Try printing to the rear cover Condition Suggested solutions Wrinkles or creases Ensure that the paper is loaded properly Check the paper type and quality See page 3 2 Turn over the stack of paper in the tray Also try rotating the paper 180 in the tray Try printing to...

Page 45: ...is the proper paper weight 75 g m2 20 lb bond paper is recommended Check for copy paper or pieces of copy paper remaining in the machine after a paper jam has been cleared Scanning problems Toner cartridge produces fewer copies than expected before running out of toner Your originals may contain pictures solids or heavy lines For example your originals may be forms newsletters books or other docum...

Page 46: ...n your system Open MFP configurator and switch to the Printers tab in Printers configuration window to look at the list of available printers Make sure that your machine is displayed on the list If not please invoke Add new printer wizard to set up your device Check if the printer is started Open Printers configuration and select your machine on the printers list Look at the description in the Sel...

Page 47: ...o LP 0 designation displayed in the scanners options dev mfp1 relates to LP 1 and so on USB ports start at dev mfp4 so scanner on USB 0 relates to dev mfp4 respectively and so forth sequentially In the Selected port pane you can see if the port is occupied by some other application If this is the case you should wait for completion of the current job or should press Release port button if you are ...

Page 48: ...Make sure that you are using a high quality cable Your product not listed at Product List Window after you click Add and Select USB Make sure that the cables are connected correctly and the machine is turned on Check if Ready appears on the display of the control panel If not clear the problem depending on the error message see Understanding display messages on page 9 4 Make sure that the correct ...

Page 49: ...characters x 2 lines Toner cartridge lifeb 3 000 pages at ISO 19752 5 coverage Ships with 1 000 pages toner cartridge Memory 8 MB Non extendable External dimension W x D x H 409 x 362 x 232 mm 16 1 x 14 3 x 9 1 inches Weight 9 3 Kg including consumables Package weight Paper 2 16 Kg Plastic 0 4 Kg Duty cycle Monthly print Up to 10 000 pages Scanner and copier specifications a Sound Pressure Level I...

Page 50: ...a tion software connecting method media type media size and job complexity Up to 18 ppm in A4 19 ppm in Letter First print out time 11 seconds From Ready Print resolution Up to 600 x 600 dpi Printer language SPL Xerox Printer Language OS Compatibilityb b Please visit www xerox com to download the latest software version Windows 98 Me 2000 XP Various Linux OS Macintosh 10 3 10 4 Inteface USB 2 0 ...

Page 51: ... J jam clear 9 1 L Linux problems 9 10 loading documents document galss 3 1 loading paper in the manual feeder 3 5 in the paper input tray 2 3 M Macintosh problems 9 12 manual feeder 3 5 memory clear 8 1 O order information toner cartridges 7 1 output location select 3 6 output tray 3 6 P paper guidelines 3 3 paper jam clear 9 1 paper load in paper input tray 2 3 in the manual feeder 3 5 paper siz...

Page 52: ...4 specifications general 10 1 paper 3 2 printer 10 2 scanner and copier 10 1 Status LED 9 3 system requirements Windows 2 8 T toner cartridge installing 2 2 maintaining 8 3 order information 7 1 redistributing 8 3 replacing 8 4 toner save mode use 2 6 U USB connecting 3 6 ...

Page 53: ...WorkCentre 3119 Software section ...

Page 54: ... Tab 7 Paper Tab 8 Graphics Tab 9 Extras Tab 10 About Tab 10 Printer Tab 10 Using a Favorite Setting 11 Using Help 11 Chapter 3 ADVANCED PRINTING Printing Multiple Pages on One Sheet of Paper N Up Printing 12 Printing Posters 13 Printing a Reduced or Enlarged Document 13 Fitting Your Document to a Selected Paper Size 13 Using Watermarks 14 Using an Existing Watermark 14 Creating a Watermark 14 Edi...

Page 55: ...anning Using the WIA Driver 18 Chapter 6 USING YOUR PRINTER IN LINUX Getting Started 19 Installing the MFP Driver 19 System Requirements 19 Installing the MFP Driver 20 Uninstalling the MFP Driver 21 Using the MFP Configurator 21 Opening the MFP Configurator 21 Printers Configuration 22 Scanners Configuration 22 MFP Ports Configuration 23 Configuring Printer Properties 23 Printing a Document 24 Pr...

Page 56: ...alling Software for Macintosh 27 Setting Up the Printer 28 For a Network connected Macintosh 28 For a USB connected Macintosh 28 Printing 29 Printing a Document 29 Changing Printer Settings 29 Printing Multiple Pages on One Sheet of Paper 30 Scanning 31 ...

Page 57: ... printer is a printer directly attached to your computer using the printer cable supplied with your printer such as a USB or parallel cable NOTE If the New Hardware Wizard window appears during the installation procedure click in the upper right corner of the box to close the window or click Cancel This is recommended for most users All components necessary for printer operations will be installed...

Page 58: ...computer asks you to confirm your selection click Yes The selected driver and all of its components are removed from your computer 4 After the software is removed click Finish Scanner driver 1 Start Windows 2 From the Start menu select Programs or All Programs Xerox WorkCentre 3119 Series Scanner Driver Uninstall 3 When your computer asks you to confirm your selection click Yes The selected driver...

Page 59: ...m various Windows applications The exact steps for printing a document may vary depending on the application program you are using Refer to the User s Guide of your software application for the exact printing procedure 1 Open the document you want to print 2 Select Print from the File menu The Print window is displayed It may look slightly different depending on your application The basic print se...

Page 60: ...changes permanent make them in the Printers folder The following procedure is for Windows XP For other Windows OS refer to the corresponding Windows User s Guide or online help 1 Click the Windows Start button 2 Select Printers and Faxes 3 Select Xerox WorkCentre 3119 Series 4 Right click on the printer driver icon and select Printing Preferences 5 Change the settings on each tab click OK Layout T...

Page 61: ...ting on special materials like envelopes and transparencies You have to load one sheet at a time into the Manual Tray or Multi Purpose Tray If the paper source is set to Auto Selection the printer automatically picks up print material in the following tray order Manual Tray or Multi Purpose Tray Tray1 Optional Tray2 Type Make sure that Type is set to Printer Default If you load a different type of...

Page 62: ...der line widths or darker gray scale images Dark This setting is for finer line width higher definition in graphics and lighter gray scale images Advanced Options You can set advanced settings by clicking the Advanced Options button TrueType Options This option determines what the driver tells the printer about how to image the text in your document Select the appropriate setting according to the ...

Page 63: ...nt Odd Pages Your printer prints only the odd numbered pages of the document Print Even Pages Your printer prints only the even numbered pages of the document 1 2 3 1 2 3 About Tab Use the About tab to display the copyright notice and the version number of the driver See Printing a Document on page 6 for more information about accessing printer properties Printer Tab If you access printer properti...

Page 64: ...tem from the Favorites drop down list The printer is now set to print according to the Favorites setting you selected To delete a Favorites item select it from the list and click Delete You can also restore the printer driver s default settings by selecting Printer Default from the list Using Help Your printer has a help screen that can be activated by clicking the Help button in the printer prope...

Page 65: ... on One Sheet of Paper N Up Printing You can select the number of pages to print on a single sheet of paper To print more than one page per sheet the pages will be reduced in size and arranged in the order you specify You can print up to 16 pages on one sheet 1 To change the print settings from your software application access printer properties See Printing a Document on page 6 2 From the Layout ...

Page 66: ...ed or Enlarged Document You can change the size of a page s content to appear larger or smaller on the printed page 1 To change the print settings from your software application access printer properties See Printing a Document on page 6 2 From the Paper tab select Reduce Enlarge in the Printing Type drop down list 3 Enter the scaling rate in the Percentage input box You can also click the or butt...

Page 67: ... message displays in the preview window When the First Page Only box is checked the watermark prints on the first page only 4 Select watermark options You can select the font name style size or grayscale level from the Font Attributes section and set the angle of the watermark from the Message Angle section 5 Click Add to add a new watermark to the list 6 When you have finished editing click OK an...

Page 68: ...ST Dear ABC Regards WORLD BEST Using a Page Overlay After an overlay has been created it is ready to be printed with your document To print an overlay with a document 1 Create or open the document you want to print 2 To change the print settings from your software application access printer properties See Printing a Document on page 6 3 Click the Extras tab 4 Select the desired overlay from the Ov...

Page 69: ...ied CD ROM Setting Up a Host Computer 1 Start Windows 2 From the Start menu select Printers and Faxes 3 Double click your printer driver icon 4 From the Printer menu select Sharing 5 Check the Share this printer box 6 Fill in the Shared Name field and then click OK Setting Up a Client Computer 1 Right click the Windows Start button and select Explorer 2 Open your network folder in the left column ...

Page 70: ...depth settings Thus depending on your system and what you are scanning you may not be able to scan at certain resolutions especially using enhanced dpi Scanning Process with TWAIN enabled Software If you want to scan documents using other software you will need to use TWAIN compliant software such as Adobe PhotoDeluxe or Adobe Photoshop The first time you scan with your machine select it as your T...

Page 71: ...face up into the ADF OR Place a single document face down on the document glass 2 From the Start menu on your desktop window select Settings Control Panel and then Scanners and Cameras 3 Double click your scanner driver icon The Scanner and Camera Wizard launches 4 Choose your scanning preferences and click Preview to see how your preferences affect the picture 5 Click Next 6 Enter a picture name ...

Page 72: ...sent by e mail uploaded to an FTP site or transferred to an external OCR system The MFP driver package is supplied with a smart and flexible installation program You don t need to search for additional components that might be necessary for the MFP software all required packages will be carried onto your system and installed automatically this is possible on a wide set of the most popular Linux cl...

Page 73: ...ck the icon at the bottom of the desktop When the Terminal screen appears type in root localhost root cd mnt cdrom Linux root localhost root install sh NOTE The installation program runs automatically if you have an autorun software package installed and configured 4 Click Install 5 When the welcome screen appears click Next 6 When the installation is complete click Finish The installation program...

Page 74: ...gurator MFP Configurator is a tool primarily intended for configuring MFP devices Since an MFP device combines the printer and scanner the MFP Configurator provides options logically grouped for printer and scanner functions There is also a special MFP port option responsible for the regulation of access to an MFP printer and scanner via a single I O channel After installing the MFP driver see pag...

Page 75: ...ies For details see page 23 Shows all of the installed printer Switches to Printer configuration Shows the status model name and URI of your printer Classes Tab The Classes tab shows a list of available printer classes Refresh Renews the classes list Add Class Allows you to add a new printer class Remove Class Removes the selected printer class Scanners Configuration In this window you can monitor...

Page 76: ...ners I O ports are being chosen by scanner drivers automatically so proper settings are applied by default Switches to MPF ports configuration Shows the port type device connected to the port and status Shows all of the available ports Configuring Printer Properties Using the properties window provided by the Printers configuration you can change the various properties for your machine as a printe...

Page 77: ... files such as color options image size or image position Device allows you to set the print resolution paper source and destination 5 Click OK to apply the changes and close the scx6x20 Properties window 6 Click OK in the Xerox LPR window to start printing 7 The Printing window appears allowing you to monitor the status of your print job To abort the current job click Cancel Printing Files You ca...

Page 78: ...s 6 Click Preview in the Scanner Properties window Click your scanner The document is scanned and the image preview appears in the Preview Pane 7 Change the scan options in the Image Quality and Scan Area sections Image Quality allows you to select the color composition and the scan resolution for the image Scan Area allows you to select the page size The Advanced button enables you to set the pag...

Page 79: ... Type drop down list 2 Click Delete The setting is deleted from the list Using the Image Editor The Image Editor window provides you with menu commands and tools to edit your scanned image You can use the following tools to edit the image Tools Function Saves the image Use these tools to edit the image For further details about the Image Editor program refer to the onscreen help Cancels your last ...

Page 80: ...stem Mac OS 10 3 x or higher RAM 128 MB Free Disk Space 200 MB Install the Printer driver 1 Make sure that you connect your printer to the computer Turn on your computer and printer 2 Insert the CD ROM which came with your printer into the CD ROM drive 3 Double click CD ROM icon that appears on your Macintosh desktop 4 Double click the MAC_Installer folder 5 Double click the MAC_Printer folder 6 D...

Page 81: ... Some printers do not support a network interface Before connecting your printer make sure that your printer supports a network interface by referring to Printer Specifications in your Printer User s Guide 1 Follow the instructions on Installing Software for Macintosh on page 27 to install the PPD and Filter files on your computer 2 Open Print Setup Utility from the Utilities folder 3 Click Add on...

Page 82: ...e menu and click Print 5 Choose the number of copies you want and indicate which pages you want to print 6 Click Print when you finish setting the options Mac OS 10 3 Make sure that your printer is selected Changing Printer Settings You can use advanced printing features when using your printer From your Macintosh application select Print from the File menu The printer name which appears in the pr...

Page 83: ... of printed characters and graphics The higher setting also may increase the time it takes to print a document Mac OS 10 3 Printing Multiple Pages on One Sheet of Paper You can print more than one page on a single sheet of paper This feature provides a cost effective way to print draft pages 1 From your Macintosh application select Print from the File menu 2 Select Layout 3 Select the number of pa...

Page 84: ...r TWAIN source in the application you use The basic scanning process involves a number of steps Place your photograph or page on the document glass or ADF Open an application such as PhotoDeluxe or Photoshop Open the TWAIN window and set the scan options Scan and save your scanned image NOTE You need to follow the program s instructions for acquiring an image Please refer to the User s Guide of th...

Page 85: ...install Linux 20 N n up printing Macintosh 30 Windows 12 O orientation print 24 Windows 7 overlay create 15 delete 15 print 15 P Paper properties set 8 paper size set 8 print 24 paper source set 24 Windows 8 paper type set Macintosh 30 print 24 Windows 8 poster print 13 print document 6 fit to page 13 from Macintosh 29 from Windows 6 N up Macintosh 30 Windows 12 overlay 15 poster 14 scaling 13 wat...

Page 86: ...9 toner save 9 true type option 9 software install Macintosh 27 Windows 4 system requirements Macintosh 27 uninstall Macintosh 27 Windows 5 system requirements Linux 19 Macintosh 27 T toner save set 9 TWAIN scan 17 U uninstall software Macintosh 27 Windows 5 uninstalling MFP driver Linux 21 W watermark create 14 delete 14 edit 14 print 14 WIA scan 18 ...

Reviews: