Security
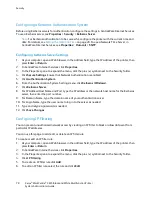
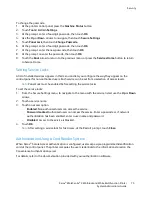
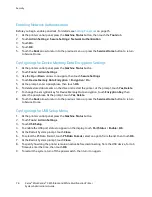
To set the IP address or host name to appear on the control panel screen:
1.
To set the IP address or host name to appear on the control panel screen, for Display Network
Information, select an option.
2.
Click
Save Changes
.
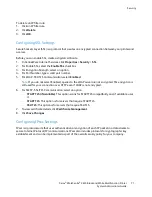
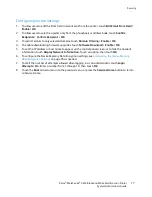
To encrypt the data on the device memory:
1.
Click the
Device Memory Data Encryption
link.
2.
For Encryption, select
On
.
3.
Enter an Encryption Key for the printer, then reenter the key.
Note:
All stored data is deleted after you change the Data Encryption Settings.
4.
Click
Save Changes
.
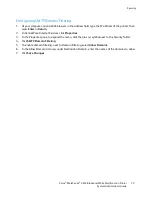
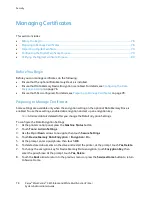
To limit the number of attempts allowed when a user logs in as an administrator:
1.
To limit the number of attempts allowed when logging in as an administrator, for Login Attempts,
select an option.
2.
Click
Save Changes
.
Network Authentication
Network Authentication is a security protocol that requires users to provide their login credentials before
they can access the printer. The printer compares the user credentials to the information stored on an
authentication server. To prove their identity, users can type their user credentials at the control panel, in
CentreWare Internet Services, or they can use a card reader.
To configure access rights using network authentication:
•
Provide information about your authentication server and configure authentication server settings.
•
Enable Panel Lock. For details, see
Managing Panel Lock
on page 74.
•
Ensure that service locks are set. For details, see
Setting Service Locks
on page 75.
•
Ensure that Network Authentication is enabled. For details, see
Configuring Secure Settings
on page
77.
To access the authentication system:
1.
In CentreWare Internet Services, click
Properties
>
Security
.
2.
Click
Authentication System
.
See also:
•
Configuring a Kerberos Authentication System
on page 69
•
Configuring Xerox Secure Access Settings
on page 68
•
Configuring LDAP Authentication
on page 68
Xerox
®
WorkCentre
®
3615 Black and White Multifunction Printer
67
System Administrator Guide


