background image

XPro - Operation Manual

9

The Meter Structure

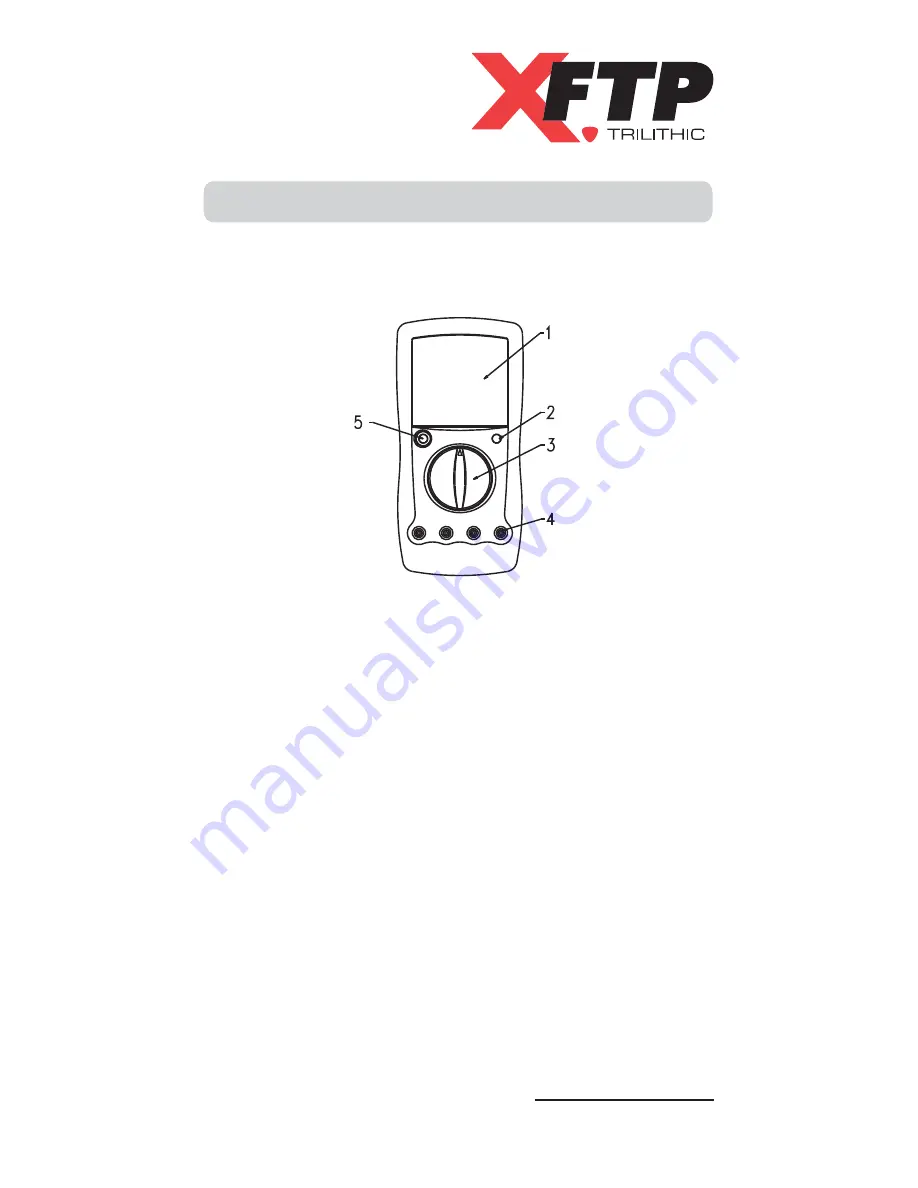
The following figure shows the structure of the Meter.

1. LCD Display

2.

HOLD

 Button

3. Rotary Switch

4. Input Terminals

5.

POWER

 Button

Summary of Contents for XPro

Page 1: ...XPro Digital Multimeter Operation Manual...

Page 2: ......

Page 3: ...Measurement 14 DC and AC Current Measurement 16 Resistance Measurement 18 Diode Measurement 20 Continuity Testing 22 Capacitance Measurement 24 Temperature Measurement 26 Transistor Measurement 27 Fr...

Page 4: ...XPro Operation Manual 2 Maintenance 37 General Service 37 Replacing the Fuse 38 Replacing the Battery 39 Warranty Information 40...

Page 5: ...can measure AC DC Voltage AC DC Current Resistance Capacitance Temperature Frequency Transistor Diode and Continuity It also includes Data Hold Full Icon Display Overload Protection and Sleep Mode fea...

Page 6: ...he Meter Check the following items carefully to see if there are any missing or damaged parts Operation Manual Test Leads Multipurpose Socket Temperature Probe 9 Volt Battery In the event that you fin...

Page 7: ...level fixed installation with smaller transient overvoltages than CAT IV Use the Meter only as specified in this operating manual otherwise the protection provided by the Meter may be impaired In this...

Page 8: ...not apply more than the rated voltage as marked on the Meter between the terminals or between any terminal and grounding The Meter is suitable for indoor use The rotary switch should be placed in the...

Page 9: ...stance continuity diodes capacitance or current Before measuring current check the Meter s fuses and turn off power to the circuit before connecting the Meter to the circuit Replace the battery as soo...

Page 10: ...out the battery when not using for an extended period Constantly check the battery as it may leak when it has been in extended use Replace the battery as soon as leaking is detected A leaking battery...

Page 11: ...XPro Operation Manual 9 The Meter Structure The following figure shows the structure of the Meter 1 LCD Display 2 HOLD Button 3 Rotary Switch 4 Input Terminals 5 POWER Button...

Page 12: ...the positions of the rotary switch Position Function C Temperature Measurement hFE Transistor Measurement AC Voltage Measurement DC Voltage Measurement AC Current Measurement DC Current Measurement Hz...

Page 13: ...e following table describes the operation of the functional buttons Button Operation Performed Power Yellow Button Turn the Meter on and off Hold Blue Button Enter and exit the hold mode In hold mode...

Page 14: ...e unit of transistor test 2 The battery is low WARNING To avoid false readings replace the battery as soon as the low battery indicator appears 3 AC Indicator for AC voltage or current The displayed v...

Page 15: ...mV V V Volts the unit of voltage mV Millivolt 1x10 3 or 0 001 Volts F nF F Farad the unit of capacitance F Microfarad 1x10 6 or 0 000001 Farads nF Nanofarads 1x10 9 or 0 000000001 Farads A mA A A Amp...

Page 16: ...ranges are 2V 20V 200V and 750V To measure DC or AC Voltage perform the following steps 1 Insert the red test lead into the HzV terminal and the black test lead into the COM input terminal WARNING To...

Page 17: ...and reduce the range step by step until a satisfactory reading is obtained The LCD displays 1 indicating the existing selected range is overloaded you must select a higher range in order to obtain a...

Page 18: ...Current ranges are 2mA 200mA 20A The AC Current ranges are 2mA 200mA and 20A To measure DC or AC current perform the following steps 1 Turn off power to the circuit Discharge all high voltage capacit...

Page 19: ...the circuit The measured value is shown on the display When performing a DC or AC current measurement please note the following If the value of current to be measured is unknown use the maximum measu...

Page 20: ...minal and the black test lead into the COM terminal 2 Set the rotary switch to an appropriate measure ment position in the range 3 Connect the test leads across with the object being measured The meas...

Page 21: ...n measured resistance value Y X accurate readings of resistance If the input terminal short circuit reading is greater than or equal to 0 5 check the test leads for any looseness or other cause For hi...

Page 22: ...t of a circuit perform the following steps 1 Insert the red test lead into the HzV terminal and the black test lead into the COM terminal 2 Set the rotary switch to 3 For forward voltage drop readings...

Page 23: ...f other pathways between the probe tips Connect the test leads to the proper terminals as said above to avoid an error display The LCD will display 1 indicating an open circuit or a wrong connection T...

Page 24: ...not sound if the resistance of a circuit under test is greater than 70 The buzzer sounds continuously if the circuit is in good condition with a resistance value less than or equal to 10 The measured...

Page 25: ...en performing a continuity test please note the following The open circuit voltage is around 3 V When the continuity measurement has been completed disconnect the connection between the testing leads...

Page 26: ...range 3 Insert the capacitor to be tested into the corresponding jack of the multipurpose socket The measured value is shown on the display WARNING To avoid damage to the Meter or to the devices unde...

Page 27: ...erloaded the Meter displays 1 To minimize the measurement error caused by the distributed capacitor the testing lead should be as short as possible For high capacitance 10 F it is normal for the test...

Page 28: ...HzV and mA terminals 2 Set the rotary switch to C The LCD will display 1 at this moment WARNING To avoid harm to you or damage to the Meter please do not attempt to input voltages higher than 60V DC o...

Page 29: ...ature probe from the multipurpose socket and remove the multipurpose socket from the input terminals Transistor Measurement To measure a transistor perform the following steps 1 Insert the multipurpos...

Page 30: ...osition in the Hz range 3 Parallel connect the test leads across the object being measured The measured value is shown on the display When performing a frequency measurement please note the following...

Page 31: ...e POWER Button two times Operation of Hold Mode To use the Hold Mode perform the following steps 1 Press the Hold Button to enter the Hold Mode 2 Press the Hold Button again to exit the Hold Mode 3 Wh...

Page 32: ...cation Fused protection for A and mA Terminal 0 5 A 250 V fast type 5 x 20 mm Maximum Display 1999 updates 2 to 3 times per second Range Manual ranging Polarity Display Automatically Overloading Displ...

Page 33: ...uracy Specified Accuracy 5 of Range in a ratio field of more than 1 V m no assigned accuracy is specified Battery Type One piece 9 V NEDA1604 or 6F22 or 006P Dimensions 179 x 88 x 39 mm Weight Approxi...

Page 34: ...Voltage Remarks Input impedance of approximately 10 M Frequency response 40 Hz 1 kHz 500 V 40 Hz 400 Hz 500 V Displays effective value of sine wave mean value response Range Resolution Accuracy Overl...

Page 35: ...ntinuous measurement 10 seconds and interval time between 2 measure ments greater than 15 minutes Range Resolution Accuracy Overload Protection 20 A 0 01 A 2 mA 1 A 20 mA 10 A 0 8 1 200 mA 0 1 mA 1 5...

Page 36: ...200 0 1 0 8 3 Test Lead Short Circuit Resistance 2 k 1 20 k 10 2 M 1 k 0 8 1 20 M 10 k 1 0 2 200 M 100 k 5 x reading 10 10 250 VAC Range Resolution Overload Protection 1 mV 250 VAC Range Resolution Re...

Page 37: ...probe Suitable for K type nickel chrome nickel silicon thermocouple accessory is a point contact K type nickel chrome nickel silicon thermocouple and is suitable for testing temperatures lower than 2...

Page 38: ...ks Overload protection Fuse 5 x 20 mm F 0 5A 250 V Frequency Remarks 100 mV rms input amplitude 30 V rms Range Resolution Accuracy hFE 1 Vce 3 V lbo 10 A 1000 MAX Range Resolution Accuracy Overload Pr...

Page 39: ...ture in the terminals can affect readings Turn the Meter off when it is not in use and take out the battery when not in use for an extended period Do not store the Meter in a place of high humidity hi...

Page 40: ...prying one end loose and then take out the fuse from its bracket 5 Install ONLY replacement fuse with the identical type and specification and make sure the fuse is fixed firmly in the bracket 6 Rejo...

Page 41: ...three 3 screws for the case bottom and separate the case top from the case bottom 4 Remove the battery from the battery connector 5 Replace with new 9 V battery NEDA1604 6F22 or 006P 6 Rejoin the case...

Page 42: ...der this Warranty and in no event shall Trilithic Inc be liable for incidental or consequential damages for any alleged breach of this Warranty This Warranty shall not apply to any part of the product...

Page 43: ......

Page 44: ...9710 Park Davis Drive Indianapolis IN 46235 317 895 3600 www fieldtechproducts com P N 0010288000 Rev 11 08...

Reviews: