background image

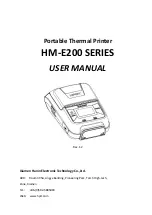
Portable Thermal Printer

HM-E200


SERIES

USER


MANUAL

Rev.1.2

Xiamen


Hanin


Electronic


Technology


Co.,Ltd.

ADD:

  Room 305A, Angye Building, Pioneering Park, Torch High-tech, 

Zone, Xiamen

Tel.:


+86-(0)592-5885993

Web:


www.hprt.com

Summary of Contents for HM-E200 Series

Page 1: ...le Thermal Printer HM E200 SERIES USER MANUAL Rev 1 2 Xiamen Hanin Electronic Technology Co Ltd ADD Room 305A Angye Building Pioneering Park Torch High tech Zone Xiamen Tel 86 0 592 5885993 Web www hp...

Page 2: ...nter could result in a fire Never attempt to repair the printer yourself Also do not disassemble or modify the product Doing so could lead to injury fire or electric shock Do not touch the tear bar Th...

Page 3: ...rinting quality may suffer if the thermal head heating element becomes soiled by being touched with your hands Do not touch the thermal head heating element There is a risk of damage to the driver IC...

Page 4: ...nce every 6 months Thermal head Dip a cotton swab in an alcohol solvent ethanol methanol or isopropyl alcohol and clean the heating area of the head Platen While turning the platen use a soft dry clot...

Page 5: ...1 Button 18 3 1 2 Panel Lamp 19 3 1 3 LCD Indication 19 3 1 4 Buzzer Description 20 3 2 Self Test 21 3 2 1 Self Test Procedure 21 3 2 2 Printing the Bluetooth Device Name and Barcode Information 21 3...

Page 6: ...ubleshooting Procedure 34 9 1 Troubleshooting Guide 35 9 1 1 Power Supply Failure 35 9 1 2 Printing Failure 35 9 1 3 Faulty Sensor 36 9 1 4 Paper Feed Failure 36 9 1 5 Error Message Printer Status ind...

Page 7: ...ing thru direct thermal printing method Print speed 110mm s Support Bluetooth Ver3 0 4 0 BLE Dual Mode Support Secure Magnetic Stripe Reader Model with Card Reader AES or 3DES encryption DUKPT Key Man...

Page 8: ...1 Printer Accessories The printer is packaged with the following accessories If any of these accessories is broken or missing please contact the dealer that you bought the product Note The AC adapter...

Page 9: ...HM E200 User Manual 3 1 2 Appearance and Components...

Page 10: ...ert or remove the battery pack 2 Insert the battery pack into the back of the printer as in the figure shown below following the direction of the arrow Press down on the battery pack until the hooks c...

Page 11: ...turn off the printer and let the battery charge until the POWER lamp goes off for fully charge Notes about the Battery Pack General Battery Characteristics The battery is a consumable and its performa...

Page 12: ...e a USB cable other than the designated USB cable Do not throw the battery into a fire place it near a flame or heating device or leave it in a hot environment under direct sunlight in a car etc Do no...

Page 13: ...ting the disposal method of the country in which this device is used If the battery pack is not in use for a long time please remove it after fully charged And it should be recharged every 3 months Wh...

Page 14: ...fault XXXXX is the last digits of the Product Serial Number Notes 1 HM E200 has two Bluetooth modes a One is Bluetooth Ver3 0 with PIN for Android or Windows system PIN and Device name can be changed...

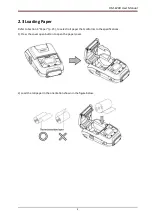
Page 15: ...3 Loading Paper Refer to Section 4 Paper p 25 to select roll paper that conforms to the specifications 1 Press the cover open button to open the paper cover 2 Load the roll paper in the orientation sh...

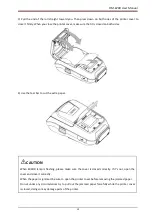
Page 16: ...Use the tear bar to cut the extra paper CAUTION When ERROR lamp is flashing please make sure the cover is closed correctly If it s not open the cover and close it correctly When the paper is jammed b...

Page 17: ...he tear bar There is a tear bar inside the paper outlet slot You could neither put your hand in the paper outlet slot while printing is in progress nor put your hand into the outlet even when printing...

Page 18: ...ter displays Enter Menu Mode then you can configure the settings 3 To switch the Menu and option parameter or return to the previous menu press MODE button 4 To move the cursor _ entry the printer mod...

Page 19: ...e LCD Press the MODE button once to switch the menu item Display 1 Self Test 2 System Setting Press and hold the FEED button for 2 seconds to get into the menu Display 1 Darkness 2 Standby Time 3 Powe...

Page 20: ...080 Sec When set the parameter to 0000 the standby time becomes invalid If set the parameter to 001 009 it will return to the previous setting so do not set it Press the MODE button twice to switch th...

Page 21: ...to get into the menu Display 0 Cancel 1 OK 0 When the setting does not need to be reset press and hold FEED button to return to the previous menu Press the MODE button 6 times to switch the menu item...

Page 22: ...3 Hex Dump Mode Hex Dump Mode 4 Previous Menu 2 System Setting 1 Density 0 Medium 1 Low 2 High 3 Special Medium 2 Standby Time Standby Time 0010 9999 Sec 60 Sec 3 Power Off Time Power Off Time 0000 99...

Page 23: ...d screw hole to attach the belt clip to the printer 2 Use a screw driver to firmly screw in the screw 2 5 2 Using the Belt Clip When the printer is attached to your belt you can use it like the pictur...

Page 24: ...put the printer into Menu Setting mode The MODE button can now be used to change Printer MODE status visible on the LCD screen for fast configuration Refer to 2 4 Menu Settings for details about mode...

Page 25: ...isplay shows alphanumeric characters 2 Content Mode Status Indicates the currently specified printer mode or error status Remaining battery power There is sufficient remaining battery power The remain...

Page 26: ...0 Paper type Receipt Black mark Front Black mark Back Out of paper 3 1 4 Buzzer Description Buzzer Status No ring Low battery Once Begin charging Press button Cover close Twice Paper out Cover open Th...

Page 27: ...1 Turn on the power while holding down FEED button 2 The printer will print the current printer status including the firmware version bluetooth information barcode information 3 The self test will fi...

Page 28: ...ill recover to the Print Ready Mode when receiving print data or button operations Press the FEED button or the MODE button and confirm that the LCD is turned on When the LCD is not turned on it is po...

Page 29: ...t if not the card cannot be read properly See correct example on Figure 3 4 2 If you hold the corner of the card it is difficult to swipe it straight so that you may fail to read the card data So hold...

Page 30: ...lot the front rear part is loose and a read error occurs If you insert a card tilted upward downward into the MSR slot the card does not move horizontally and a read error occurs If you extract a card...

Page 31: ...ting Range CAUTION 1 Do not use roll paper whose end is glued to its core because the printer will be unable to properly detect the end of the paper Also we recommend that you use roll paper that has...

Page 32: ...anual 26 4 4 Specification of Black Mark HM E200 supports black mark on both sides of the paper and the specification of black mark is illustrated by the following image Note PCS value of BM should be...

Page 33: ...00bps adjustable Data bit 8 data bit fixed Parity bit No parity fixed Stop bit 1 stop bit fixed SSP Compatible USB Bluetooth Wifi Optional Power saving Sleep mode YES Memory Flash 4MByte Character Set...

Page 34: ...r 13mm 40 5mm Recommended paper P220AG PD450 FD200 Alpha 400 2 1 Physical characteristics Operation condition 5 C to 50 C 25 to 85 RH Storage condition 30 C to 60 C 5 to 95 RH Dimension 84 4 W x 126 8...

Page 35: ...HM E200 User Manual 29 Dimensions External Dimension 84 4mm W x 126 8mm D x 51 5mm H Weight 237g including battery pack...

Page 36: ...6 Detailed Specification Item Specification Hardware specification MCU 32bits RISC FLASH 256K bytes RAM 48K Bytes Bluetooth frequencies 2 402 2 48 GHz Bluetooth module basic clocking 40MHz Bluetooth o...

Page 37: ...ttery Charge HM E200 printer has a USB interface for Battery charging and is connected by means of 5pin micro USB socket In the following table the signals present on the micro USB socket are listed P...

Page 38: ...0 BLE Dual Mode Frequency Range 2 4GHz ISM band Data Transmission Rate 115200bps adjustable Data Bit 8 data bit fixed Parity Bit No parity fixed Stop Bit 1 stop bit fixed SSP Compatible PIN code 1234...

Page 39: ...HM E200 User Manual 33 8 Specifications of Accessories 8 1 Battery Pack 3 7V 1300mAh Rechargeable Lithium ion Safety Approvals PSE 8 2 Belt Clip...

Page 40: ...all the corresponding items into consideration This allows you to specify a hidden defective part Cause Lists as many possible causes as possible Guess a trouble cause out of them and take its check...

Page 41: ...the thermal head connector Check connection of the thermal head connector Connect the thermal head cable to connector properly Printer cover one side close Close printer cover correctly Faulty thermal...

Page 42: ...or feed irregularly The printer cover is not closed properly Close the printer cover properly Faulty connection of the motor connector Check connection of the motor connector Connect the motor cable t...

Page 43: ...e LCD Message Description of failure message Remark Cover Open Printer cover is not closed properly Close printer cover properly Out of Paper Empty paper Replace the roll paper High Temperature Therma...

Page 44: ...es and can radiate radio frequency energy and if not installed and used in accordance with the instructions may cause harmful interference to radio communications However there is no guarantee that in...

Reviews: