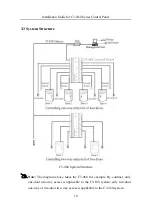
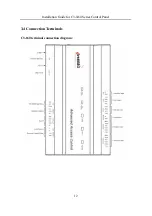
background image


Installation Guide for C3-X60 Series Access 
Control Panel 


Version: 

1.0 

Date: 

April, 2011 


About This Manual 

This manual is a guide to installation and connection of the C3-X60 series access 

control panel. For software using direction of the product, please refer to the user 

manual


Summary of Contents for C3-X60 Series

Page 1: ...ccess Control Panel Version 1 0 Date April 2011 About This Manual This manual is a guide to installation and connection of the C3 X60 series access control panel For software using direction of the pr...

Page 2: ......

Page 3: ...6 3 Connection and Installation 8 3 1 Panel Box Installation 8 3 2 Installation and Wiring 9 3 3 System Structure 10 3 4 Connection Terminals 12 3 5 Connection with External Accessories 16 3 6 Connect...

Page 4: ......

Page 5: ...lest the equipment should fall and get damaged and more undesirably cause severe personal injuries Therefore it is important to install the equipment as instructed by the manufacturer 4 All periphera...

Page 6: ...sonnel must use only the substitutes specified by the manufacturer 9 Security inspection After the equipment is repaired the repair personnel are supposed to conduct security inspection to ensure the...

Page 7: ...ommended not to connect any other auxiliary devices without permission Before all non routine operations must communicate with our engineers in advance 5 A control panel should not share one power sup...

Page 8: ...tromotive force generated by an electronic lock at the instant of switching off on it is necessary to connect a diode in parallel please use the FR107 delivered with the system with the electronic loc...

Page 9: ...y or four door one way access control A maximum of 30 000 card holders and 100 000 offline event records Support of multiple Wiegand card formats and a password keypad compatible with various types of...

Page 10: ...ange materials Outline dimensions of the control panel 185 1mm length 106mm width 36mm thickness for C3 160 260 226mm length 106mm width 36mm thickness for C3 460 External box dimensions 400mm 330mm 9...

Page 11: ...yellow green Flash state indicates it is sending or receiving data through RS485 communication 5 CARD indicator yellow Flash state indicates card is punched on reader See the indicators in the followi...

Page 12: ...3 Connection and Installation 3 Connection and Installation 3 1 Panel Box Installation Installation steps for the control panel Appearance and Internal of the panel box 8...

Page 13: ...n make sure the power supply is disconnected Any operation with power connected will cause severe damage to the equipment 2 The access control wires must be separated according to heavy and light curr...

Page 14: ...System Structure C3 460 System Structure Note The diagram above takes the C3 460 for example By contrast only one door two way access is applicable to the C3 160 system only two door one way or two do...

Page 15: ...munication wires should be kept away from high voltage wires as far as possible and should be neither routed in parallel with nor bundled with power wires A management workstation is actually a PC con...

Page 16: ...Installation Guide for C3 X60 Series Control Panel 3 4 Connection Terminals C3 160 terminal connection diagram 12...

Page 17: ...3 Connection and Installation C3 260 terminal connection diagram 13...

Page 18: ...Installation Guide for C3 X60 Series Control Panel C3 460 terminal connection diagram 14...

Page 19: ...set through relevant access control software Please see the respective software instructions for details Terminals on the C3 control panel No Functional Port C3 160 One Door Two Way C3 260 Two Door Tw...

Page 20: ...exit button is a switch installed indoors to open a door When you press the button the door will be opened An exit button is fixed at a height of about 1 4 meter above the ground Ensure it is located...

Page 21: ...essories Note The diagram above takes C3 460 for example By contrast C3 160 provides one auxiliary input interface C3 260 provides two and C3 460 provides four 3 6 Connection with Readers The control...

Page 22: ...ader connection First of all set the 485 address device number of reader by software DIP switch or keypad method Such as the reader 1 2 the odd number is for enter reader and the even number is for ex...

Page 23: ...ernal power supply is needed A reader should be installed at a height of about 1 4 meter above the ground and at a distance of 30 50mm away from a door frame Connection between C3 460 and Readers 3 7...

Page 24: ...that are unlocked when power is connected and locked when power is disconnected that is NO lock The COM and NC terminals are applicable to the locks that are locked when power is connected and unlocke...

Page 25: ...3 Connection and Installation 1 Wet mode External power supply for NO Lock 2 Wet mode External power supply for NC Lock 21...

Page 26: ...Installation Guide for C3 X60 Series Control Panel 3 Dry mode External power supply for NO Lock 4 Dry mode External power supply for NC Lock 22...

Page 27: ...3 Connection and Installation 5 Dry mode NO Lock under the binary value control 6 Dry mode NC Lock under the binary value control 23...

Page 28: ...Installation Guide for C3 X60 Series Control Panel 3 8 System Power Supply Structure An access control operator panel is powered by 12V DC Generally to reduce 24...

Page 29: ...nd electronic locks should be powered respectively To prevent power failure of a control panel from making the whole system unable to work normally the access control management system is usually requ...

Page 30: ...r sensor are recommended 5 Other control cables like exit buttons are all made of 2 core wires RVV 2 0 5mm2 6 Notes for wiring Signal wires like network cables and RS 485 wires can neither run in para...

Page 31: ...method Reliable large diameter ground wires in compliance with applicable national standards are needed on the wiring site and should be connected in a tree form to avoid DC loop These ground wires m...

Page 32: ...achieve a better shielding effect by reducing signal reflection during communications 2 A single 485 bus can be connected with 63 access control operator panels at most but preferably should be connec...

Page 33: ...below put number 8 of the DIP switches of the first and last control panels to ON position RS485 Communication System Networking 4 4 DIP Switch Settings 1 485 address setting Number 1 6 of the DIP swi...

Page 34: ...ess No 1 2 4 8 16 32 01 ON OFF OFF OFF OFF OFF 02 OFF ON OFF OFF OFF OFF 03 ON ON OFF OFF OFF OFF 04 OFF OFF ON OFF OFF OFF 05 ON OFF ON OFF OFF OFF 06 OFF ON ON OFF OFF OFF 07 ON ON ON OFF OFF OFF 08...

Page 35: ...ON ON ON OFF 29 ON OFF ON ON ON OFF 30 OFF ON ON ON ON OFF 31 ON ON ON ON ON OFF 32 OFF OFF OFF OFF OFF ON 33 ON OFF OFF OFF OFF ON 34 OFF ON OFF OFF OFF ON 35 ON ON OFF OFF OFF ON 36 OFF OFF ON OFF...

Page 36: ...ON ON ON ON ON 63 ON ON ON ON ON ON 2 Restoring factory setting The silk screened 7 number 7 of the DIP switch is the switch for restoration of system settings The switch is set to OFF by default Whe...

Page 37: ...4 System Networking 33...

Reviews: