background image

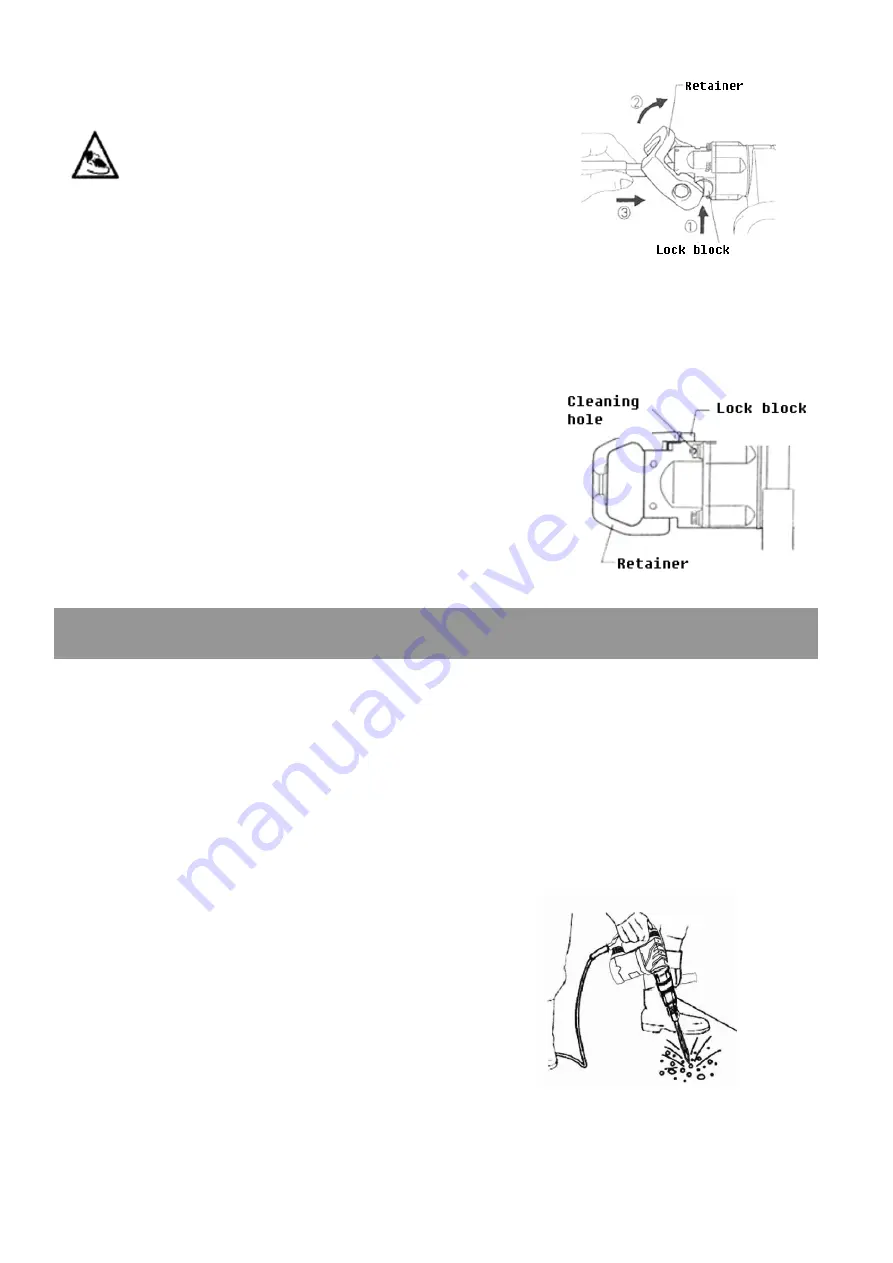
Mounting tool bits


Warning: before do it, make sure unplug the machine! 

(1) 

Please properly press the lock block;


(2) please insert the bit as picture showing


(3) put the bit into the bottom, then loose the 
      lock block and turning the retainer as picture's   

opposize direction. 
After assembly, pull the bit with force tosure   
that have be correctly assembly. 

 
To disassembly, just press the lock block then turn the retainer as picture showing. 


(remark

all of above operation must on the condition thatthe temperature is not so 

high to injur your skin) 
 
When lock block is difficult to operate just   
clean the remains and add some oilfrom the 
  cleaning hole, then turn a few times. 


Prior to operation


1. Power source 

Ensure that the power source to be utilized conforms to the power requirements which specified 

on the name plate of the hammer. 
2. Power switch 

Ensure that the power switch is in the position of OFF. If the plug is connected to power 

receptacle while the power switch is in ON position, the demolition hammer will start operation 
immediately, which can cause serious accident! 
 

Operation 

1. Switch action 
To start the tool, simply pull the trigger.   
Release the trigger to stop, for continuous 
Operation, pull the trigger and then push in 
The lock button, to stop from the locked   
Position, just press the trigger fully, then   
Release it. 
2. Operate this demolition hammer by utilizing extra pressure. The performance will be better if it is 
pressed properly against the work surface.   

4. Operation


Summary of Contents for XP-45HD

Page 1: ... the machine works and how it should be operated Maintain the machine in accordance with the instructions and make certain that the machine work correctly please store this instriation and other enclosed documents with the machine together Bj 2013 Zhejiang Xinpu Industrial Commercial Co Ltd 106 No 330 National Road Huajie Industrial Zone Yongkang City Zhejiang 321300 P R China ...

Page 2: ...oltage AC 230V Frequency 50Hz Input power 1200W Impact rate 3000 min Weight 5 96kg Impact energy 12J Bit lock style 17mm hexagon flat shank lock system Sound pressure values in accordance with 2000 14 EC 89dB A Guaranteed Sound power values in accordance with 2000 14 EC 105dB A Vibration Main handle ah Cheq 25 78 m s2 K 4 26m s2 Auxiliary handle ah Cheq 10 42m s2 K 1 5m s2 Standard accessories Hex...

Page 3: ...attachments used may present risk of injury 1 Point chisel Hexagon size17 280 length Unit mm 2 Flat chisel Hexagon size17 280 length Unit mm 3 Big flat chisel Hexagon size17 280 length 50Cutting width Unit mm 4 Tine spade Hexagon size17 500 length Unit mm 5 Groove chisel Hexagon size17 280 length Unit mm 6 4PCS KITS Hexagon size17 280 length Unit mm 7 Lubricate grease one box 30g ...

Page 4: ...l in case of nonobservance of the instruction in this manual Indicate electrical shock hazard Immediately unplug the plug from the main electricity in the case that the cord gets damage and during maintenance Wear ear and eye protection Faulty and or discarded electrical or electronic apparatus have to be collected at the appropriate recycling location The guaranteed Noise Value according to Noise...

Page 5: ...ric shock if your body is earthed or grounded c Do not expose power tools to rain or wet conditions Water entering a power tool will increase the risk of electric shock d Do not abuse the cord Never use the cord for carrying pulling or unplugging the power tool Keep cord away from heat oil sharp edges or moving parts Damaged or entangled cords increase the risk of electric shock e When operating a...

Page 6: ...ing power tools Such preventive safety measures reduce the risk of starting the power tool accidentally d Store idle power tools out of the reach of children and do not allow persons unfamiliar with the power tool or these instructions to operate the power tool Power tools are dangerous in the hands of untrained users e Maintain power tools Check for misalignment or binding of moving parts breakag...

Page 7: ...10 When chipping into walls floors or wherever live electrical wire may be encountered DON T TOUCH ANY METAL PARTS OF THE TOOL Hold the tool by the insulated grasping surface to prevent electric shock if you chip into a live wire 11 Don t touch the BIT OR PARTS CLOSE TO THE BIT immediately after operation they may extremely hot and could burn your skin 12 Any damage and abnormal happen please stop...

Page 8: ...e then turn a few times Prior to operation 1 Power source Ensure that the power source to be utilized conforms to the power requirements which specified on the name plate of the hammer 2 Power switch Ensure that the power switch is in the position of OFF If the plug is connected to power receptacle while the power switch is in ON position the demolition hammer will start operation immediately whic...

Page 9: ...ver tightly And assembly the disassembled parts correctly 4 Clean the machine Maintenance and inspection Before do any maintenance ensure unplug the plug 1 Inspecting the demolition hammer Use a dull accessory such as bull point cutter etc will cause motor malfunction and efficiency degraded Replace with a new one when your accessory is abased 2 Inspecting the mounting screws Regularly inspect all...

Page 10: ...d holder correctly and tightly 6 Cleaning Clean the machine regularly with a soft cloth preferably after each use Solvent such as gasoline thinner alcohol etc These kind of chemical materials are not allowed to use water or soap are recommended 7 Warranty For the condition of warranty please refer to the separately provided warranty card Environment Faulty and or discarded electrical or electronic...

Page 11: ...s validity Machine Description Demolition Hammer Machine Type XP 45HD Applicable EC Directive EC Machinery Directive 98 37 EC EC Low Voltage Directive 2006 95 EC EC Directive of Electromagnetic Compability 89 336 EEC amended by 93 68 EEC Noise Directive 2000 14 EC amended by 2005 88 EC Applicable Harmonized Standards EN 60745 1 2006 EN 60745 2 6 2003 A1 A11 EN55014 1 2000 A1 A2 EN55014 2 1997 A1 E...

Page 12: ......

Page 13: ......

Reviews: