background image


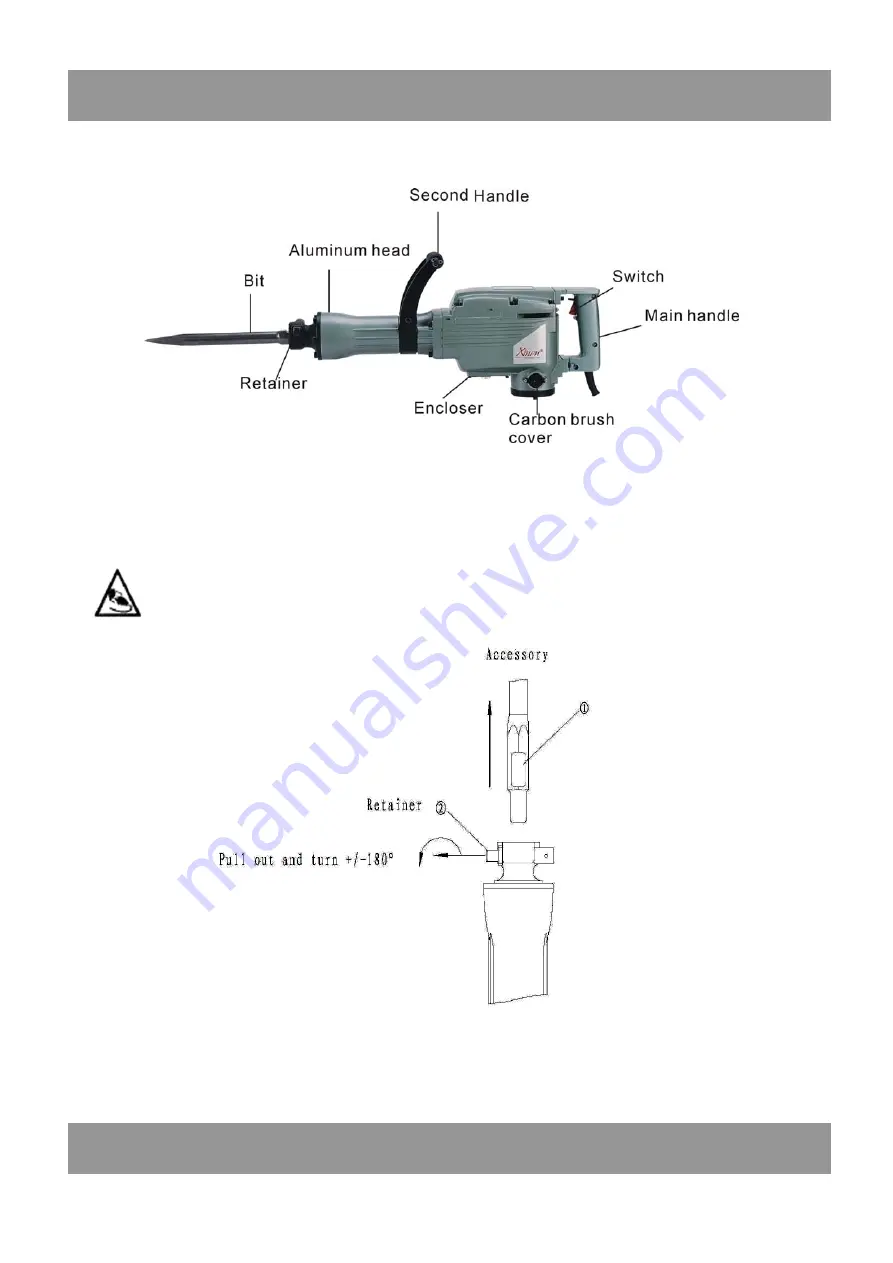
Name of the parts


Mounting tool bits


Warning: before do it, make sure unplug the machine! 

(1) Pull out of the retainer "2",  turning 180

  clockwise or anticlockwise, insert the 

accessory shank portion"1" into the hole on the front cover.   

(2) Turning the retainer back into original position. 


Remarking:

 When you removing the accessory, such as a bull point, a cutter etc.., follow above 

procedure in reverse order. 


3. Assembly


4. Operation


Summary of Contents for XP-65RA

Page 1: ...read though these HANDLING INSTRUCTIONS Ensure that you know how the machine works and how it should be operated Maintain the machine in accordance with the instructions and make certain that the mac...

Page 2: ...ion 2 Safety instruction 3 Assembly 4 Operation 5 Maintenance Technical specifications Machine Type XP 65RA Voltage AC 230V Frequency 50Hz Input power 1240W Impact rate 1400 min Weight 16 2kg Impact e...

Page 3: ...sent risk of injury 1 Point chisel Hexagon size30 410 length Unit mm 2 Flat chisel Hexagon size30 410 length Unit mm 3 Big flat chisel Hexagon size30 410 length 50Cutting width Unit mm 4 Groove chisel...

Page 4: ...mm Tooth high 8mm Length width 60 60mm 9 Tamping plate Shank Hexagon size30 394 length Unit mm Length width 150 150mm 10 Big flat spade Shank Hexagon size30 296 length Unit mm Length width 170 150mm 1...

Page 5: ...se of nonobservance of the instruction in this manual Indicate electrical shock hazard Immediately unplug the plug from the main electricity in the case that the cord gets damage and during maintenanc...

Page 6: ...of electric shock b Avoid body contact with earthed or grounded surfaces such as pipes radiators ranges and refrigerators There is an increased risk of electric shock if your body is earthed or groun...

Page 7: ...not use the power tool if the switch does not turn it on and off Any power tool that cannot be controlled with the switch is dangerous and must be repaired c Disconnect the plug from the power source...

Page 8: ...ning itself operate tool only when hand held 9 Don t point the tool to anybody for the bit could fly out in case 10 When chipping into walls floors or wherever live electrical wire may be encountered...

Page 9: ...tainer 2 turning 180 clockwise or anticlockwise insert the accessory shank portion 1 into the hole on the front cover 2 Turning the retainer back into original position Remarking When you removing the...

Page 10: ...perly force against the work surface Note Sometimes the power tool does not begin the striking the stroke even the motor keep running because oil inside become thick If the power tool is used at a low...

Page 11: ...heart of the machine please avoid any damage to the winding or any water and oil to wet it 5 Carbon brush replacements Carbon brushes are consumable parts when it becomes worn or limit worn it can ca...

Page 12: ......

Page 13: ......

Reviews: