background image

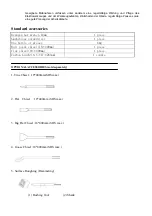
6. Tamping (Hammering) 


           (1) Rammer                       (2) Shank (150 x 150 mm) 
Optional accessories are subject to change without notice. 


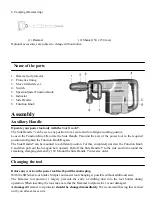
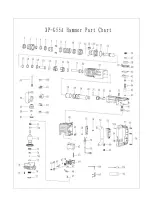
  Name of the parts 

     
1.


Hammer rod protector 

2.


Protective lining   

3.


Move limited sleeve 

4.


Switch 

5.


Speed Adjuster Function Knob 

6.


Indicator 

7.


Side Handle 

8.


Function Knob 


Assembly


Auxiliary Handle 

Operate your power tool only with the 

Side Handle

7.


The Side Handle 

7

 can be set to any position for a secure and low-fatigue working posture. 

Loosen the Function Knob 

8

, rotate the Side Handle 

7

 around the axis of the power tool to the required 

position and tighten the Function Knob 

8

 again. 

The Side Handle

7

 can be mounted to a different position. For this, completely unscrew the Function Knob 

8 and then pull out the hexagon bolt upward. Pull off the Side Handle 

7

 to the side and turn around the 

remaining clamping element by 18

0

Mount the Side Handle 

7

 in reverse order. 


Changing the tool 

 
Before any work on the power tool itself, pull the mains plug. 

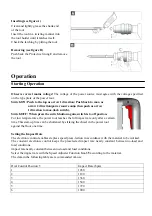
With the SDS-max tool holder. Simpler and easier tool changing is possible without additional aids.   
The Hammer rod protector 1 largely prevents the entry of drilling dust into the tool holder during 
operation. When inserting the tool, take care that the Hammer rod protector 1 is not damaged. 

A damaged 

Hammer rod protector

 should be changed immediately. 

We recommend having this carried 

out by an after-sales service. 


Summary of Contents for XP-G55A

Page 1: ...achine works and how it should be operated Maintain the machine in accordance with the instructions and make certain that the machine work correctly please store this instriation and other enclosed documents with the machine together Bj 2013 Zhejiang Xinpu Industrial Commercial Co Ltd 106 No 330 National Road Huajie Industrial Zone Yongkang City Zhejiang 321300 P R China ...

Page 2: ... tools Unmodified plugs and matching outlets will reduce risk of electric shock b Avoid body contact with earthed or grounded surfaces such as pipes radiators ranges and refrigerators There is an increased risk of electric shock if your body is earthed or grounded c Do not expose power tools to rain or wet conditions Water entering a power tool will increase the risk of electric shock d Do not abu...

Page 3: ...er tool will do the job better and safer at the rate for which it was designed b Do not use the power tool if the switch does not turn it on and off Any power tool that cannot be controlled with the switch is dangerous and must be repaired c Disconnect the plug from the power source before making any adjustments changing accessories or storing power tools Such preventive safety measures reduce the...

Page 4: ...d lead to loss of control over the power tool Do not use the power tool with a damaged cord Do not touch the damaged cord and pill the plug from the outlet when the cord is damaged while working Damaged cords increase the risk of an electric shock Connect power tools that are used in the open via a Ground Fault Circuit Interrupter GFCL Ear hearing protection Exposure to noise can cause hearing los...

Page 5: ...bration Main handle ah Cheq 16 978 m s2 k 1 5m s2 Auxiliaryhandle ah Cheq 15 940m s2 k 1 5m s2 Protection class Ⅱ The values given are valid for nominal voltages U of 220 240V For lower voltages and models for specific countries these values can vary Hinweis Die Schall und Vibrationswerte wurden gemessen gemäß EN 60745 1 und EN 60745 2 6 Hinweis Der angegebene Vibrationswert ist nach einem genormt...

Page 6: ...d accessories Hexagon bar wrench 10mm 1 piece Amphibious screwdriver 1 piece One bottle of grease 60g Bull point chisel 18 400mm 1 piece flat chisel 18 400mm 1 piece Carbon brush 6 5 17 26 mm 1 couple OPTIONALACCESSORIES sold separately 1 Tine Chisel 18 400mm SDS max 2 Flat Chisel 18 400mm SDS max 3 Big Flat Chisel 18 400mm SDS max 4 Goose Chisel 18 400mm SDS max 5 Surface Roughing Hammering 1 Bus...

Page 7: ...b 8 again The Side Handle7 can be mounted to a different position For this completely unscrew the Function Knob 8 and then pull out the hexagon bolt upward Pull off the Side Handle 7 to the side and turn around the remaining clamping element by 180 Mount the Side Handle 7 in reverse order Changing the tool Before any work on the power tool itself pull the mains plug With the SDS max tool holder Si...

Page 8: ...OFF When press the switch button again switch is to off positon For low temperatures the power tool reaches the full impact rate only after a certain time This start up time can be shortened by striking the chisel in the power tool against the floor one time Setting the Impact Rate The electronic control enables stepless speed press lection in accordance with the material to be worked The constant...

Page 9: ...tilation slots clean A damaged dust protection cap should be changed immediately We recommend having this carried out by an after sales service Indicator 6 When the carbon brushes are worn out the power tool switches itself off This is indicated approx 8 hours beforehand by the lighting or blinking of the indicator 6 The power tool must then be sent to an after sales service agent Addresses are li...

Page 10: ......

Page 11: ......

Reviews: