Quick Installation Guide for XR300 Models
The Xirrus XR320 is a 2x2 802.11ac indoor wall access point (AP) with two fixed-band radios: one 5 GHz radio and
one 2.4 GHz radio. It includes an Ethernet wall switch with four 10/100/1000 ports, one of which may supply
power.
Preparation
Run a data uplink cable (Cat5e/Cat6) for the 1 Gigabit uplink port.
Supply power—typically via IEEE 802.3af/at Power over Ethernet (PoE) on the same cable as the data uplink.
The total PoE uplink cable length must be no more than 100 m, including all cable segments. The Array must
be connected to PoGE networks without routing cables to the outside plant.
If you supply 802.3at PoE power to the uplink port, then you may use the XR320’s LAN4-PoE switch port to
supply 802.3af power and data to another device.
Alternatively, power may be supplied through a local 48 VDC power adapter (sold separately).
Pass-through port—this simply provides an Ethernet pass-through connection (with or without POE) from the
back of the unit to a port on the side of the XR320.
LAN ports—these four switch ports on the bottom of the XR320 allow you to provide Ethernet connectivity to
other devices. LAN4-PoE supplies 802.3af PoE, if a 48 VDC power adapter is used (
below), or if 802.3at
PoE power is supplied as described above.
Wall Installation
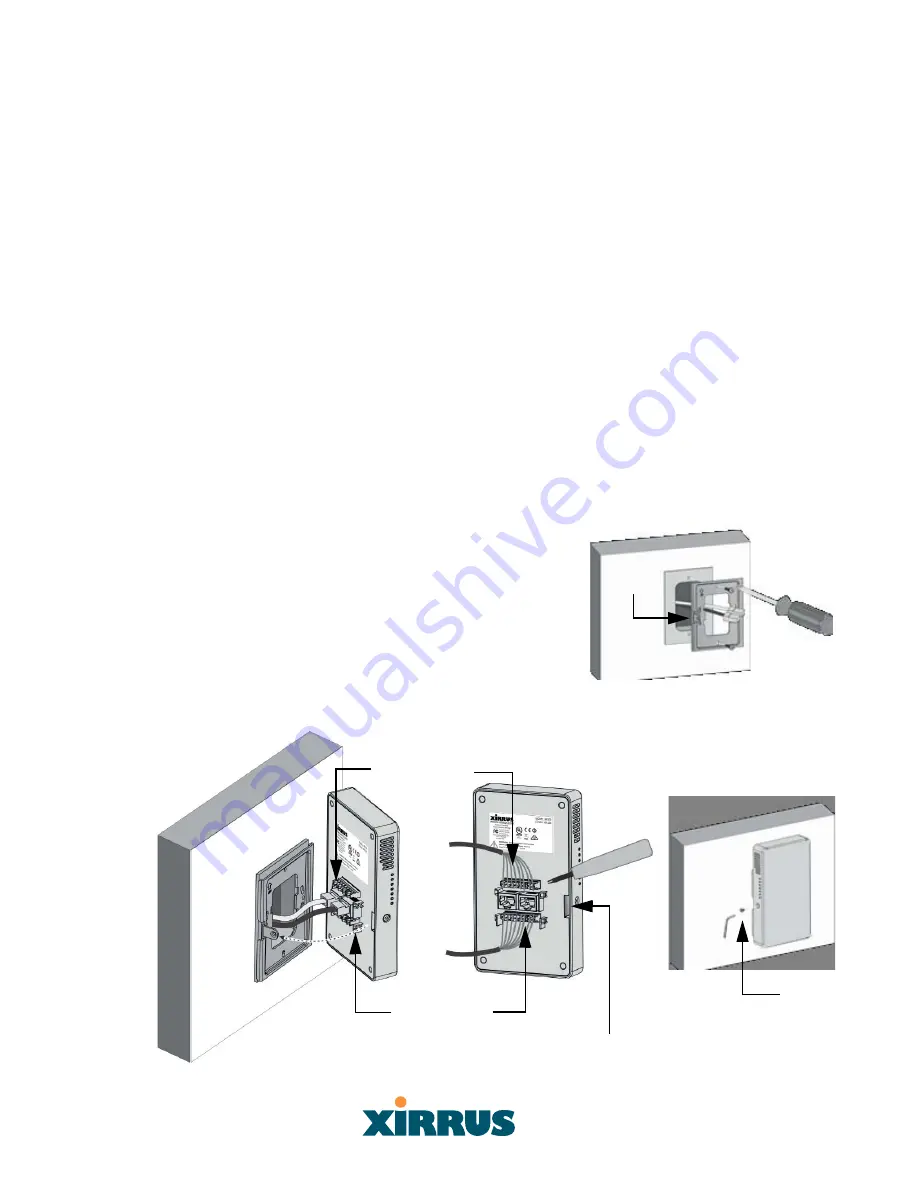
Figure 1
Locking
tab
XR-300 Series Access Points (APs) should be mounted on an inside wall.
1.
Remove the blank wall plate from the wall with a screwdriver.
2.
As shown in
, feed the Uplink (PoE) and Pass-through cables
through the opening in the supplied mounting bracket and secure the
bracket to the wall using the two screw holes previously occupied by
the blank wall plate. Ensure that the “UP” label is at the top, and that
the tab for the locking screw is on the left facing towards you.
Locking slot
Pass-through
Uplink PoE
Figure 2
A
B
C
Install
Locking Screw


