background image

1

2

1

1

2

Installation Instruction

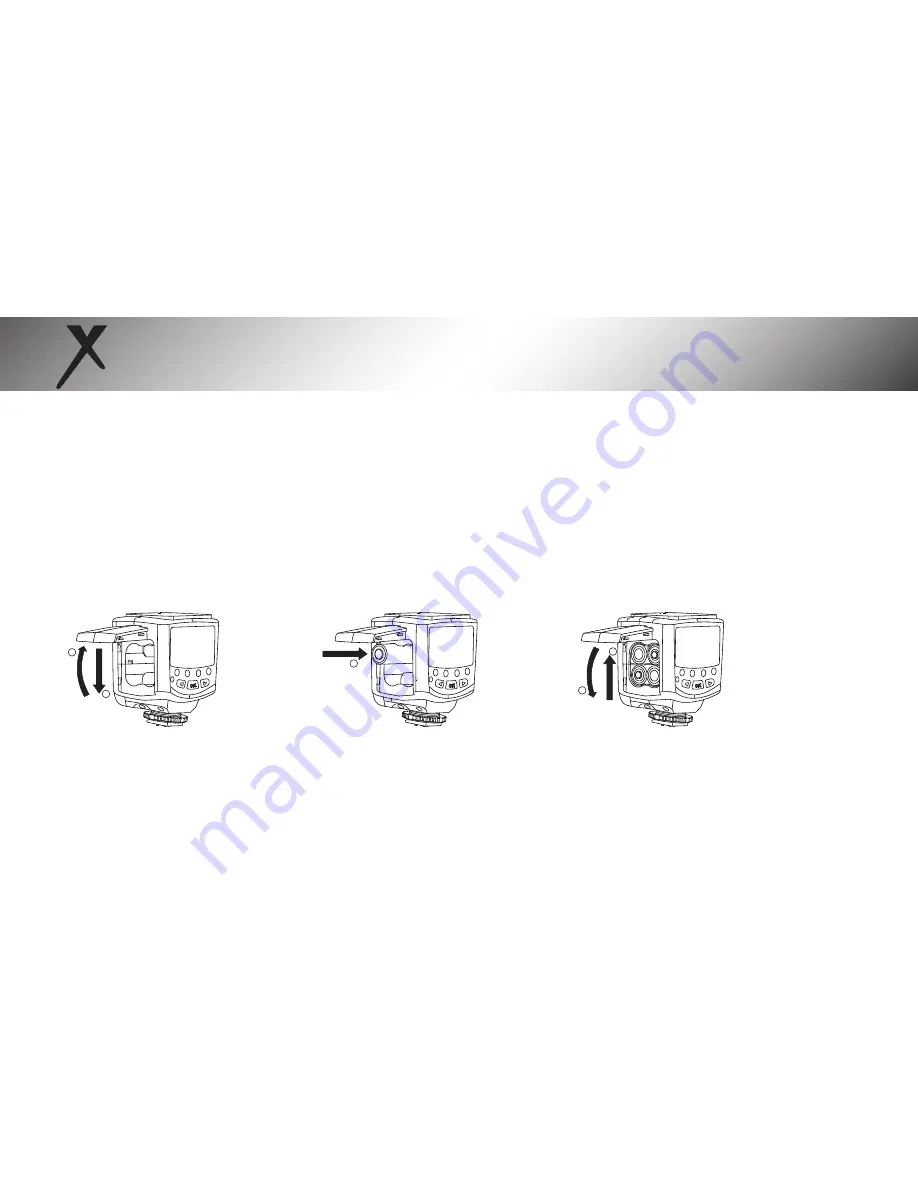
1. Install Batteries
Slide the batteries chamber’s cover in the direction of the arrow. Insert the 
batteries according to the label inside battery chamber.Make sure the 
direction of the batteries’ polarity is correct. Close the battery chamber cover
 in the direction of the arrow.

-6-

Summary of Contents for XTDF18

Page 1: ...Item XTDF18 INSTRUCTION MANUAL Universal High Power Auto Focus Digital SLR Flash wide angle diffuser reflection board D SLR designed for ...

Page 2: ...a doctor immediately when it occurs 5 To avoid possible injury to eyes do not use the flash light on the people who need a hight degree of attention 6 Please take out the batteies and stop using immediately in case of below This product is dropped or shocked seriously and the inner part of the product is bared If this battery leaks corrosive liquieds please take out the battery with golves The pro...

Page 3: ... speed of charging recycle It only takes 4 seconds in charging The improved power saving mode In the power saving mode the flash will get automatic sleeping The brightness of the fine control The brightness is more refined 8 levels of output control 1 128 1 1 every level have six fine adjustment cooperate different zoom valule to get the flash effects what s you demind for 2 ...

Page 4: ...1 2 3 4 5 6 7 8 Nomenclature 1 Reflection board 2 Wide angle diffuser 3 Flash head 4 Wireless sensor 5 Battery compartment cover 6 Hot shoe stand 7 Fixed dial 8 Contacts 9 Locking pin 3 ...

Page 5: ...M S1 S2 ZOOM PILOT MODE ZOOM ON OFF 9 10 11 12 13 14 15 16 17 18 24 28 35 50 70 85 mm Nomenclature 4 ...

Page 6: ...ss 14 Charging indicator Test button The lighting of green light shows that charging process is finished and flash can be used the lighting of red light shows that it is in charging the alternate flashing of the green lights shows overheat protection The red ligh blinking shows that shortage of power 15 Power adjust button The output power of the flash light can be adjusted through left button 16 ...

Page 7: ...Slide the batteries chamber s cover in the direction of the arrow Insert the batteries according to the label inside battery chamber Make sure the direction of the batteries polarity is correct Close the battery chamber cover in the direction of the arrow 6 ...

Page 8: ...urning it in the direction of the arrow b Slide the speedlite hot shoe stand into the camera hot shoe stand until it stops Turn the locking ring in the direction of the arrow tighten c To detach the speedlite loosen the locking ring by turning it in the oppo site direction 7 ...

Page 9: ...his button The mode of the flash light will be switched among the M S1 S2 in circle for each press The output power and focus of the flash light can be adjusted through these buttons Power fine adjust SET button ZOOM button Please press Zoom Button into the fine adjust state and cooperate left and right button for adjust focus range The head focus of the flash light will switch among the 24 28 35 ...

Page 10: ...ht is lit The green light is lit The green lights blink alternatively The Flash ligth is fully charged and can be used The Flash ligth has not been fully charged The Flash ligth is locked to prevent overheating due to frequent flashing Normal If the red light is lit for 20 seconds replace the batteries Wait indicator to be green 9 The red lights blink alternatively Long time charged shortage of po...

Page 11: ...to flash Then you need to replace with new batteries You may press the testing button PILOT to test whether the flash works normally After use hold the power switch for 2S to power off 3 M Mode In M mode you can set the flash output level as you like you can adjust the flash output level The adjustment range of the flash output level is 1 128 1 1 There are 8 levels of output and each level has 6 f...

Page 12: ...flash synchronously iwth the result consist ent with the use of radio slave To use this mode correctly the master flash should be set at manual flash and the TTL falash system with prefligth function and the red reduction function with mult iple flashes should not be used S2 mode It is also called pre flash cancel mode This mode is similar with S1 mode but it can neglect the pre flash given by Ttl...

Page 13: ...ts overheating protection funciton will be triggered the red and green lights of the charging indicator will blink alternatively and the flash light will be locked in such case wait indicator to be green then cancel the protection before continuing the use Please try to use the 1 4 output or lower when rapid shooting is needed to prevent the effect on the shooting 12 ...

Page 14: ...n zoom will chang green light when focus adjust status Pressing and the covered focus lenght of the flash will switch of 24 28 35 50 70 85mm In setting the flash zooming position the indicator in the operational panel will indicate the currentposition The focus length showed by the displayed position can be found in the table below represents ON state of indicator s light while represents OFF stat...

Page 15: ... fine adjust function Press the SET button Among two power indicator lights up through the left and right key for fine tuning every time fine tuning value one third When make sure the parameters then press SET key again can save and quit or after 15 seconds later Automatic save and exit ...

Page 16: ...outdoor state The Wireless triggering distance is as long as 10 15M Please keep in mind the following tips the wireless triggering window needs to face the master flash and the direct sunlight shall be avoided If these demands conflict with your hoped direction of light irradiation please try to rotate the flash head in each direction in order to meet the shooting demands Before placing of the sla...

Page 17: ...ould be even and white inorder to get efficient reflection if the refl ection surface is not white clor cast may appear in photo 4 Use Reflection Board to Take Photos With the reflection board flash draw the reflection board and the wide angle diffusion board out from the light head at the same time and then push the wide angle diffusion board back In such case if this product is being used to tak...

Page 18: ...ffuser Pull out the wide angle diffusion board push back the reflection board and arrange them as per the figure Iin such case the flash scopes will extent to 18 mm and the flash effect will be softer and more natural 17 ...

Page 19: ...s Net weight ccessories 56 meters ISO 100 85mm M S1 S2 0 90 degrees 0 270 degrees 4XAA size batteries Alkaline or Ni MH are usable 100 1500 times AA alkaline cell used approx 4s 5600k 1 500s 1 20000s 8 levels of output control 1 128 1 1 every level have six fine adjustment hot shoe 20 30m indoor 10 15m outdoor Power saving mode and over heat proteciton 165x74 6x59 2mm 250g Flash light 1 protecting...

Page 20: ... 9 24 87 7 8 8 28 9 11 36 1 12 5 41 13 5 44 3 15 5 50 9 17 55 8 6 3 20 7 7 8 25 6 8 8 28 9 9 5 31 2 11 36 1 12 39 4 4 4 14 4 5 5 18 6 3 20 7 6 8 22 3 7 8 25 6 8 5 27 9 3 1 10 2 3 9 12 8 4 4 14 4 4 8 15 7 5 5 18 6 19 7 2 5 8 2 3 2 10 5 3 1 10 2 3 4 11 2 3 9 12 8 4 3 14 1 2 5 8 2 2 7 8 9 3 2 10 5 3 7 12 1 4 4 14 4 4 7 15 4 105 36 118 1 26 2 86 18 5 60 7 13 1 43 9 3 30 5 6 5 21 3 4 6 15 1 5 1 16 7 Co...

Page 21: ... in relation to falsh are proper 4 Vignetting appears in photos or only part of the subject is illuminated Please check the current coverage of focus length and make sure if the lens focus length exceeds the coverage range of the falsh The products s zooming range is 24 105mm of the medium format system you can try to pull out the wide angle diffuser to expand the flash range 5 The flash light is ...

Page 22: ......

Reviews: