9
Basic Operations
Press [ ] key on the remote control to show the
home page.
1. Press [
▲
]/[
▼
]/[
t
]/[
u
] key to select an
application;
2. Press [
OK
] key to run the application;
3. Press [
] key to return to previous page;
★
Special Tips
The operations in smart mode are complicated.
The user can install Apps with different operation
methods, and the operations described in this manual
are for reference only. Part of applications need
external equipment to run normally. Certain functions
are invalid from the remote control. For more
convenient operation, please operate with USB mouse
and keyboard.
Quick Start
Before using this device, please get familiar with
the operations below for better experience.
Mouse Control
1. Click: Click the mouse and release immediately;
2. Press and hold: Click the mouse and hold for at
least three seconds;
3. Clicking the left mouse key has the same effect
as pressing [
OK
] key on the remote control;
4. Clicking the right mouse key has the same effect
Instructions for Intelligent
Platform Operation
as pressing [ ] key on the remote control.
Language input setting
Language
:
elect the system
language. Select
Settings > Preferences >
Language
, and press [
OK
] key; press [
▲
]/[
▼
] key to
select the desired language, and then press [
OK
] key.
Selecting Input Method:
In the smart mode,
select
Settings > Preferences > Keyboard >Current
Keyboard
, and press [
OK
] key then press [
▲
]/[
▼
] key
to choose
input
m
ethod in the submenu; you can also
download and install third party input method.
Setting System Time:
In the smart mode,
select
Settings > Preferences > Date & time >
Automatic date & time
, press [
OK
] key then press
[
▲
]/[
▼
] key to select ''Use network-provided time''
press [
OK
] key to confirm and the system update the
clock from the network automatically; if the TV set isn't
connected to the network, you can only set the system
time manually.
Screenshot:
Before screen shooting, please
insert the USB mass storage device into the USB
interface, and press [
SNAPSHOT
] key. After screen
shooting, the pictures are saved in the
":\Pictures\Screenshots" folder in the USB mass
storage device.
Smart Applications
Browser:
You can use the browser to show the
text, video, audio and other information on the
Internet.
Before accessing the Internet, please connect your
TV set to the Internet; refer to
“
Network Settings
"
for
details.
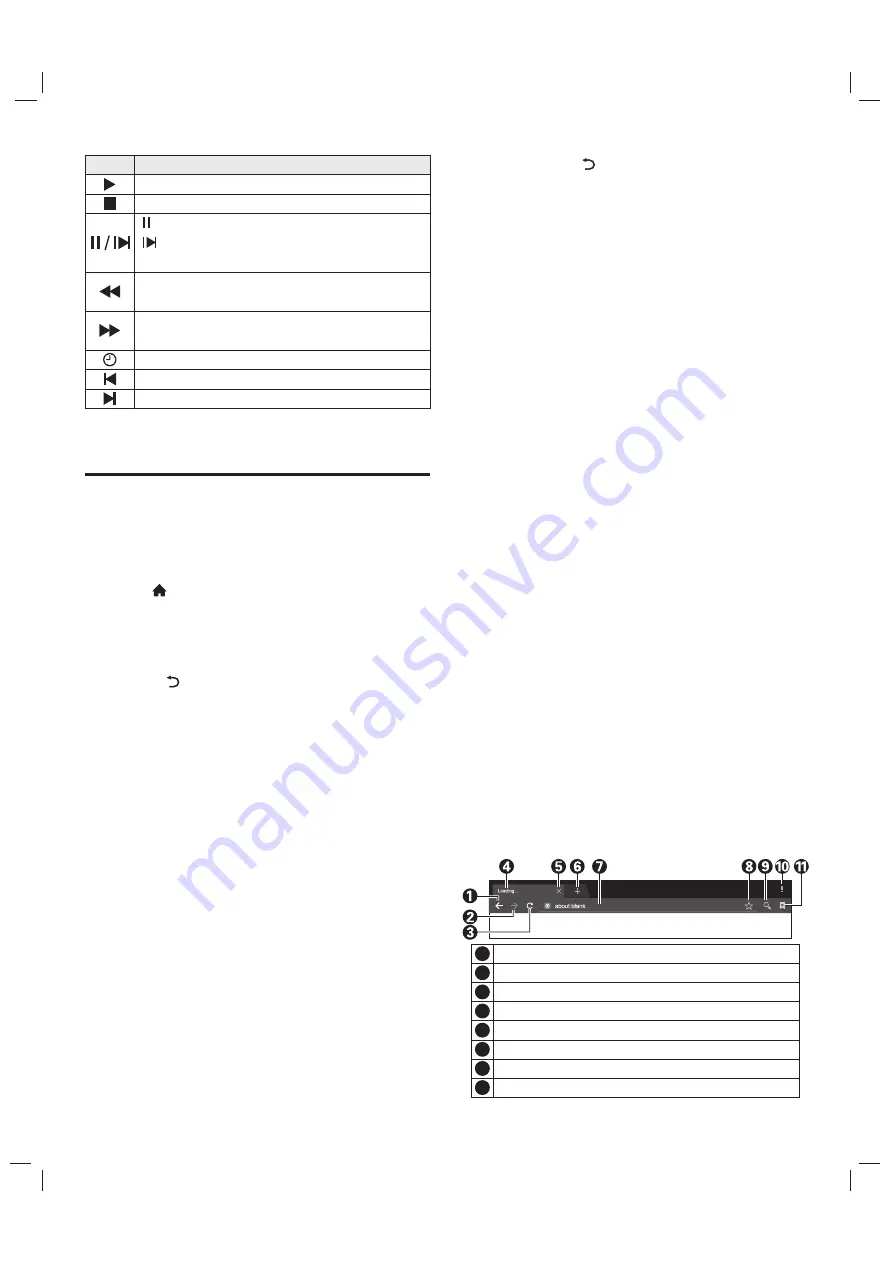
In the smart mode, s
Input box for URL.
Option for adding a bookmark.
7
8
Close the current webpage window.
Add a new webpage window.
5
6
Back to the previous webpage.
Go forward to the next webpage.
Refresh the webpage.
Webpage window of the browser.
1
2
3
4
Icon
Description
Play
: Play or set A-B repeat.
Stop
: Stop and quit.
Pause
: Pause.
Step:
Step by step, press [
REC LIST
] key
to play normally.
Rev
: Fast back, press [
REC LIST
] key to play
normally.
FF
: Fast forward, press [
REC LIST
] key to
play normally.
Time Play
: Select time to play.
Backward
: Make a 30S jump backward.
Forward
: Make a 30S jump forward.