background image

7

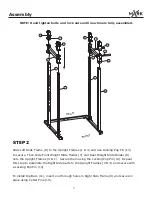
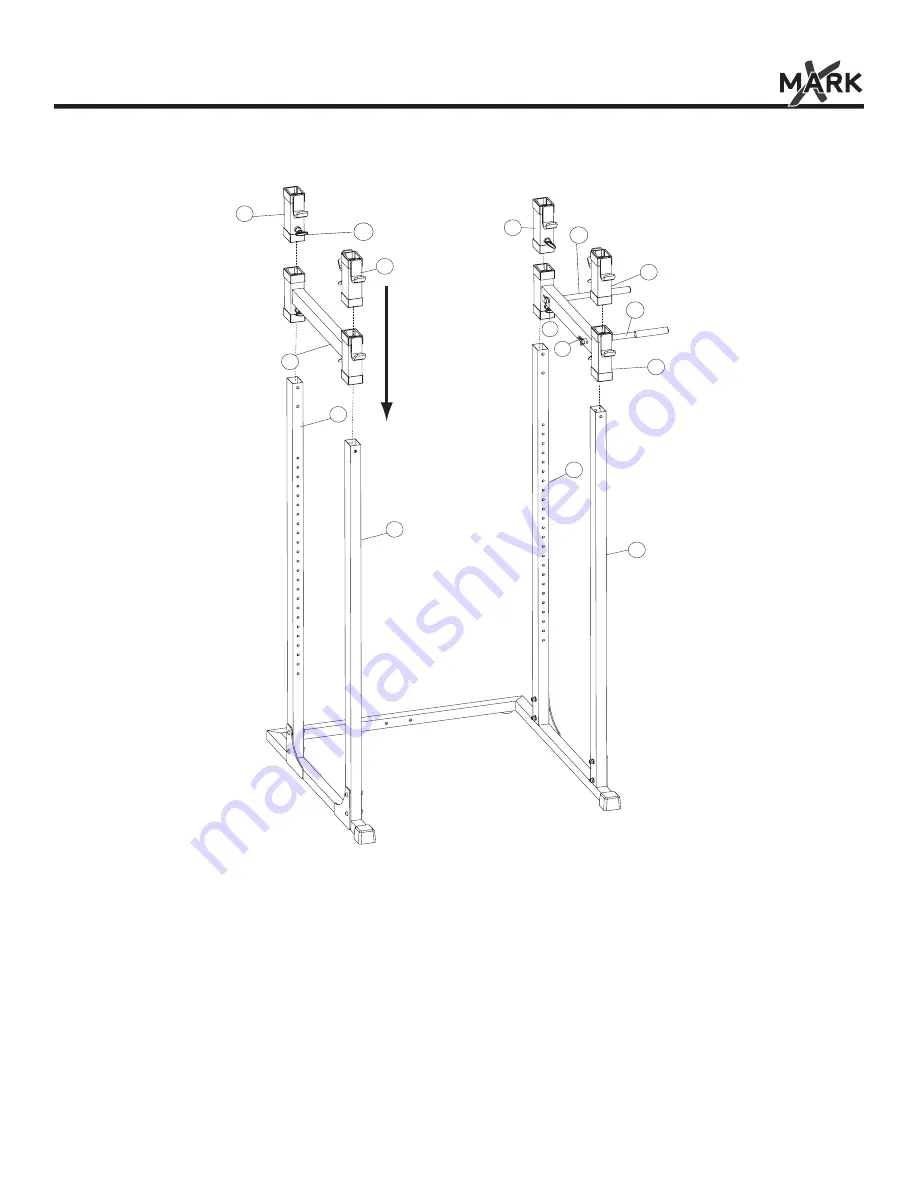
NOTE: Hand tighten bolts and lock nuts until machine is fully assembled.

STEP 2

Assembly

4

1

7

6

8

3

2

6

7

9

19

19

13

REAR

FRONT

11

11

Slide Left Slide Frame (8) to the Upright Frames (1 & 4) and use Locking Pop Pin (13) 
to secure. Then slide Front Weight Slide Holder (7) and Rear Weight Slide Holder (8) 
onto the Upright Frames (4 & 1).  Secure them using the Locking Pop Pin (13). Repeat 
this step to assemble the Right Side parts to the Upright Frames (2 & 3) and secure with 
a Locking Pop Pin (13).

To install Dip Bars (11), insert end through holes in Right Side Frame (9) and secure in 
place using Cotter Pins (19).

Summary of Contents for XM-4430

Page 1: ...8 09 Owner s Manual CAUTION Read all precautions and instructions in this manual before using this equipment POWER CAGE XM 4430 ...

Page 2: ...2 Table of Contents Important Safety Information 4 Before You Begin 3 8 5 y l b m e s s A 9 t s i L s t r a P 10 w e i V d e d o l p x E 11 n o i t a m r o f n I y t n a r r a W ...

Page 3: ...ard Time MAILING ADDRESS 7501 Trammel Drive Shreveport LA 71108 THANK YOU for making this unit a part of your exercise program XMARK Fitness assures the very best in value appearance durability and biomechanics XMARK FITNESS SERIES XMARK Fitness To avoid unnecessary delays in warranty parts and to insure that a permanent record of your purchase is on file with our company be sure to send in the wa...

Page 4: ... read the Owner s Manual and are familiar with safety information and precautions This unit should only be used on a level surface and is intended for indoor use only XMARK Fitness recommends an equipment mat be placed under the unit to protect the floor or carpet and for easier cleaning Wear comfortable good quality walking or running shoes and appropriate cloth ing Do not use this unit with bare...

Page 5: ...ONT UPRIGHT FRAME TUBE 2 RIGHT FRONT UPRIGHT FRAME TUBE 3 LEFT REAR UPRIGHT FRAME TUBE 4 RIGHT REAR UPRIGHT FRAME TUBE 9 12 STEEL PLATE 11 DIP BAR 6 REAR WEIGHT SLIDE HOLDER 7 FRONT WEIGHT SLIDE HOLDER Prior to assembly remove components from the box and verify that all the listed parts were supplied Unpack all parts and place them in a clear area Be sure to remove all packing material 10 BASE FRA...

Page 6: ...ht Frames with Single Holes 1 2 should be positioned to the front of unit as seen in picture Attach to Base Frame 10 using M12x70 Bolts 20 M12 Washers 23 and M12 Lock Nuts 24 Upright Frames 3 4 should be attached to Base Frame 10 at rear of unit using M12x70 Bolts 20 M12 Washers 23 and M12 Lock Nuts 24 Numbers on the Upright Frame face the inside of the unit ...

Page 7: ...e Locking Pop Pin 13 to secure Then slide Front Weight Slide Holder 7 and Rear Weight Slide Holder 8 onto the Upright Frames 4 1 Secure them using the Locking Pop Pin 13 Repeat this step to assemble the Right Side parts to the Upright Frames 2 3 and secure with a Locking Pop Pin 13 To install Dip Bars 11 insert end through holes in Right Side Frame 9 and secure in place using Cotter Pins 19 ...

Page 8: ...uts until machine is fully assembled STEP 3 Assembly 4 1 22 20 20 22 22 12 12 23 24 5 23 23 23 23 24 21 23 23 23 23 24 21 3 2 23 23 24 REAR FRONT Attach the Top Frame 5 to the Upright Frames and secure according to the above illustration ...

Page 9: ...9 Exploded View 20 24 23 22 20 23 24 18 18 13 13 13 13 16 16 22 12 5 12 17 23 24 23 17 23 21 23 24 21 23 23 24 23 23 24 24 24 23 23 23 23 24 20 20 23 24 20 24 23 23 20 ...

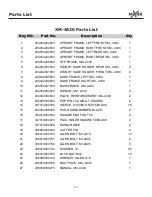
Page 10: ...1 204042003503 DIP BAR XM 4430 2 12 204042004503 PLATE REINFORCEMENT XM 4430 2 13 802900300002 POP PIN LOCKING T SHAPED 8 14 307010000706 SLEEVE 63 5X88 9 50X75 BLACK 16 15 202042008006 PAD ROUND RUBBER BLACK 2 16 306010020042 SQUARE END FOOT 50 2 17 307010000270 PLUG INNER SQUARE 50 BLACK 2 18 307010000956 HANDLR GRIP 2 19 306990000024 COTTER PIN 2 20 306010020753 ALLEN BOLT M12X70 12 21 30601002...

Page 11: ...es and taxes or any other charges associated with transportation of the parts or product In addition you are responsible for insuring any parts or product shipped or returned You assume the risk of loss during shipment You must present XMARK Fitness with proof of purchase documents including the date of purchase Any evidence of alteration erasure or forgery of proof of purchase documents will be c...

Page 12: ...XMARK Fitness 7501 Trammel Drive Shreveport LA 71108 Customer Service 1 800 719 4605 ...

Reviews: