background image

I

 worked really hard

on this manual -

so please read it.

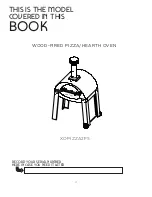
XOPIZZA2FS

WOOD FIRED PIZZA/HEARTH OVEN

Summary of Contents for XOPIZZA2FS

Page 1: ...I worked really hard on this manual so please read it XOPIZZA2FS WOOD FIRED PIZZA HEARTH OVEN ...

Page 2: ...ly a phone call away call 973 403 8900 Talk to one of our undercounter experts CONGRATULATIONS on purchasing your XO Before you proceed take just a moment to register your XO at Ensuring warranty coverage should you need service Providing ownership verification for insurance purposes Let s XO notify you in the event of product changes or recalls www xoappliance com register your product REGISTRATI...

Page 3: ...rd your serial number Your safety matters Dimensions Using Your Wood Fired Oven Handy Tips Lighting and using the oven Controlling temperature More Cooking TLC Cleaning and maintenance 15 18 Oven assembly Step by step instructions 14 20 All The Rest Warranty Obtaining service FAQ s F Optional accessories requently asked questions 19 ...

Page 4: ...4 XOPIZZA2FS WOOD FIRED PIZZA HEARTH OVEN 2 this is the model covered in this book record your serial number here in case you need it later Made in Italy ...

Page 5: ...ead the entire manual before you install the oven FOR YOUR SAFETY Do not store or use gasoline or other flammable vapors or liquids in the vicinity of this or any other appliance Always keep the area under and around this appliance free and clear of any and all combustible materials Outer oven surfaces can reach temperatures above 120 F Keep all combustible materials beyond a three 3 foot minimum ...

Page 6: ...tterscont This product can expose you to Chromium a metal known by the State of California to cause cancer birth defects or other reproductive harm WARNING For more information go to this website www P65WARNINGS ca gov ...

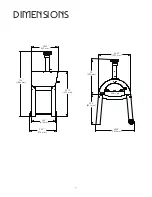
Page 7: ...dimensions 7 72 6 1844 mm 26 5 673 mm 30 5 775 mm 42 28 1074 mm Made in Italy 50 12 1273 mm 33 5 851 mm 39 993 mm 29 49 749 mm 35 55 903 mm ...

Page 8: ...apers this can damage the finish of your oven To clean your oven use warm soapy water with a mild non abrasive cleaner Some parts of the oven may experience discoloration from the high temperatures Your XO Oven can be used throughout the year However during cold months when the outside temperature is near or below freezing build the fire slowly allowing the oven to warm up gradually Rapid temperat...

Page 9: ...andle will be in line with the chimney USE DRY SEASONED HARDWOOD ONLY Place your wood in the center of the oven s cooking floor stacking it in a loose criss cross to ensure good air flow Smaller pieces will ignite faster add larger wood as the fire grows Place an odor free fire starter such as Royal Oak Tumbleweed or Fatwood below the stack DO NOT USE ANY ACCELERANTS such as charcoal lighter fluid...

Page 10: ...er with the burning wood and coals all the way to the left hand side of the oven After moving the fire to the left side of the oven brush the oven floor clean of ash and debris Use a long handle brush with brass or copper bristles Never use steel wire brushes wet cloths natural or plastic fiber brushes to clean the oven floor Watch as your beautiful rolling fire follows the internal dome of the ov...

Page 11: ... and finally breads or desserts OPEN DOOR COOKING Open door cooking is the most common method where an active flame is present Fire needs oxygen to burn well Use this method for dishes that require high heat such as pizza CLOSED DOOR COOKING Closed door cooking is used for cooking dishes longer at lower temperatures such as baking or roasting Closing or partially closing the oven door helps to red...

Page 12: ... together in a mixing bowl Cover and allow to rest for 5 minutes Bubbles should form in the mixture This is known as proofing If bubbles do not form start over with new yeast Add the olive oil salt and the rest of the flour Mix gently for approximately 2 minutes and turn the dough out onto a lightly floured surface With lightly floured hands knead the dough for 3 4 minutes After kneading the dough...

Page 13: ...left side allowing the flames to curl up and over the cooking zone creating a natural convection cooking environment Like other convection cooking systems this results in decreased cooking times RADIANT COOKING During the pre heating process heat is stored in the refractory materials of the oven During cooking this heat is radiated back to the food from every direction CONDUCTIVE COOKING Heat stor...

Page 14: ...ontainer Leave this outdoors in a safe location for 2 3 days to ensure that all embers are completely extinguished Once the ashes are completely out and cold dispose of them properly in accordance with local regulations Never leave ash or burned wood in the oven where it will absorb moisture Your XOPIZZA2FS is a self cleaning oven Any cheese toppings or spills from a pizza roasts or other dishes w...

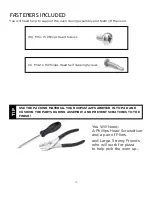
Page 15: ...R XOPIZZA2FS ARRIVED IN TO PAD AND CUSHION THE PARTS DURING ASSEMBLY AND PREVENT SCRATCHES TO THE FINISH 16 M5 x 15 Phillips Head Screws 4 M4 2 x 15 Phillips Head Self Tapping Screws You Will Need A Phillips Head Screwdriver and a pair of Pliers and Large Strong Friends who will work for pizza to help pick the oven up 15 TIP ...

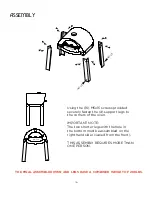
Page 16: ...ade in Italy Using the 16 M5x15 screws provided securely fasten the 4 support legs to the corners of the oven IMPORTANT NOTE The two shorter legs with the hole in the bottom must be assembled on the right hand side viewed from the front THIS ASSEMBLY REQUIRES MORE THAN ONE PERSON H O L E H O L E ...

Page 17: ...the end Raise the oven to allow the wheel axle to be inserted into the hole at the bottom of the front leg Insert the axle completely so that it passes through the hole at the bottom of the rear leg Slide the second wheel onto the axle Secure the wheel in place by inserting the split cotter pin through the hole in the end of the axle and bend the pin over so that it is fixed in place Split Cotter ...

Page 18: ...lled fit the chimney to the outlet in the top of the oven The chimney has interlocking tabs that will hold it securely in place while allowing it to be removed if you wish Alternately you may choose to attach the chimney using the 4 4 2 x 16 self tapping screws supplied After attaching the chimney slide the chimney cap into place and you are ready to start cooking 18 ...

Page 19: ...imes will be reduced QUESTION What about tools or cooking utensils The three tools you will need are a large pizza peel for adding and removing food a smaller round peel for rotating dishes while in the oven and a brush used for removing ash and manipulating the fire You may want additional accessories later based on your cooking preferences QUESTION What kind wood should I use Burn dry seasoned h...

Page 20: ...elivery is available We are all committed to ensuring the best experience with our products at every level CALL 973 403 8900 or VISIT US ONLINE AT WWW XOAPPLIANCE COM Award Winning Luxury Appliance Service SERVICE THAT EXCEEDS EXPECTATIONS Eastern Marketing Service provides professional factory trained field service and support in the Northeast Mid Atlantic states All other markets are served This...

Reviews: