- 11 -
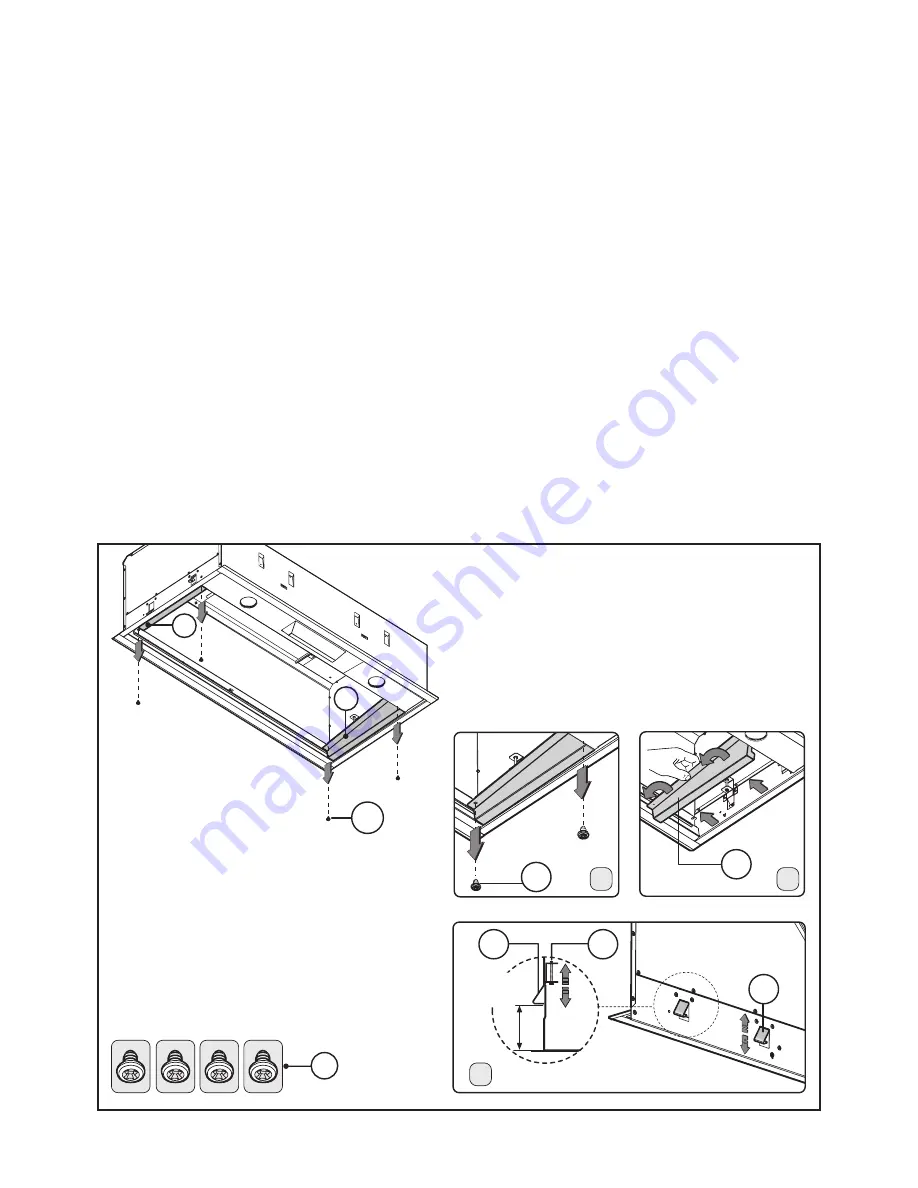
• Fixing of the hood in the lower part of the kitchen cabinet:
For all measurements relating to the cooker hood, please refer to
Fig.2
.
Before fixing the cooker hood to the lower part of the cabinet, the following steps should
be performed:
1. Remove the 4 screws
E
fixing the two cooker hood brackets
H
(RHS and LHS) in place
as indicated in
Fig.4A
.
2. Remove the brackets
H
as shown in
Fig.4B
.
3. Make sure the thickness of the cabinet falls within the range of values listed in
Fig.4C
.
Fit the cooker hood in the cabinet
(Fig.8)
and make sure the 4 springs are fixed in place
well. Fix the cooker hood to the cabinet securely by using a screwdriver to tighten the
screws
M
until the appliance is flush with the cabinet
(Fig.5)
. Place again the 2 brackets
H
(right and left) of the hood and fix them with the 4 screws
E (Fig.6 - Fig.7)
.
When installed in this way the appliance discharges fumes outside, either through a
perimeter wall or existing ducting.It is therefore necessary to purchase a non-flammable
air exhaust tube
A
(not supplied) which complies with all current legislation and connect
it to flange
B (Fig.3)
.
Fig.4
B
H
A
E
Min - 0-1/2"
Max - 1-0/16"
C
F
F
D
E
B
B
E
Summary of Contents for XOI33SMUA
Page 12: ... 12 H E E M F Fig 6 Fig 5 Fig 7 ...
Page 20: ... 20 124 241 100 609 29 492 12 110 145 173 140 39 40 70 261 554 120 XOI33SMUA ...
Page 32: ... 32 H E E M F Fig 6 Fig 5 Fig 7 ...
Page 40: ... 40 XOI33SMUA 124 241 100 609 29 492 12 110 145 173 140 39 40 70 261 554 120 ...
Page 52: ... 52 H E E M F Fig 6 Fig 5 Fig 7 ...
Page 60: ... 60 124 241 100 609 29 492 12 110 145 173 140 39 40 70 261 554 120 XOI33SMUA ...
Page 61: ......
Page 62: ......
Page 63: ......


