background image

- 13 -

27” to 32”

installation

A

B

1

2

3

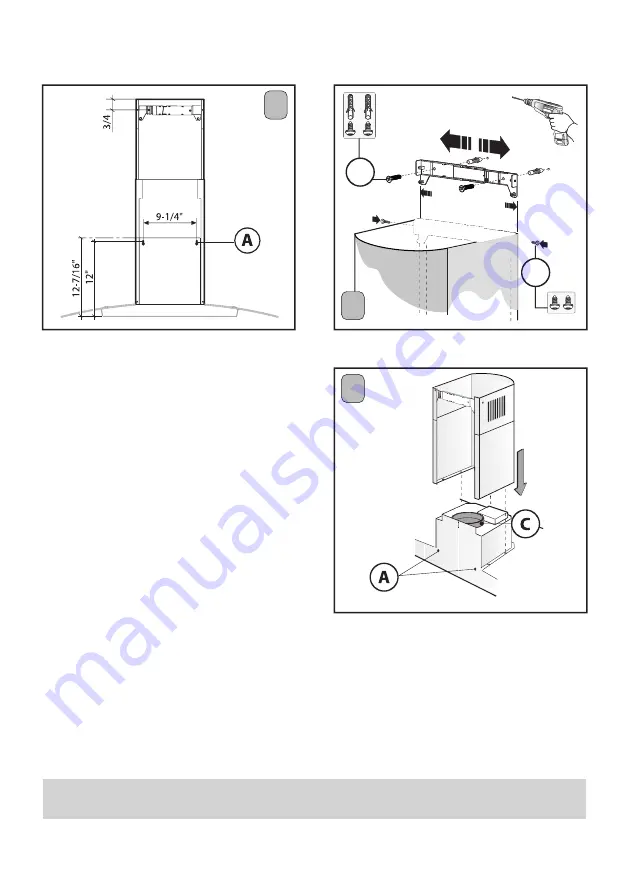
MOUNT TO THE WALL:

Drill the holes 

A

 respecting the distances 

indicated 

(Fig.1). 

Fix the appliance to 

the wall and align it in horizontal posi-

tion to the wall units. When the appli-

ance has been adjusted, definitely fix 

the hood using the screws 

A


(Fig.3)

. For 

the various installations use screws and 

screw anchors suited to the type of wall 

(e.g. reinforced concrete, plasterboard, 

etc.). If the screws and screw anchors are 

provided with the product, check that 

they are suitable for the type of wall on 

which the hood is to be fixed.

INSTALL THE DUCT COVER:

Adjust the width of the support bracket of the upper flue 

(Fig.2).

 Then fix it to the ceiling 

using the screws 

A


(Fig.3)

 in such a way that it is in line with your hood and respecting 

the distance from the ceiling indicated in 

Fig.1

. Connect the flange 

C

 to the air exhaust 

hole using a connection pipe 

(Fig. 3)

. Insert the upper flue into the lower flue. Fix the 

lower flue to the hood using the screws 

B

 provided 

(Fig.3)

, extract the upper flue up to 

the bracket and fix it with the screws 

B


(Fig.2)

.

IMPORTANT - The range hood must be secured to wall studs or use drywall
anchors capable of supporting 75 lbs.

Summary of Contents for XOM30GC

Page 1: ...I worked really hard on this manual so please read it XOM WALL MOUNT MODELS XOM30GC XOM36GC ...

Page 2: ......

Page 3: ... experts Online https xoappliance com priority service for your xo product Or by phone 973 403 8900 CONGRATULATIONS on purchasing your XO Before you proceed take just a moment to register your XO at www xoappliance com register your product REGISTRATION HELPS YOU BY Ensuring warranty coverage should you need service Providing ownership verification for insurance purposes Let s XO notify you in the...

Page 4: ...G READY Safety and Precautions Planning Ductwork Install Examples Dimensions THE INSTALL Mounting Height Installing Electrical Connections MAINTENANCE Filters Cleaning Recirculation Light Replacement OPERATING The Push Button Controls CCC Make Up Air Conversion PARTS WARRANTY 17 18 19 20 5 11 12 14 15 16 ...

Page 5: ...Residential Kitchen ventilating use only Do not use to exhaust haz ardous or explosive materials and vapors CAUTION To avoid motor bearing damage and noisy and or unbalanced impellers keep drywall spray construction dust etc off power unit CAUTION Please read specification label on product for further information and requirements WARNING TO REDUCETHE RISK OF FIRE ELECTRIC SHOCK OR INJURYTO PERSONS...

Page 6: ...T USE WATER including wet dishcloths or towels a violent steam explosion will result D Use an extinguisher ONLY if 1 You know you have a Class ABC extinguisher and you already know how to operate it 2 The fire is small and contained in the area where it started 3 The fire department is being called 4 You can fight the fire with your back to an exit aBased on kitchen firesafety tips published by NF...

Page 7: ... A Do not check filters with hood working B Do not touch the lamps after a prolonged use of the appliance C No food must be cooked flambè underneath the hood D The use of an unprotected flame is dangerous for the filters and could cause fires E Watch constantly while frying food in order to avoid cooking oil flare ups F Before performing any maintenance operation disconnect the hood from the elect...

Page 8: ...see chart WHEN YOU MUST USE FITTINGS TRY TO SEPARATE THEM WITH SECTIONS OF 3 OR MORE OF STRAIGHT DUCT ALWAYS FOLLOW THE MANUFACTURER S GUIDELINES FOR THE COOKING EQUIPMENT YOU ARE VENTING IF MAKE UP AIR CONTROL DAMPERS ARE REQUIRED POSITION THE SENSOR IN A STRAIGHT RUN OF DUCT IDEALLY WITH 3 OF STRAIGHT DUCT BETWEEN EACH SIDE OF THE SENSOR AND A DUCT FITTING REMEMBER TO INCLUDE POWER AND CONTROL W...

Page 9: ...NTER THE NUMBER OF EACH TYPE OF TURN YOU ARE USING AND THE TYPE OF END CAP MULTIPLY ACROSS EACH ROW THE MULTIPLIER x QTY USED TO GET THE EQUIVALENT FEET FOR THOSE COMPONENTS ADD UP ALL THE VALUES IN THE EQUIVALENT FEET COLUMN DUCT PIECE DESCRIPTION MULTIPLIER QTY USED EQUIVALENT FEET 1 of 6 Round Duct 1 of 3 1 4 x 10 Rect Duct 6 90 Degree Elbow 6 45 Degree Elbow 3 1 4 x 10 90 Degree 3 1 4 x 10 45 ...

Page 10: ... 10 VENTED RECIRCULATION WALL EXHAUST ROOF EXHAUST GRID EXHAUST R E C I R C U L A T I O N EXHAUST MUST BE RE TURNED TO THE SPACE typical installation examples ...

Page 11: ...6 24 3 4 A Max 1117 6 Min Extractor 730 Min Filtering 812 5 Max 44 Min Extractor 28 3 4 Min Filtering 32 11 1 4 19 5 16 Front of hood Side of hood Top of hood DIMENSIONS MODEL A XOM30GC 30 XOM36GC 36 Duct cover removed ...

Page 12: ...ds have a recommended range of installation height over the cooking surface It is important to install the hood at the proper mounting height Hoods mounted too low could result in heat damage and fire hazard while hoods mounted too high will be hard to reach and will lose its performance and efficiency ...

Page 13: ...are suitable for the type of wall on which the hood is to be fixed INSTALL THE DUCT COVER Adjust the width of the support bracket of the upper flue Fig 2 Then fix it to the ceiling using the screws A Fig 3 in such a way that it is in line with your hood and respecting the distance from the ceiling indicated in Fig 1 Connect the flange C to the air exhaust hole using a connection pipe Fig 3 Insert ...

Page 14: ...ow disconnect switch 3 Replace the box cover Replace the Anti grease flters All wiring must be in compliance with national electrical code ANSI NFPA 70 1999 and all local codes and regulations ELECTRICAL CONNECTION A Remove the central screw and lift the electrical plant box B Remove the 3 fixed screws Then position the electrical box so it is in line with the holes of the previously removed screw...

Page 15: ...t and washing instructions are not followed the anti grease filters may present a fire hazard CLEANING STAINLESS STEEL Do not use corrosive detergents abrasive detergents or oven cleaners Do not use any product containing chlorine bleach or any product containing chloride Do not use steel wool or abrasive scrubbing pads which will scratch and damage surface Cleaning Stainless Steel Clean periodica...

Page 16: ...is exhausted back into the room The carbon element filters gradually lose efficiency and cannot be cleaned or regenerated These must be replaced at least 4 times a year more frequently if needed based on the amount of use and style of cooking CHANGING THE CARBON FILTERS Changing the filters is easy To Reduce the Risk of Fire and Shock use only conversion Kit Model XORFSQR ACK00083 Filters The XORF...

Page 17: ...e motor starts up again at the first speed after fifty minutes and BUTTON T and BUTTON 1 start to flash again for ten minutes and so on By pressing any key for the exclusion of the hood light the hood will return immediately to its normal functioning e g if BUTTON 2 is pressed the clean air function is deactivated and the motor moves to the 2nd speed straight away By pressing the BUTTON 0 the func...

Page 18: ...t breaker 2 VERY IMPORTANT after turning power back on to the unit you must press and hold both the and 0 buttons simultaneously within 5 seconds of re powering the unit NOTE If you do not press the buttons within the first 5 seconds after turning power back on to the hood the CCC function will not engage and you must repeat from Step 1 3 The control blinks 3 times 4 The hood is now configured at ...

Page 19: ...EMENT LIGHTS REMOTE CONTROLS DUCT COVERS REPLACEMENT SWITCHES BLOWER MOTORS FAN WHEELS ALL OF THESE PARTS AND MORE ARE AVAILABLE SIMPLY VISIT WWW XOAPPLIANCE COM and click on PARTS STORE OR CALL US AT 973 403 8900 access parts accessories ...

Page 20: ...avor of the original purchaser user at the original installation location Any such assignment or transfer shall void the warranties herein made and shall void all warranties express or implied including any warranty or merchantability or fitness for a particular purpose IMPROPER USAGE XOassumesnoliabilityforpartsorlaborcoverageforcomponentfailureorotherdamagesresultingfrom improper usage or instal...

Page 21: ...J ai travaillé très dur sur ce manuel veuillez donc le lire XOM WALL MOUNT MODÈLES XOM30GC XOM36GC ...

Page 22: ...rts en ventilation En ligne https xoappliance com priority service for your xo product Ou par téléphone 973 403 8900 FÉLICITATIONS pour l achat de votre XO Avant de continuer prenez un instant pour enregistrer votre XO à l adresse www xoappliance com register your product L INSCRIPTION VOUS AIDE EN Assurant la couverture de garantie si vous avez besoin d un service Vérifiant la propriété à des fin...

Page 23: ...t précautions Planification des conduits Exemples d installation Dimensions L INSTALLATION Hauteur de montage Installation Connexions électriques ENTRETIEN Filtres Nettoyage Recirculation Remplacement de la lumière FONCTIONNEMENT Commandes du bouton poussoir Conversion d air d appoint CCC PIÈCES et GARANTIE 36 37 38 39 24 30 31 33 34 35 ...

Page 24: ...é à l extérieur à travers un conduit d évacuation Ne pas évacuer l air dans des interstices tels qu entre des cloisons ou des plafonds dans des greniers des espaces confinés ou des garages ATTENTION N utiliser que pour une ventilation générique Cet appareil n est pas propre à l aspiration de matières ou de vapeurs dangereuses ou explosives ATTENTION Afin d éviter des bruits et des dommages au nive...

Page 25: ...ne température G Ne jamais laisser la cuisinière sans surveillance pendant la cuisson H Utiliser systématiquement des ustensiles de cuisine adaptés au type et à la quantité d aliments que l on prépare AVERTISSEMENT AFIN DE RÉDUIRE LES RISQUES DE DOMMAGES AUX PERSONNES EN CAS D INCENDIE PAR INFLAMMATION DES GRAISSES PRESENTES SUR LA CUISINIERE RESPECTER LES REGLES SUIVANTESa A ETOUFFER LA FLAMME à ...

Page 26: ...g Refrigeration and Air Conditioning Engineers ASHRAE et par les autorités locales préposées C Au cours des opérations de découpage ou de perforation du mur ou du plafond veiller à ne pas endommager les câbles électriques ou d autres canalisations cachées D L appareil doit toujours être relié à un trou d évacuation vers l extérieur E L unité doit être reliée à la terre AVERTISSEMENT AFIN DE RÉDUIR...

Page 27: ...ER LE NOMBRE DE RACCORDS voir tableau LORSQUE VOUS DEVEZ UTILISER DES RACCORDS ESSAYEZ DE LES SÉPARER AVEC DES SECTIONS DE 3 pi OU PLUS DE CONDUIT DROIT SUIVEZ TOUJOURS LES DIRECTIVES DU FABRICANT POUR L ÉQUIPEMENT DE CUISSON QUE VOUS VENTILEZ SI DES AMORTISSEURS DE COMMANDE D AIR SONT NÉCESSAIRES POSITIONNEZ LE CAPTEUR DANS UN CONDUIT EN LIGNE DROITE IDÉALEMENT AVEC UN CON DUIT EN LIGNE DROITE DE...

Page 28: ...T LE TYPE DE CAPUCHON D EXTRÉMITÉ OF MULTIPLIEZ SUR CHAQUE LIGNE LE MULTIPLICATEUR X QUANTITÉ UTILISÉE POUR OBTENIR LES PIEDS ÉQUIVALENTS POUR CES COMPOSANTS AJOUTEZ TOUTES LES VALEURS DANS LA COLONNE PIEDS ÉQUIVALENTS PIÈCE DE CONDUIT DESCRIPTION MULTIPLICA TEUR QTÉ UTILISÉE PIEDS ÉQUIVALENTS Conduit rond de 1 pi sur 6 po 1 pi de conduit rectangulaire 3 1 4 po x 10 po Coude de 6 po à 90 degrés Co...

Page 29: ...9 VENTILÉ RECIRCULATION ÉVENT D ÉCHAPPEMENT MURAL ÉVENT D ÉCHAPPEMENT DE TOIT ÉCHAPPEMENT GRILLE L É C H A P P E M E N T D E RECIRCULATION DOIT ÊTRE RETOURNÉ DANS L ESPACE exemples d installation typiques ...

Page 30: ...24 3 4 A Max 1117 6 Min Extractor 730 Min Filtering 812 5 Max 44 Min Extractor 28 3 4 Min Filtering 32 11 1 4 19 5 16 Devant de la hotte Côté de la hotte Haut de la hotte MODÈLE A XOM30GC 30 XOM36GC 36 Couverture de conduit retiré ...

Page 31: ...e de hauteur d installation recommandée sur la surface de cuisson Il est important d installer la hotte à la bonne hauteur de montage Les hottes mon tées trop bas peuvent entraîner des dommages causés par la chaleur et un risque d incendie tandis que les hottes montées trop haut seront difficiles à atteindre et perdront leurs performances et leur efficacité ...

Page 32: ...s sont bien adaptés au type de mur sur lequel sera fixé la hotte INSTALLATION DE LA COUVERTURE DU TUYAU Régler la largeur de l étrier de support du tube décoratif supérieur Fig 2 Fixer l étrier au plafond au moyen des vis A Fig 2 de façon à les aligner avec la hotte et en respectant la distance par rapport au plafond comme indiqué sur la figure 1 Relier la bride C au trou d évacuation d air en uti...

Page 33: ...nexion à double jet 3 Remplacez le couvercle de la boîte Remplacez les filtres anti graisse Tout le câblage doit être conforme au code électrique national ANSI NFPA 70 1999 et à tous les codes et réglementations locaux A Enlevez la vis centrale et soulevez la boîte de l installation électrique B Enlevez les 3 vis déjà serrées Puis positionnez la boîte de l installation électrique de sorte qu elle ...

Page 34: ...e ou un chiffon en microfibres et polissez dans le sens du grain de l acier inoxydable Toutes les surfaces peintes doivent être nettoyées avec de l eau chaude et du détergent uniquement Le nettoyage et la maintenance réguliers sont la clé d une longue durée de vie et des per formances de pointe de tout équipement Le filtre anti graisse a pour rôle de retenir les particules grasses en suspension da...

Page 35: ...tres à éléments en carbone perdent progressivement en efficacité et ne peuvent pas être nettoyés ou régénérés Ceux ci doivent être remplacés au moins 4 fois par an plus fréquemment si nécessaire en fonction de la quantité d utilisation et du style de cuisson CHANGEMENT DES FILTRES À CARBONE Changer les filtres est facile Pour réduire le risque d incendie et de choc utilisez uniquement les filtres ...

Page 36: ... tard Les diodes électroluminescentes BOUTON T et BOUTON 1 recommencent à clignoter pen dant 10 minutes et ainsi de suite En appuyant sur n importe quelle touche à l exception des touches de lumière la hotte retourne immédiatement à son fonctionnement normal ex en appuyant sur le BOUTON 2 la fonction clean air se désactive et le moteur passe directement à la 2ème vitesse en appuyant sur le BOUTON ...

Page 37: ...2 TRÈS IMPORTANT après avoir rallumé l appareil vous devez appuyer et maintenir les bou tons et 0 simultanément dans les 5 secondes suivant la remise sous tension de l appareil REMARQUE Si vous n appuyez pas sur les boutons dans les 5 premières secondes après avoir rallumé la hotte la fonction CCC ne s enclenchera pas et vous devez répéter l étape 1 3 La commande clignote 3 fois 4 La hotte est mai...

Page 38: ...COUVERCLES DE CONDUITS INTERRUPTEURS DE REMPLACEMENT MOTEURS DE VENTILATEUR ROUES DE VENTILATEUR TOUTES CES PIÈCES ET PLUS SONT DISPONIBLES VISITEZ SIMPLEMENT WW XOAPPLIANCE COM et cliquez sur LE MAGASIN DE PIÈCES OU APPELEZ NOUS AU 973 403 8900 accessoires et pièces d accès ...

Page 39: ...ne sur le site d installation d origine Une telle cession ou un tel transfert annulera les garanties faites dans les présentes et annulera toutes les garanties expresses ou implicites y compris toute garantie ou qualité marchande ou adéquation à un usage particulier MAUVAISE UTILISATION XO n assume aucune responsabilité pour les pièces ou la main d œuvre en cas de défaillance des composants ou d a...

Page 40: ...He trabajado mucho en este manual así que léalo XOM WALL MOUNT MODELOS XOM30GC XOM36GC ...

Page 41: ...n línea https xoappliance com priority service for your xo product Or por teléfono 973 403 8900 ENHORABUENA por la compra de su XO Antes de continuar tómese un momento para registrar su XO en www xoappliance com register your product EL REGISTRO LE AYUDA PARA Garantizar la cobertura de la garantía en caso de que ne cesite servicio Suministrar la verificación de la propiedad para fines de seguros P...

Page 42: ...NSTALACIÓN Altura de Montaje Instalación Conexiones eléctricas MANTENIMIENTO Filtros Limpieza Recirculación Sustitución de la Luz FUNCIONAMIENTO Controles del Botón Pulsador Conversión de Aire de Reposición CCC PIEZAS y GARANTÍA por favor lea y siga todas las instrucciones de seguridad 55 56 57 58 donde están las cosas 43 49 50 52 53 54 ...

Page 43: ...dapto para aspirar materiales o vapores peligrosos o explosivos ATENCION Para evitar daños al motor y rumores y o hélices desbalanceadas evite que la unidad de alimentación llegue a contacto con esprays polvo etc ATENCION Para ulterior información y pedidos lea la etiqueta de especificación del producto ADVERTENCIA PARA REDUCIR EL RIESGO DE INCENDIO SACUDIDA ELECTRICA O SDAÑOS A PERSONAS SIGA LAS ...

Page 44: ...ue el quemador PRESTE MUCHA ATENCION DURANTE ESTA OPERACION PARA EVITAR QUEMADURAS Si las llamas no se extinguen inmediatamente EVACUE EL LUGAR Y LLAME A LOS BOMBEROS B NO TOQUE NUNCA UNA CAZUELA HIRVIENTE se puede quemar C NO USE AGUA inclusive estropajos o toallas húmedas se produciría una violenta explosión de vapor D Use un extinguidor SOLO en caso que 1 Se tenga un extinguidor de Clase ABC y ...

Page 45: ... D El aparato debe estar siempre conectado a un agujero de evacuación hacia el exterior E La unidad deber ser conectada al suelo ADVERTENCIA PARA REDUCIR EL RIESGO DE INCENDIO USE SOLO TUBERIAS METALICAS ADVERTENCIA EN CIERTOS CASOS LOS ELECTRODOMESTICOS PUEDEN REVELARSE PELIGROSOS A No controle los filtros mientras la campana se encuentre en función B No toque las luces después de un uso prolunga...

Page 46: ...CESORIOS consulte la tabla CUANDO DEBA USAR ACCESORIOS INTENTE SEPARARLOS CON SECCIONES DE 3 O MÁS DE CONDUCTO RECTO SIGA SIEMPRE LAS DIRECTRICES DEL FABRICANTE PARA EL EQUIPO DE COCINA QUE ESTÁ VENTILANDO SI SE REQUIEREN AMORTIGUADORES DE CONTROL DE REPOSICIÓN DE AIRE COLOQUE EL SENSOR EN UN RECORRIDO RECTO DEL CONDUCTO IDEALMENTE CON 3 DE CONDUCTO RECTO ENTRE CADA LADO DEL SENSOR Y UN ACCE SORIO...

Page 47: ...ANDO Y EL TIPO DE TAPA DE EXTREMO MULTIPLIQUE A LO LARGO DE CADA FILA EL MULTIPLICADOR x CANTIDAD UTILIZADA PARA OBTENER LOS PIES EQUIVALENTES PARA ESOS COMPONENTES SUME TODOS LOS VALORES EN LA COLUMNA PIES EQUIVALENTES PIEZA DE CONDUCTO DESCRIPCION MULTIPLICA DOR CANTIDAD UTILIZADA PIES EQUI VALENTES Conducto redondo de 1 de 6 1 de 3 1 4 x 10 Rect Conducto Codo de 6 y 90 grados Codo de 6 y 45 gra...

Page 48: ... 48 VENTILADO RECIRCULACIÓN ESCAPE DE PARED ESCAPE DE TECHO ESCAPE DE REJILLA EL ESCAPE DE RECIRCU LACIÓN DEBE SER DE VUELTO AL ESPACIO ejemplos típicos de instalación ...

Page 49: ...ax 1117 6 Min Extractor 730 Min Filtering 812 5 Max 44 Min Extractor 28 3 4 Min Filtering 32 11 1 4 19 5 16 Parte delantera de la campana Lado de la campana Parte superior de la campana MODÈLE A XOM30GC 30 XOM36GC 36 Sin cubierta de conducto ...

Page 50: ...recomendado de altura de instalación sobre la superficie de cocción Es importante instalar la campana a la altura de montaje adecuada Las campanas montadas demasiado bajas podrían resultar en daños por calor y peligro de incendio mientras que las campanas montadas demasiado altas serán difíciles de alcanzar y perderán su rendimiento y eficiencia ...

Page 51: ...oducto controle que sean adaptos para el tipo de pared que deberá sostener la campana INSTALACIÓN DE LA CUBIERTA DEL TUBO Regule el ancho de la abrazadera de soporte del tubo decorativo superior Fig 2 Luego fije la abrazadera al techo con los tornillos A Fig 2 de modo que se alínee con la cam pana y respetando la distancia con el techo indicada en la Fig 1 Conecte el reborde C al agujero de evacua...

Page 52: ...rruptor de desconexión de doble tiro 3 Vuelva a colocar la cubierta de la caja Reemplace los filtros antigrasa Todo el cableado debe cumplir con el código eléctrico nacional ANSI NFPA 70 1999 y todos los códigos y regulaciones locales A Quitar el tornillo central y levantar la caja planta eléctrica B Quitar los 3 tornillos fijados Entonces colocar la caja planta eléctrica de modo que esté alineada...

Page 53: ...microfibra y pula en la dirección del grano de acero inoxidable Las superficies pintadas deben limpiarse únicamente con agua tibia y detergente La limpieza y el mantenimiento regulares son la clave para la larga vida útil y el máximo rendimiento de cualquier equipo El filtro antigrasa cumple la función de retener las partículas de grasa en suspensión en el aire por lo tanto puede atascarse en dist...

Page 54: ... se devuelva de nuevo a la habitación Los filtros de elementos de carbono pierden gradualmente eficiencia y no se pueden limpiar ni regenerar Estos deben reemplazarse al menos 4 veces al año con mayor frecuencia si es necesario en función de la cantidad de uso y el estilo de cocción CAMBIO DE LOS FILTROS DE CARBONO Cambiar los filtros es fácil Para reducir el riesgo de incendio y descarga utilice ...

Page 55: ...ido con una luz fija por 50 minutos En ese momento el motor reparte en la primera velocidad los leds BOTÓN T y BOTÓN 1 recomienzan a relampagear por 10 minutos y se repite el ciclo Presionando cualquier botón a excepción de las luces la campana inmediatamente regresa a su funcionamiento normal ej presionando el BOTÓN 2 se desactiva la función clean air y el motor cambia a la 2 velocidad presionand...

Page 56: ...yuntor 2 MUY IMPORTANTE después de volver a encender la unidad debe presionar y mantener pulsados los botones y 0 simultáneamente dentro de los 5 segundos posteriores a volver a encender la unidad NOTA Si no pulsa los botones dentro de los primeros 5 segundos después de volver a encender la campana la función CCC no se activará y debe repetir el paso 1 3 El control parpadea 3 veces 4 La campana ah...

Page 57: ...CIA CUBIERTAS DE CONDUCTOS INTERRUPTORES DE REPUESTO MOTORES DEL SOPLADOR RUEDAS DEL VENTILADOR TODAS ESTAS PIEZAS Y MÁS ESTÁN DISPONIBLES SIMPLEMENTE VISITE WWW XOAPPLIANCE COM y haga clic en LA TIENDA de piezas O LLÁMENOS al 973 403 8900 piezas de acceso y accesorios ...

Page 58: ...r usuario ori ginal en el lugar de instalación original Cualquier cesión o transferencia anulará las garantías aquí hechas y anulará todas las garantías expresas o implícitas incluyendo cualquier garantía o comerciabilidad o idoneidad para un propósito particular USO INADECUADO XO no asume ninguna responsabilidad por las piezas o la cobertura de mano de obra por fallas en los componentes u otros d...

Page 59: ......

Page 60: ...3011000130300 00 ...

Reviews: