4
3. Flash writing programs
Connect the digital board, analog board, trans-connect board and power board according the wiring
diagram.
Flash write N710, N711
a) Flash write W24CXX.EXE to N710, N711 with self-made flash write tool on the line.
b) Upgrade software from USB interface.
Note: N710, N711 may upgrade from HDMI and VGA interface respectively. a) and b) can be done
at the same time.
4. Unit adjustment
Connect the digital board, analog board, trans-connect board, button board, IR board and power
board according the wiring diagram. Put the power on and observe if the display is normal.
4.1 Adjustment of Digital board and Analog board
a) Press POWER button on the remote control, the indicator light on IR receive board turns blue.
b) Press the buttons “INPUT, 2, 5, 8, 0” one by one to enter factory menu, select ”Result” item, and
check if each item in this page is “
√
”, otherwise, the IC mentioned in the item is failure.
c) Check if picture and sound are normal of all the channels, if STEREO/SAP can be identified
correctly. Check AV-OUT function: the picture and sound of AV-OUT should be the picture and
sound of the current channel at TV/AV1/S/AV2, AV-OUT of other signal source don’t need to
check.
4.2 Adjustment of unit connection
Turn on the TV and check if it is normal: display LOGO about 2 seconds later, display picture about
10 seconds later.
4.3 Aging
a) Turn on the TV, select TV channel without signal input.
b) Aging for an hour in the aging room.
4.4 White balance adjustment of ACD (use CA210, VG849 generator)
Enter MENU
→
Picture
→
Picture Settings, set ”Preset” to standard.
Note:
1) Press ”
▲
” and “
▼
” to switch factory menu item, and ”ENTER” to access, press”
◄
” and “
►
” to
select adjustment item, press”
▲
“ and “
▼
“or input digital data to adjust value of the item,
press ”EXIT” to exit.
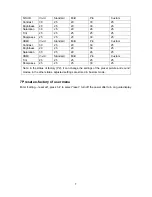
2) Coordinate of cold color temperature 12000K is (X=270, Y=283), coordinate of warm color
temperature 7500K is (X=300, Y=306), coordinate of normal color temperature 9300K is (X=285,
Y=293).
4.4.1 Adjustment of YPBPR, VGA, ADC
a) Press” INPUT, 2.5.8.0”one by one to enter factory menu.
b) Press”
▼
“ to move cursor to “Adc Calibrate” item, press” ENTER” to access.
c) Input YPrPb signal (VG-848, Timing 978(483P), Pattern 984 SMPTE Color Bar), move
cursor to START and press “ENTER” to auto adjust until complete
d) Input YPRPB signal (VG-848, Timing 976(720P), Pattern 984 SMPTE Color Bar), move
cursor to START and press “ENTER” to auto adjust until complete
e) Move cursor to Source, press ”ENTER” switch to Anolog RGB(VGA). Input VGA signal
(VG-848 Timing 856(1024*768/60HZ), Pattern 920 Gray 8 step(H)), move cursor to START
and press “ENTER” to auto adjust until complete
Summary of Contents for LC-32FC18
Page 1: ...LCD TELEVISION LC 32FC18 America ...
Page 16: ...14 Block diagram of TPA3008D2 ...
Page 17: ...15 Pin description ...
Page 29: ...CPU board ...
Page 30: ...CPU board ...
Page 31: ...CPU board ...
Page 32: ...CPU board ...
Page 33: ...CPU board ...
Page 34: ...CPU board ...
Page 35: ...CPU board ...
Page 36: ...CPU board ...
Page 37: ...CPU board ...
Page 38: ...CPU board ...
Page 39: ...AV trans connect board ...
Page 40: ...analog board ...
Page 41: ...32 power board 667 L32T18 20 ...
Page 43: ...APPENDIX Exploded view LC 32X18 ...
Page 45: ...603 L32FC18 14 Ver 1 1 ...


