


5
signal, press auto-adjust button to all screen or adjust PC settings menu to auto correction.
Separate auto adjust for TIME885 (640x480/60Hz) and TIME854 (800x600/60Hz).
3.4.2 VGA channel auto color adjustment
Input the VG-848 TIME854(800x600/60Hz) and PATTERN920(GRAY 8 STEP(H)), enter the factory
menu1, select the AUTO COLOR after, press the VOL+ button to select AUTO COLOR.
3.5 HDTV channel adjustment
Input the VG-848 TIME972(1080i/60Hz) and PATTERN976(64 GRAY & Color), enter the factory
menu1, select the AUTO COLOR after, press the VOL+ button to select AUTO COLOR.
4. Performance check
4.1 TV function
Input center source signal to RF-TV terminal, check if the channel is leak for auto searching.
4.2 AV/S and HDTV terminal
Input AV/S and HDTV signal, check if the signal is normal.
4.3 VGA terminal
Input 640 x 480 @60Hz VGA format signal, check if the signal is normal.
4.4 HDMI terminal
Separate input HDMI and DVI signal; check the picture and sound is normal, check if the HDCP
function is normal.
4.5 check the sound channel
Check the speaker and headphone of each channel.
4.6 ex-factory setting
Enter the first page of factory menu, select the factory out after, press the VOL+ button to display
“doing”, then “doing” disappear while it can auto ex-factory setting.
Summary of Contents for PH-42R6
Page 1: ...PDP TELEVISION PH 42R6 Canada...
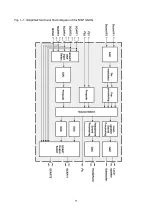
Page 11: ...9 Fig 1 1 Simplified functional block diagram of the MSP 34x0G...
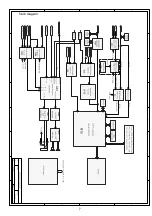
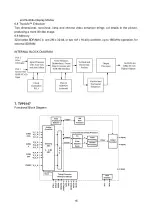
Page 13: ...11 INTERNAL BLOCK DIAGRAM...
Page 26: ...Power board...
Page 27: ...Power board power board...
Page 39: ...APPENDIX Exploded view PH 42X6...
Page 42: ...603 PH42R60 10 Ver 1 0...


