background image

9

Owner’ Manual

Wiring Connections

Speaker Wiring Notes

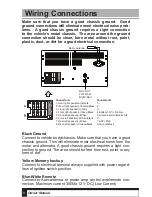
Follow the above wiring diagram to install the head unit with 

new or existing speakers.

• This unit is designed for use with four (4) speakers with imped-

ance between 4 Ohms to 8 Ohms.

• An impedance load of less than 4 Ohms could damage the 

unit

• Never bridge or combine the speaker wire outputs.  When not 

using four speakers, use electrical tape to tape the ends of the 

unused speaker outputs to prevent a short circuit.

• Never ground the negative speaker terminals to chassis 

ground.

Summary of Contents for XM-2RSU418BT

Page 1: ...Car AM FM Radio with USB SD Control XM 2RSU418BT ...

Page 2: ...ote Control 16 Simple Troubleshooting Guide 17 Specifications 18 Welcome Thank you for purchasing this high technology car stereo with USB SD MMC control This unit can encode and record songs and radio programmes to your USB Flash disk or SD MMC card If there is any compatibility problems we recommend you to format your flashdisk storage card in FAT32 mode before using it If the problem persisits ...

Page 3: ...rent products such as power amps If you ground the products together and the ground becomes detached there is a risk of damage to the products or fire Be sure to connect the colour coded leads according to the dia gram Incorrect connections may cause the unit to malfunction or damage the vehicle s electrical system Cords for this product and those for other products may be different colours even i...

Page 4: ...ort circuiting to the vehicle s body Don t pass the yellow lead through a hole into the engine com partment to connect to the battery This will damage the lead s insulation and cause a very dangerous short Do not shorten any leads If you do the protection circuit may fail to work when it should Never feed power to other equipment by cutting the insulation of the power supply lead of the unit and t...

Page 5: ...different value If the fuse blows again please contact your installation company Do not block vents or heater panels Blocking them will cause heat to build up inside and may result in fire Double check that all wiring and connections are correct before re connecting the battery and turning on the unit After completing the installation and before operating the unit recon nect the battery Then press...

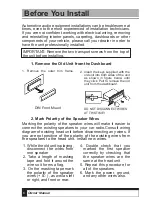
Page 6: ... in figure below until they click Pull to remove the old unit from the dashboard 1 Remove the outer trim frame 1 While the old unit is playing disconnect the wires from one speaker 2 Take a length of masking tape and fold it around the wire so it forms a flag 3 On the masking tape mark the polarity of the speaker wires as well as left or right and front or rear 4 Double check that you marked the f...

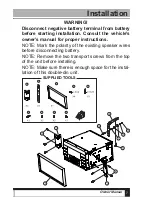
Page 7: ...icle s owner s manual for proper instructions NOTE Mark the polarity of the existing speaker wires before disconnecting battery NOTE Remove the two transport screws from the top of the unit before installing NOTE Make sure there is enough space for the instal lation of this double din unit SUPPLIED TOOLS Installation ...

Page 8: ...a 12 V DC Low Current Radio Antenna Connector A 1 Rear right speaker Purple 2 3 Front right speaker Grey 5 Front left speaker White Rear right speaker Purple Black 4 Front right speaker Grey Black 6 Front left speaker White Black 7 Rear left speaker Green 8 Rear left speaker Green Black Connector B 1 2 3 4 Battery 12V Yellow 5 Antenna power Blue White 6 7 ACC Red 8 Ground Black RCA OUT Left White ...

Page 9: ... for use with four 4 speakers with imped ance between 4 Ohms to 8 Ohms An impedance load of less than 4 Ohms could damage the unit Never bridge or combine the speaker wire outputs When not using four speakers use electrical tape to tape the ends of the unused speaker outputs to prevent a short circuit Never ground the negative speaker terminals to chassis ground ...

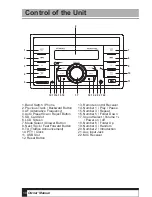
Page 10: ...ect Button 5 SD Card Slot 6 LCD Screen 7 Mode Select Answer Button 8 Next Track Fast Forward Button 9 TA Traffice Announcement 10 PTY Clock 11 USB Slot 12 Reset Button 13 Remote Control Receiver 14 Number 1 Play Pause 15 Number 3 Repeat 16 Number 5 Folder Down 17 Sound Select Volume Power on off 18 Number 6 Folder Up 19 Number 4 Random 20 Number 2 Introduction 21 Aux input Jack 22 MIC Receiver ...

Page 11: ...ode automatically CALL OUT will be shown on the display indicating the dialling is in progress 3 Accepting Calls When there is incoming call CALL IN will be shown on the display indi cating there is phone call to answer BT TALK will be shown after the ANSWER button is pressed Rotate the volume knob during ringing or conversation to adjust the respective volume level 4 Rejecting Calls During ringin...

Page 12: ...t the balance is 0 9 Fader Press SEL Button repeatly until the display shows FAD Rotate the VOL Button to adjust the balance between the front rear speakers When F R is shown on the screen it indicates that the fader is 0 10 Preset Equalizer Function Press SEL Button until the display shows EQ then use button to choose the EQ sound effects The Sequence of equalizer setting will be as follows FLAT ...

Page 13: ...il the preset station number is shown The button you pressed is now the pre set button for that station 5 Automatic Store Preset Scan A Automatic Scan Store While listening to the FM Radio press and hold the F PS Button for 3 sec onds The receiver will automatically scan and save the station listening to While listening to the AM Radio press and the F PS Button for 3 seconds The receiver will auto...

Page 14: ...SEEK mode the unit will seek for traffic an nouncement programme when TA is pressed in TA ALARM mode no TA TP is displayed and the alarm is set off 3 PTY PROGRAMME TYPE This radio will allow you to select the type of programme required and will search for a station broadcasting that type of programme Press and hold the PTY button once to show the music type Then press 1 6 button to choose the diff...

Page 15: ...ne song the consequent song will be played for 10 seconds and so on Press the 2 INT button to cancel 7 Repeat Press the 3 RPT button to repeat the same song continuously The RPT Track no will be shown on the screen indicating the repeatprocess is operating Press 3 RPT button to cancel 8 Random Press the 4 RDM button to play all the files in card USB in random order The RDM Track no will be shown o...

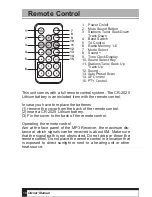
Page 16: ...tance at which signals can be received is about 6M Make sure that the signal path is not obstructed Do not drop or throw the remote control Do not place the remote control in a location that is exposed to direct sunlight or next to a heating unit or other heat source MUTE SEL CLK BND APS PTY AF TA 1 2 3 6 5 4 MODE 1 2 3 4 5 6 7 8 9 11 12 13 14 15 10 1 Power On off 2 Mute Sound Button 3 Stations Tu...

Page 17: ...lace with the proper rating size fuse Press the RESET Button Check and make sure the antenna is connected properly Check and make sure the antenna is the correct length Make sure the antenna is not broken If the antenna is broken replace it The antenna is poorly grounded Check and make sure the antenna is grounded at mounting location File information shows in LCD but will not play If you have fil...

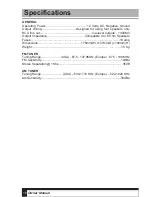
Page 18: ...CA line out low level outputs 1000MV Output Impedance Compatible 4 to 8 Ohm Speakers Fuses 10 amp Dimensions 178mm W x137mm D x100mm H Weight 1 5 Kg FM TUNER Tuning Range USA 87 5 107 9MHz Europe 87 5 108 MHz FM Sensitivity 12dBu Stereo Separation 1 Khz 35dB AM TUNER Tuning Range USA 530 1710 KHz Europe 522 1620 KHz Am Sensitivity 30dBu ...

Reviews: