background image

7

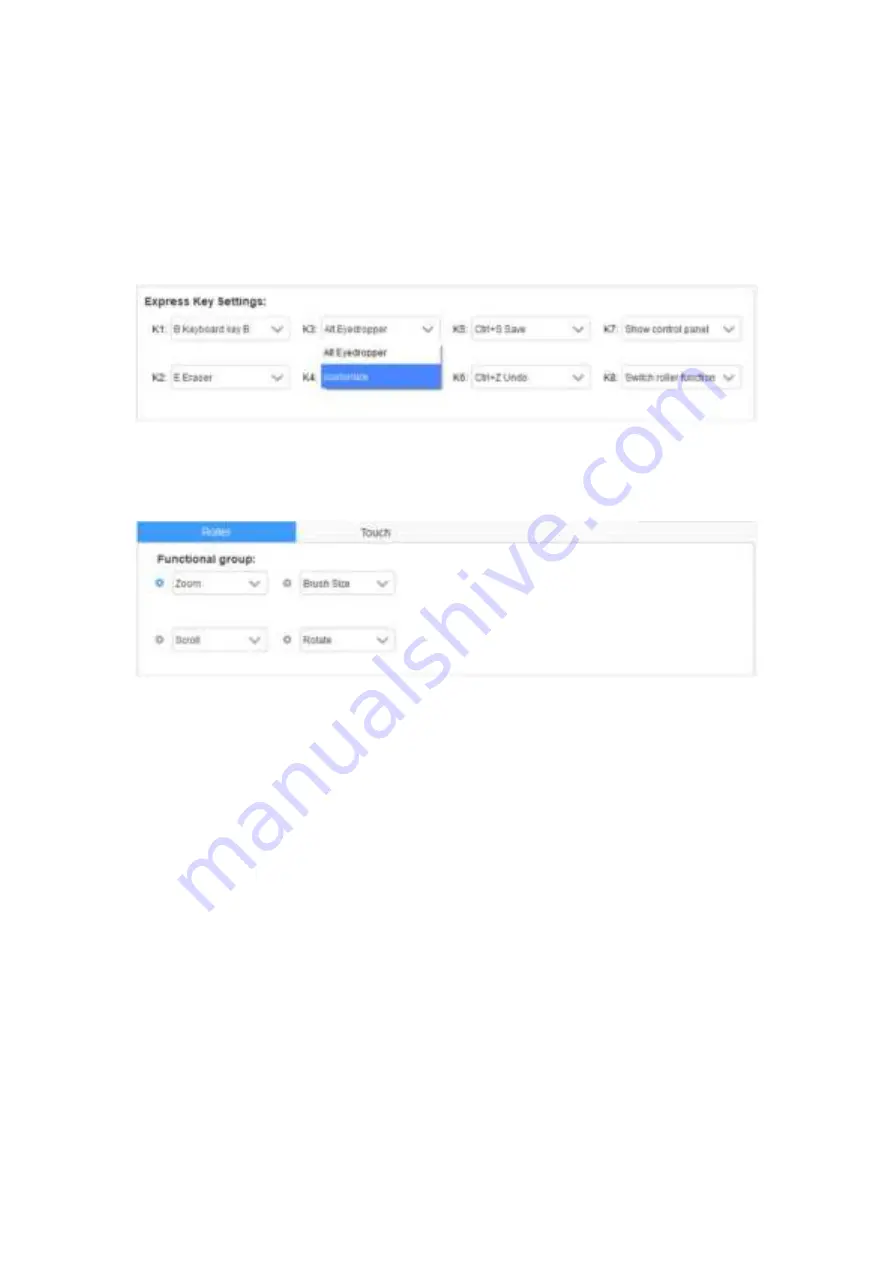
express keys to “Switch Ring function” (if applicable), so that to switch roller or touch

control function.

Customize express key:

Select “customize” from the drop-down menu to customize the function of each

express key. The setting steps are the same as those of digital pen keys (

see 3. Pen

settings

).

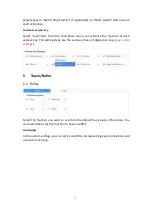
5. Touch/Roller

5.1 Roller

Select the function you want to use from the default four groups of functions. You

can customize or set this function to have no effect.

Customize

In the custom settings, you can set KL and KR to corresponding key combinations and

use custom naming.

Summary of Contents for Deco Pro MW

Page 1: ...Quick Guide Deco Pro SW MW www xp pen com ...

Page 2: ...1 2 3 4 English 5 6 繁体中文 7 8 9 10 11 12 13 14 15 16 17 18 한국어 Français 日本語 Español Deutsch Italiano 19 20 21 22 23 24 Русский язык Português Polski Contents Nederlands ...

Page 3: ...cted to the computer 2 Visit the XP PEN website www xp pen com choose Support section and click Download Choose product model and download the latest driver according to your computer system 3 Follow the prompts to finish the driver installation Wired Connection Connect the pen tablet to your computer The pen tablet will get started automatically Wireless Connection A Connection to the Bluetooth re...

Page 4: ...ro SW MW快速指南 1 有線連接 使用數據線將繪圖板連接至電腦 繪圖板自動開機 2 無線連接 A 藍牙接收器 將藍牙接收器插入電腦並開啟繪圖板 B 藍牙無線直連 僅支援Windows Mac OS 1 開啟繪圖板后長按左上角快速鍵3S 進入等待配對狀態 藍燈快閃 2 打開電腦藍牙功能 添加藍牙設備 搜尋到Deco Pro SW MW設備名 稱 點擊後完成藍牙配對 藍燈常亮 3 撥動電源開關至OFF位置關機 二 連接方式 1 2 3 4 5 6 8 7 溫馨提示 為了使您的繪圖板 繪圖顯示器能夠展現最佳性能 建議您定期查看官網驅動更新 三 下載安裝驅動程式 1 確保您的繪圖板 繪圖顯示器與電腦處於連接狀態 2 登陸XP PEN 官網 www xp pen com 進入 支持 頁面 點擊 下載 依 照產品型號和您電腦作業系統 下載並安裝對應的驅動程式 3 開啟驅動程式 設定參數並測試產品...

Page 5: ... Kontrolllampe violett sind der rote und blaue Status gleichzeitig aktiv 4 Dreh Taste 5 Tastenkombinationen 6 Arbeitsbereich 7 Kontrolllampe 2 a Blinkt Der Stift befindet sich im aktiven Bereich berührt aber das Tablet nicht b Kontinuierlich an Der Stift ist mit dem aktiven Bereich in Kontakt c Aus Der Stift befindet sich außerhalb des aktiven Bereichs 8 Power Taste Kurzanleitung für die Deco SW MW ...

Page 6: ...etooth en el ordenador y a continuación pulse la tecla de encendido para encender la tableta de lápiz B Conexión Bluetooth directa solo para Windows Mac OS 1 Pulse la tecla de encendido para encender la tableta de lápiz A continuación pulse prolongadamente la tecla de acceso directo situada en la parte superior izquierda durante 3 segundos para acceder al empareja miento por Bluetooth si el indica...

Page 7: ... B Connexion Bluetooth directe Windows Mac OS uniquement 1 Appuyez sur la touche marche arrêt pour allumer la tablette à stylet Ensuite maintenez la touche de fonction en haut à gauche appuyée pendant 3 secondes pour accéder à l association Bluetooth le témoin bleu clignote rapidement 2 Activez le Bluetooth sur l ordinateur configurez et ajoutez un périphérique Bluetooth recherchez le nom du périph...

Page 8: ...ambi accesi contemporaneamente 4 Roller 5 Tasti di scelta rapida 6 Area attiva 7 Indicatore 2 Indicatore di calligrafia a Lampeggiante la stilo si trova nell area attiva ma non tocca la tavoletta grafica b Sempre acceso la stilo è a contatto con l area attiva c Spento la stilo è al di fuori dell area attiva 8 Tasto di accensione Guida rapida Deco Pro SW MW Connessione cablata Collegare la tavoletta ...

Page 9: ...点滅 バッテリー残量低下 20 b 常時点灯 充電中 c 消灯 満充電 赤と青のステータスライトが同時に点灯する場合 表示色が紫になります 4 ホイール 5 エクスプレスキー ショットカットキー 6 作業エリア 7 ステータス表示ライト2 a 点滅 スタイラスペンは作業エリア内にありますが タブレットに接触して いません b 常時点灯 スタイラスペンは作業エリア内にあり タブレットに接触してい ます c 消灯 スタイラスペンは作業エリア外にあります 8 電源キー Deco Pro SW MWクイックガイド USBケーブルで接続 付属のUSBケーブルでペンタブレットをお使いのパソコンやAndroid端末に接続 します USBケーブルで接続する場合 ペンタブレットが自動的に起動します ワイヤレス接続 A Bluetoothレシーバーで接続 Bluetoothレシーバーをお使いのパソコンやAnd...

Page 10: ...누름 c 항상 켜짐 성공적으로 페어링됨 빨간색 상태 a 점멸 저전력 20 b 점등 충전 중 c 꺼짐 충전 완료 보라색은 빨간색과 파란색 표시기가 동시에 켜져 있음을 나타냅니다 4 롤러휠 5 단축키 6 활성 영역 7 표시등 2 필기 표시기 a 점멸 스타일러스가 활성 영역 내에 있으나 펜 타블렛에 접촉하지 않은 상태 b 점등 스타일러스가 활성 영역에 접촉함 c 꺼짐 스타일러스가 활성 영역을 벗어남 8 전원 키 Deco Pro SW MW 퀵 가이드 유선 연결 연결선을 이용하여 펜 타블렛을 컴퓨터에 연결하십시오 무선 연결 A 블루투스로 연결하십시오 전원을 켜주신후 블루투스 수신기를 컴퓨터와 연결하여 무선 상태로 전환합니다 B 직접 Bluetooth 연결 Windows Mac OS만 해당 1 전원 키를 눌러 펜 타블...

Page 11: ...ki są włączone jednocześnie 4 Rolka 5 Klawisze skrótów 6 Aktywny obszar 7 Wskaźnik 2 Wskaźnik pisma ręcznego a Miga Rysik znajduje się w aktywnym obszarze ale nie dotyka tabletu z piórem b Świeci ciągle Rysik dotyka aktywnego obszaru c Nie świeci Rysik znajduje się poza aktywnym obszarem 8 Przycisk zasilania Deco Pro SW MW Krótki przewodnik Połączenie przewodowe Podłącz tablet z piórem do komputer...

Page 12: ...красный и синий индикаторы светятся одновременно 4 Колесо управления 5 Клавиши быстрого доступа 6 Рабочая область 7 Индикатор 2 Индикатор рукописного ввода a Мигает стилус находится в рабочей области но не касается планшета b Постоянно светится стилус соприкасается с рабочей областью c Индикатор не светится стилус находится за пределами рабочей области 8 Кнопка питания Краткое руководство по экспл...

Page 13: ...ão liga desliga para ligar o tablet B Conexão Bluetooth direta apenas Windows Mac OS 1 Ative o botão liga desliga para ligar o tablet Em seguida prima durante 3 segundos a tecla de atalho no canto superior esquerdo para entrar no emparelhamento Bluetooth com o indicador azul piscando rapidamente 2 Ligue o Bluetooth no computador configure e adicione o dispositivo Bluetooth procure o nome do disposi...

Page 14: ...dig aan zijn 4 Rol 5 Sneltoetsen 6 Actief gebied 7 Lampje 2 Handschriftlampje a Knippert De stylus bevindt zich in het actieve gebied maar raakt de pentablet niet aan b Altijd aan De stylus is in contact met het actieve gebied c Uit De stylus bevindt zich buiten het actieve gebied 8 Aan uit toets Beknopte handleiding voor de Deco Pro SW MW Bekabelde verbinding Sluit de pentablet aan op uw computer...

Page 15: ...1 XP PEN Driver User Manual ...

Page 16: ...2 The supported product models are as follows Pen tablet Deco Fun series Deco Fun XS S L ...

Page 17: ...e folder and operate the exe file Windows or dmg Mac file and then follow the prompts until installation is completed Notes 1 Before installation please temporarily close the antivirus software and firewall as well as all opened software 2 If other pen tablet drivers have been installed on the computer please uninstall them first 3 It is recommended to restart the computer after installation is co...

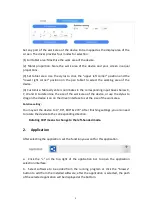
Page 18: ...the same time If multiple monitors are used in extended mode it is necessary to select the work area of the device on the driver interface to map to the corresponding monitor The driver provides three modes to set the display area of the screen 1 Set full screen Set the screen area of the selected monitor to the maximum 2 Set screen area Use the mouse to manually set the display area of the screen...

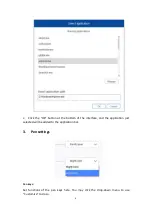
Page 19: ...ine the size of the work area of the device or use the stylus to drag on the device icon on the driver interface to set the size of the work area Rotation setting You may set the device to 0 90 180 270 After finishing settings you also need to rotate the device to the corresponding direction Rotating 180 means to change to the left handed mode 2 Application After selecting the application set the ...

Page 20: ...on at the bottom of the interface and the application just selected will be added to the application bar 3 Pen settings Pen keys Set functions of the pen keys here You may click the drop down menu to use Customize to do so ...

Page 21: ...rol You may configure mouse controls and keyboard keys here With the Keyboard Shift and Left Click selected shortcut actions are enabled in software that supports such combination key Input from the keyboard You may configure keyboard shortcuts here for example set it as Alt A in 3D MAX software and the alignment tool can be used You may set multiple sets of keyboard shortcuts here When you press ...

Page 22: ...nate is to scale down the display area of your screen to the work area of the tablet display Relative coordinate mouse mode The operation method of this mode is the same as that of a normal mouse Windows Ink Some drawing software can support Windows Ink pen pressure and you can select or cancel Windows Ink to open or close this function which is opened by default 4 Express keys To use the express ...

Page 23: ...he function of each express key The setting steps are the same as those of digital pen keys see 3 Pen settings 5 Touch Roller 5 1 Roller Select the function you want to use from the default four groups of functions You can customize or set this function to have no effect Customize In the custom settings you can set KL and KR to corresponding key combinations and use custom naming ...

Page 24: ...8 5 2 Touch You can set the touch to Mouse Mode or Roller Mode Scroll mode The setting procedure is the same as that of the roller see 5 1 Roller Mouse mode You can use the touch as a mouse 6 Settings ...

Page 25: ...Checking this function will disable the tilt effect of the stylus Diagnostic tool When there is any problem during your use of the driver you can use diagnostic tool Import export config You can import and export the configured express keys and other functions to store and read their settings Notes When you need to import export the changed functions please click the OK button on the left side of ...

Page 26: ...rdance with the instructions may cause harmful interference to radio communications However there is no guarantee that interference will not occur in a particular installation If this equipment does cause harmful interference to radio or television reception which can be determined by turning the equipment off and on the user is encouraged to try to correct the interference by one or more of the f...

Reviews: