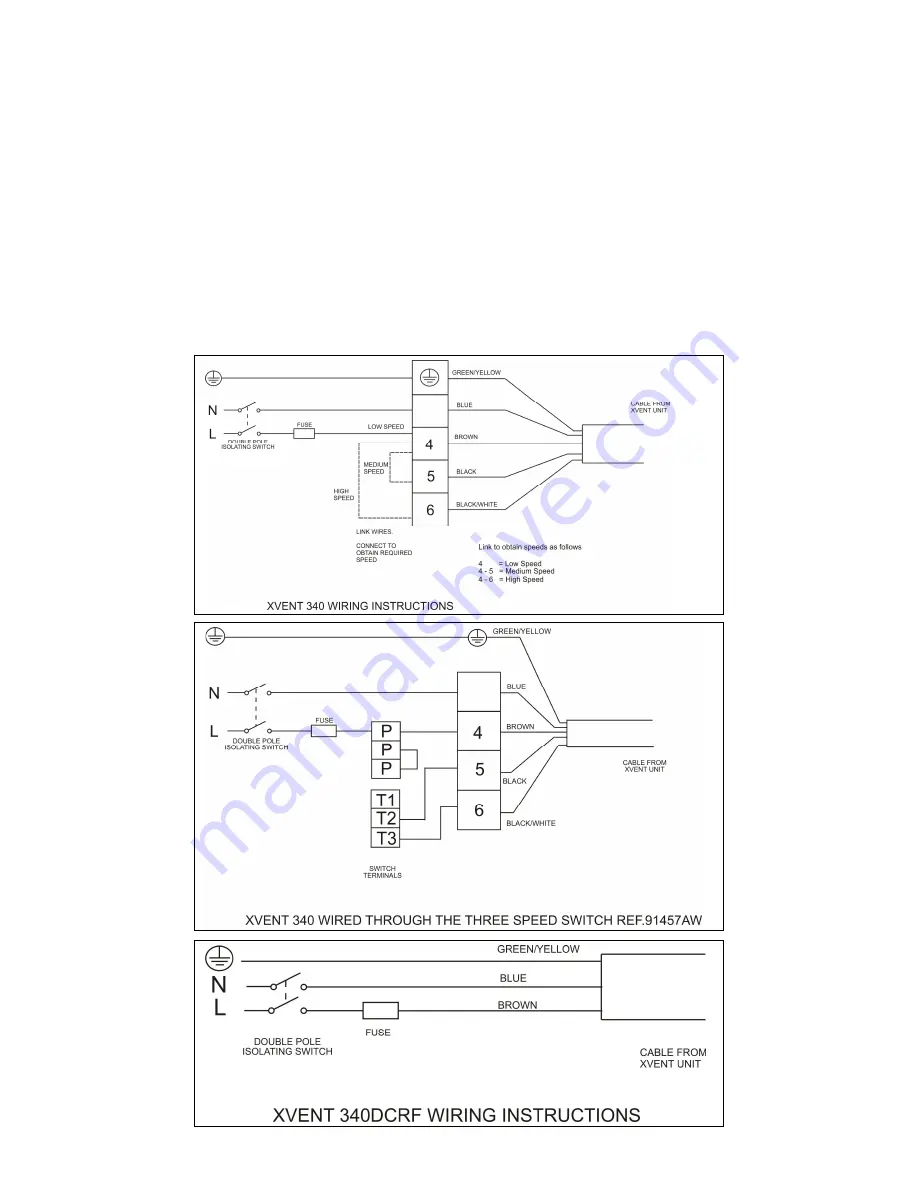
background image


Wiring Instructions 


This appliance is intended for connection to fixed wiring 


Check that the electrical rating shown on the fan matches the mains supply. 


WARNING: THIS APPLIANCE MUST BE EARTHED


All installations must be supervised by a qualified electrician. 


Installations and wiring must conform to current IEE Regulations (UK), local or appropriate 
regulations (other countries). 


A means for disconnection must be incorporated in the fixed wiring in accordance with the 
wiring rules 


1.


Switch off the mains electrical supply and remove all fuses before commencing wiring. 

2.


Wire the fan as shown below 

3.


Connect the cable from the isolating switch to the electrical supply wiring. 

4.


Refit fuse before turning on the electricity supply 


Summary of Contents for 340

Page 1: ...eed position as a background position if the house is not fully occupied In a smaller dwelling or flat the low speed position could be the normal running position with the middle position as a boost The fan is designed to run continuously 24 hours a day It is fitted with an energy efficient electric motor Maintenance In normal running the design of the fan attracts very little dirt It may be advis...

Page 2: ...5m away from open door or window or the inlet of another ventilation device The fan unit must always be firmly fixed This can be done by either of the methods below Using woodscrews fixed through the corner of the ventilator box Using threaded bolts in the notched holes Electrical The Xvent 340 and Xvent 340DC can be wired to run at speed 1 2 or 3 or by use of a 3 speed switch which gives speed ch...

Page 3: ...llations and wiring must conform to current IEE Regulations UK local or appropriate regulations other countries A means for disconnection must be incorporated in the fixed wiring in accordance with the wiring rules 1 Switch off the mains electrical supply and remove all fuses before commencing wiring 2 Wire the fan as shown below 3 Connect the cable from the isolating switch to the electrical supp...

Page 4: ...er PROGRAMMING Using a fine screwdriver briefly 1 6 sec press the flush programming key situated on the receiver on the Xvent unit A light signal starts flashing flashing 1 sec Program all RF emitters that have to interwork with the receiver one by one The correct reception of an address is acknowledged by a long light signal 4sec Up to 32 emitters can be programmed per receiver When this maximum ...

Page 5: ...he Xvent 340 is guaranteed against defects for 3 years from the date of purchase UK The Xvent 340DC Xvent 340DCRF is guaranteed against defects for 5 years from the date of purchase Please keep your purchase receipt If you have any problems contact Xpelair s Head Office at the address shown below Customers outside UK see international below UK Xpelair have a comprehensive range of services includi...

Reviews: