Preparing the hole.
If working above ground floor level, safety precautions must be observed.
WARNING: EYE PROTECTION MUST BE WORN DURING ALL DRILLING AND CHISELLING OPERATIONS.
If installing in a Wall.
1.
Check there are no buried pipes or cables in the wall or obstructions on the outside e.g. electricity, gas, water. If in doubt, seek
professional advice.
2.
Mark on the wall the centre of the duct hole.
For SL100 range the centre of the hole should be at least 110mm away from the edge of the mounting surface,
For the SL150 range the centre of the hole should be at least 145mm away from the edge of the mounting surface.
3.
Use this centre to mark a circle ƒ100mm for SL100 range / ƒ150mm for SL150 range (or to suit the wall duct ƒ115mm for
SL100 range / ƒ165mm for SL150 range).
If core drill equipment is available:
4a. Use as directed by core drill manufacturer.
If core drill equipment is not available:
4b. Drill a centre hole right through the wall.
5.
Cut the hole. Do not cut right through the wall. (The recommended method is to drill a series of holes, close together, around
the edge of the cutting line and remove the brick between the holes with a chisel).
6.
Go outside and cut a hole in the outer wall, repeating the process above.
7.
Cut ducting to the correct length if required.
8.
Fit the ducting. Ensure that the duct slopes down away from the fan to allow drainage of any incoming rain water to the
outside.
9.
Make good the hole Allow the mortar to set before continuing the fan installation.
If installing in a ceiling.
1.
Check there are no buried pipes or cables in the ceiling/joists etc. If in doubt, seek professional advice.
2.
Cut a hole ƒ100mm for SL100 range or ƒ150mm for SL150 range.
Preparing the fan for installation.
Remove the front cover by removing the screw from the underside of the cover and pulling off the cover from the bottom
corners first.
Remove the electrical cover by removing the 2 screws.
Mount the fan in the hole
If working above ground floor level, safety precautions must be observed.
If installing in a wall or ceiling.
Mark the position of the backplate
1.
Hold the backplate so that the word “TOP” marked on it is orientated correctly.
2.
Carefully insert the lip into the wall duct/ceiling.
3.
Adjust the position of the backplate until it is level.
4.
Mark on the wall/ceiling the positions of the fixing holes in the backplate.
5.
Remove the back plate from the ducting.
6.
Drill screw holes in these positions if necessary, and fit wall plugs if necessary.
Mount the backplate.
1.
If installing in a ceiling, appropriate termination ancillaries are required. Follow instructions provided.
2.
Remove knockout. Feed the mains cable through the cable entry hole in the back plate to the terminals.
3.
Insert the lip of the backplate into the wall duct/ceiling as before.
4.
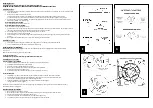
Fasten the backplate to the wall/ceiling using appropriate fasteners. See figure C.
If using screws, do not over tighten.
The fans may also be fixed to the interior of the ceiling using the clamping brackets. Tighten the screws until the fan is firmly
fixed within the hole - see figure D.
Wire the electrical connections.
1.
Make sure the mains supply is isolated,
2.
Wire the fan as shown in figure E. Check the fan model to diagram, feeding the cable to terminal block.
3.
Switch off the mains electrical supply and remove fuses
4.
Connect the cable from the isolating switch to the electrical supply wiring.
For fixed wiring circuits the protective fuse for the appliance must not exceed 5A.
E
F
G


