https://www.XPOtool.com
Item 63368
Page 4
The Tool Experts
06 2022-1
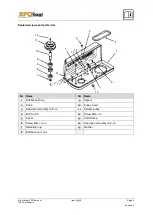
Assembly
№
Name
1
Table support
2
Table support lock handle
3
Column
4
Foot
5
Column support
6
Hex bolt M8×20
7
Lock screw table/bevel
8
Table
9
Head assembly
1.
Place the base (4) on a table or a workbench.
2.
Insert the components of the column into the base. Make sure that the holes of the column
support (5) are aligned with the holes of the base (4).
3.
Fit the M8 screws (6) through the holes of the column support (5) and the base (4) and tighten
them with a wrench.
4.
Place the table assembly onto the column.
5.
Attach the table support lock handle (2) to the table support (1) by inserting it from the left.
Tighten the connection by hand.
6.
Clean the tapered hole of the chuck. Use a clean cloth to wipe the nose of the spindle. Push the
chuck as far as possible onto the spindle nose. Use a piece of wood or a wood hammer to tap
the nose of the chuck lightly. This helps you ensure that the chuck sits correctly on the spindle.
7.
Fix the M5 pan head screw to the guard and mount the knob by turning it tight.
8.
Determine the desired speed for the drilling process and ensure that the belt is installed in the
correct position for the selected speed. Release the belt tension handle and turn the motor
anticlockwise to apply tension to the belt.


