background image

www.xprgroup.com

6

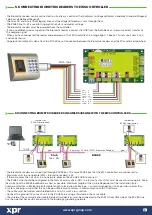
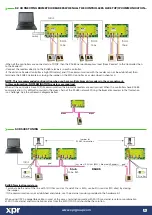
5.2 CONNECTING BIOMETRIC READERS WHEN ALL THE CONTROLLERS HAVE TCP/IP COMMUNICATION

50  ohm        

50  ohm        

Jumper for

RS485 termination

TCP/IP

gnd

gnd

1 km max / 32 Units (EWS + Biometric Readers)

Stub

max. 5m

RS485

TCP/IP

Switch

50m

max.

50m

max.

50m

max.

•When all the controllers are connected via TCP/IP, then the RS485 network becomes local (from Reader 1 to the Controller then

to the Reader 2).

•Connect the readers directly to the Rs485 terminals in each controller.

•If the distance Reader-Controller is high (50meters) and if the communication with the reader can not be established, then

terminate the RS485 network by closing the jumper in the EWS Controller or as described in chapter 4.

NOTE: This is recommended configuration when you have multiple biometric readers in the same network. 

In this configuration, NO TERMINATION resistors are required.

When all the controllers have TCP/IP communication the biometric readers are easily wired. When the controllers have RS485

communication, it is difficult to maintain the daisy chain of the RS485 network. Wiring the biometric readers in that formation

is a challenge. See the schematic diagram bellow.

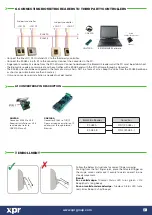
5.3 RS485 TUNING

Rs485 Termination resistors:

- Terminate both ends of the line with 120 Ohm resistor. If end of line is EWS, use built in resistor (120 ohm) by closing 

   the jumper. 

- If the communication is not established and stable, use the external resistors provided in the hardware kit. 

When using CAT 5 compatible cable, in most of the cases, termination made with 50 Ohm external resistor or combination 

of 50 Ohm external and termination resistor from the EWS (120 Ohm) should be the solution.

RS485

RS485

Summary of Contents for B100PAD-M

Page 1: ...www xprgroup com 1 Biometric Keypad Reader EN INSTALLER MANUAL B100PAD M v c2...

Page 2: ...FINGERPRINTS FROM A READER 8 3 ENROLLING FINGERPRINTS FROM DESKTOP READER 8 4 DELETING FINGERPRINTS 8 5 UPLOADING THE FINGERPRINTS TO THE BIOMETRIC READERS 8 6 FIRMWARE UPDATE 8 7 SEND CONFIGURATION 8...

Page 3: ...tdoors access control applications It offers storage up to 100 fingerprints programmable Wiegand Output 8 to 128 bits and selectable PIN Code length Configuration of the readers and fingerprint enroll...

Page 4: ...wall mount box fitted with additional heater if very low temperature to keep a constant sensor level performance XPR cannot guarantee the functionality of the product if measures and advice before are...

Page 5: ...readers are connected through RS485 bus The same RS485 bus that the EWS controllers are connected to Maximum units in one network EWS Biometric readers is 32 If there are more than 32 units in one net...

Page 6: ...ration when you have multiple biometric readers in the same network In this configuration NO TERMINATION resistors are required When all the controllers have TCP IP communication the biometric readers...

Page 7: ...inger on the swipe sensor and move it evenly towards oneself in one steady movement Result For a valid swipe Tricolour Status LED turns green OK Beep short long beep For an invalid or misread swipe Tr...

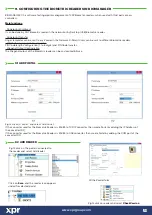
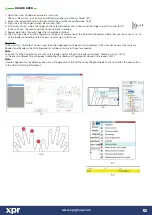
Page 8: ...he type a third tab will appear Biometric Go to that tab and put the serial number of the Biometric Reader 8 3 Important Note The serial number of the reader can be found on a sticker inside the reade...

Page 9: ...ew and the fingerprint will be sent automatically to all Biometric Readers where that user has access i e to all the readers according to the Access Level assign to that user Example If the user has U...

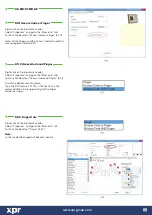
Page 10: ...epeat point 4 5 for each finger that should be enrolled 7 Click on Save New and the fingerprint will be sent automatically to all Biometric Readers where that user has access i e to all the readers ac...

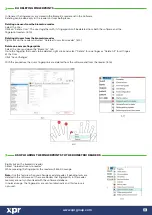
Page 11: ...Delete one or more fingerprints Select the User and open the Biometric tab Go to the fingertip that needs to be deleted right click and select Delete for one finger or Delete All for all fingers of t...

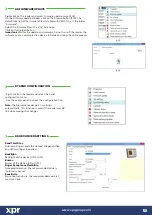
Page 12: ...or any communication device in between during the entire process Right click on the reader and select the Send configuration menu See the events panel to check the configuration flow Note The biometri...

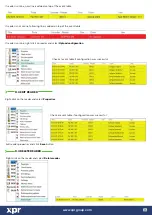
Page 13: ...ill send the same wiegand number 8 21 Right click on the biometric reader Select Properties and go to the Biometric tab For Entry Mode select Access Code and Finger 8 21 Use of the double security mod...

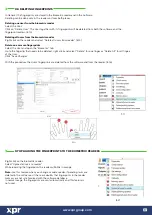
Page 14: ...in the network or by Desktop USB Biometric reader Fingerprint Transfer Finger templates can be sent to any Reader in the Network Different Users can be sent to different Biometric readers PIN Codes ma...

Page 15: ...s added on top of the event table If reader is online right click on reader and select Upload configuration Right click on the reader and select Properties Check at event table if configuration was su...

Page 16: ...ll be sent automatically to all Biometric Readers where that user has access i e to all the readers according to the Access Level assign to that user Example If the user has Unlimited Access level the...

Page 17: ...Delete one or more fingerprints Select the User and open the Biometric tab Go to the fingertip that needs to be deleted right click and select Delete for one finger or Delete All for all fingers of t...

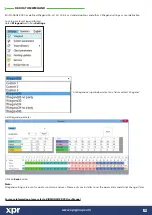
Page 18: ...setup custom Wiegand format Select Wiegand menu from Settings At Wiegand setup window select one from customs Wiegand Set Wiegand parameter Click on Save button Note Wiegand settings are out of scope...

Page 19: ...imately 100 us microseconds Time between two data bits approximately 1 ms millisecond Both data lines D0 and D1 are high Description for the 26 bits Wiegand format Each data block consists of a first...

Page 20: ...evice near or above heating equipments If cleaning do not spray or splash water or other cleaning liquids but wipe it out with smooth cloth or towel Do not let children touch the device without superv...

Reviews: