background image

MOUNTING

If the biometric reader is installed and used outdoor, the reader MUST be fitted with MCD-MINI cover available in our accessories 
in order to protect the sensor from direct rainfall. The operating temperature of the product is between -15ºC - + 50ºC. If the reader 
is installed in an environment where the temperature can drop below -10ºC or/and if the sensor could only be exposed to direct 
sunlight, it is strongly recommended to install the reader inside a third party sealed wall mount box (fitted with additional heater if 
very low temperature) to keep a constant sensor level performance. XPR™ cannot guarantee the functionality of the product if 
measures and advice before are not followed. 
It is also strongly recommended to use double technology biometric readers when use outdoor to offer first higher security but also 
the possibility to use different readers depending on users.

100 mm

94 mm

30 mm

Cable

Ø6.0

3

0

m

m

ATPD-MINI

B

12V DC
 

LED Green -

D0

D1

LED Red -

GND

A

Tamper
Tamper

RS485

Orange

Yellow

Red

Black

Pink

Violet

Green

Gray

Blue

White

WIEGAND

WIRING

LR-

LG-

Tricolor LED (Red, Green, Orange)

12V DC
 GND

Tamper

Tamper

Tamper Switch(NO)

9-14V DC

ground

D1
D0

Data 1

Data 0

LR-

Red LED -

LG-

Green LED -

A
B

RS485 A

RS485 B

Tamper Switch(NO)

Dipswitch 2: 

HID/AWID

Dipswitch 2: 

EM/HID

ON: 


HID

OFF: 

AWID

ON: 


HID

OFF: 

EM

Note: Dipswitch No.1 is not used.

BIOPROX-AH

BIOPROX-EH

ON

1 2

ON

1 2

4

Summary of Contents for B100PROX-AH

Page 1: ...Biometric Proximity Reader B100PROX EH AH INSTALLER MANUAL EN 1...

Page 2: ...LING FINGERPRINTS FROM A READER 8 3 ENROLLING FINGERPRINTS FROM DESKTOP READER 8 4 DELETING FINGERPRINTS 8 5 UPLOADING THE FINGERPRINTS TO THE BIOMETRIC READERS 8 6 FIRMWARE UPDATE 8 7 SEND CONFIGURAT...

Page 3: ...AH Reading distance 2 to 5cm B100PROX EH AH is a Wiegand biometric and Proximity EM HID AWID HID compatible reader for outdoors access control applications It offersstorageupto100fingerprintsandprogr...

Page 4: ...performance XPR cannot guarantee the functionality of the product if measuresandadvicebeforearenotfollowed Itisalsostronglyrecommendedtousedoubletechnologybiometricreaderswhenuseoutdoortoofferfirsthig...

Page 5: ...1 Free In 1 Rx Tx Busy System OK Door 1 Door 2 Free Out 1 Free Out 2 TCP IP Earth 12Vdc Out 12V gnd D1 D0 12V gnd led2 led1 12V IN1 IN1 IN2 IN2 D1 D0 12V gnd led2 led1 PB2 PB1 DS2 DS1 gnd gnd COM NC1...

Page 6: ...ollers have TCP IP communication the biometric readers are easily wired When the controllers have RS485 communication it is difficult to maintain the daisy chain of the RS485 network Wiring the biomet...

Page 7: ...stallation CNV200 Converter RS485 to USB Requires installation as USB serial device refer to CNV200 Manual CNV300 Converter RS485 to TCP IP Does not require installation IP address set through Interne...

Page 8: ...nd put the serial number of the Biometric Reader 8 3 Important Note The serial number of the reader can be found on a sticker inside the reader on the packaging box and it can be search from the softw...

Page 9: ...cally to all Biometric Readers where that user has access i e to all the readers according to the Access Level assign to that user Example If the user has Unlimited Access level then the fingerprints...

Page 10: ...reader will continuously blink in orange 6 Repeat point 4 5 for each finger that should be enrolled 7 Click on Save New and the fingerprint will be sent automatically to all Biometric Readers where th...

Page 11: ...fingertip that needs to be deleted right click and select Delete for one finger or Delete All for all fingers of the User Click Save Changes With this procedure the User s fingerprints are deleted fr...

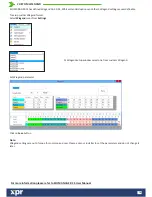
Page 12: ...ARE UPDATE Right click on the reader and select the Send configuration menu See the events panel to check the configuration flow Note The biometric reader gets its settings automatically This function...

Page 13: ...perties and go to the Biometric tab For Entry Mode select Card and Finger 8 21 Use of the double security mode Present the card ex 88009016 in the next 8 sec the reader will blink in orange waiting fo...

Page 14: ...on 1 to 8 digits and PIN Code transfer Wiegand Output Configuration The Wiegand output of the Biometric reader can be customized bitwise ADD READER Right click on the portal connected to the reader an...

Page 15: ...eader is online right click on reader and select Upload configuration Check at event table if configuration was successful EDIT READER Right click on the reader and select Properties Editreaderpropert...

Page 16: ...automatically to all Biometric Readers where that user has access i e to all the readers according to the Access Level assign to that user Example If the user has Unlimited Access level then the fing...

Page 17: ...fingertip that needs to be deleted right click and select Delete for one finger or Delete All for all fingers of the User Click Save Changes With this procedure the User s fingerprints are deleted fr...

Page 18: ...dformat SelectWiegandmenufromSettings At Wiegand setup window select one from customs Wiegand Set Wiegand parameter Click on Save button Note Wiegand settings are out of scope for common end user Plea...

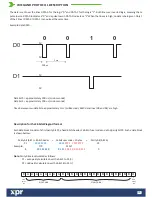
Page 19: ...ely 100 us microseconds Time between two data bits approximately 1 ms millisecond Both data lines D0 and D1 are high Descriptionforthe26bitsWiegandformat EachdatablockconsistsofafirstparitybitP1 afixe...

Page 20: ...eheatingequipments Ifcleaning donotsprayorsplashwaterorothercleaningliquidsbutwipeitoutwithsmoothclothortowel Donotletchildrentouchthedevicewithoutsupervision Note that if the sensor is cleaned by det...

Reviews: