background image

CHTH2

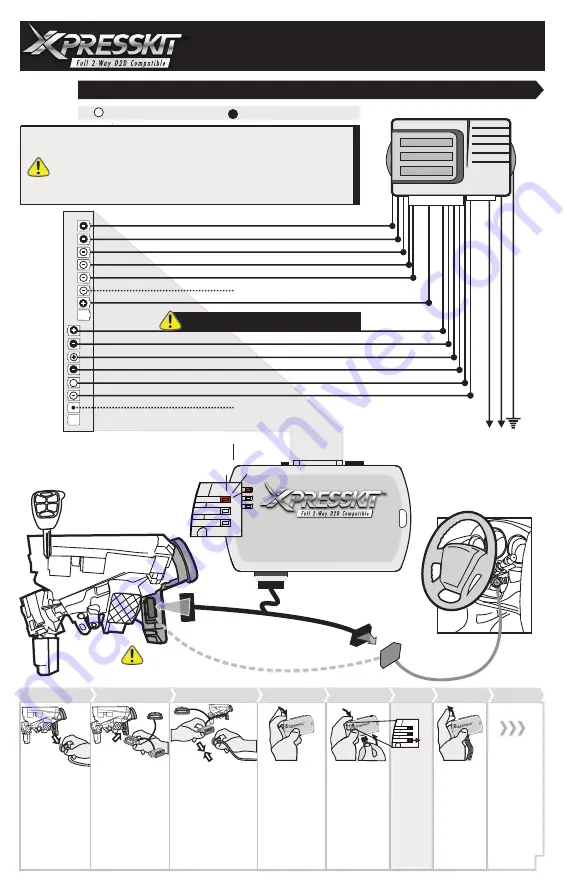
  WITHOUT D2D \ SANS D2D

D

GO PROGRAM: 1

OUTPUT | SORTIE

INPUT | ENTRÉE

(-) While running

Lock | Verrouillage

Ignition 1

Tach

~

Unlock | Déverrouillage

Trunk | Valise

P

ar

king Light | Lumièr

e de Sta

tionnement

12V Ba

tter

y | 12V Ba

tterie

Gr

ound | Masse

n.c.

VEHICLE

VÉHICULE

Lt.Blue | Bleu Pâle

White | Blanc

Pink | Rose

Blue | Bleu

Orange

Purple | Mauve

Yellow | Jaune

Lt. Blue/Black | BleuPâle/Noir

White/Black | Blanc/Noir

Pink/Black | Rose/Noir

Green | Vert

Orange/Black | Org/Noir

Purple/White | Mauve/Blanc

Yellow/Black | Jaune/Noir

DO NOT CONNECT ON THE VEHICLE

NE PAS BRANCHER SUR LE VÉHICULE

Remote Starter or Alarm | Démarreur ou alarme

CONN. 2

2

n.c.


CHALL

REMOTE CAR STARTERS AND ALARM INTERFACE

E-Brake Status

Frein Main

 | État 

Hood Status

Capot

 | État 

Door Status

Porte

 | État 

Brake Status

Frein

 | État 

Trunk Status

Valise

 | État 

7

(+) Start

D

CONNECTION

Ign.1, Ign.2, Acc.1, Acc.2, Start1 & Key Sense wires 

from the vehicle 

ignition main harness must be connected to the remote-starter. 

Do not


connect the CHALL Yellow and Light Blue/Black wire.
Les fils 

Ign.1, Ign.2, Acc.1, Acc.2, Start1 & Key Sense 

du harnais 

d'ignition principale du véhicule doivent être branchés au démarreur à 
distance. 

Ne pas

 brancher le fil Jaune et le fil Blue pâle/Noir du CHALL.

NOTE

Dodge Dakota

 2005-2006 - 

Dodge Durango

 2004-2006

Programming

Button

Bouton de
Programmation

CONN. 2

CHALL

4

5

6

MALE
MÂLE

FEMALE
FEMELLE

CHTH

2

Not used
Pas utilisé

Connect

 the 

immobilizer 

connector to the 

female connector of 

the T-Harness.

Branchez

 le 

connecteur d’immo-

bilisateur dans le 

connecteur femelle 

du harnais en T

Press and 

hold

 the 

programming 

button:

Appuyez et 

maintenir 

le 

bouton de 

programmation:

Insert 

the 8 

Pin connector 

from the T-

Harness.

Insérez

 le 

connecteur 8 

pins du 

Harnais en T.

Release

 the 

programming 

button.

Relâchez 

le 

bouton de 

program-

mation.

The Red 

LED will 

turn ON.

La DEL 

Rouge 

s'allume.

ON

3

Connect 

the male 

connector of the 

T-Harness to the 

immobilizer 

module.

Branchez 

le 

connecteur Mâle 

du Harnais en T 

dans le module 

d’immobilisation.

Disconnect

 the 

immobilizer 

connector wich 

is located at the 

key cylinder.

Débranchez

 le 

connecteur 

d’immobilisateur 

situé au barillet 

de la clé.

Continue 

with 

programming 

1 page 10.

Continuez 

avec la 

program-

mation 1 
page 10.

6

Key cylinder
Barillet de la clé

VEHICLE

VÉHICULE

3

immobilizer 
connector
connecteur 
d’immobilisateur 

Carefully unplug the connector.
Débrancher le connecteur avec précaution.

8

1

4

5

Summary of Contents for 20120503

Page 1: ...ecommend you check for firmware and or install guide updates prior to installing this product Avertissement de mise jour Des mises jour de micrologiciels sont affich es sur le Web sur une base r guli...

Page 2: ...fer to the vehicle fit guide to determine which T harness is required Avant de proc der avec l installation r f rez vous au Guide des V hicules pour d terminer lequel des Harnais en T est requis 2 Pro...

Page 3: ...F E F C D E F E F C D D E F E F E F E 2 E F C D E F E F C D C D C D C D C D C D C D C D Immobilizer Bypass Contourne Immobili C D A B A B A B A B A B A B A B A B A B C Programming 2 1 2 2 1 2 2 1 1 2...

Page 4: ...se tat Brake Status Frein tat Hood Status Capot tat Door Status Porte tat E Brake Status Frein Main tat Parking Light Lumi res de Stationnement Ground Masse 2 wire to wire Always connect Toujours bran...

Page 5: ...ON IGNITION BARREL BARRILET D IGNITION FEMALE FEMELLE MALE M LE VEHICLE V HICULE IGNITION PLUG CONNECTEUR D IGNITION 4 6 5 Programming Button Bouton de Programmation CONN 2 CHALL CHTH1 3 Not used Pas...

Page 6: ...O PROGRAM 1 Remote Starter or Alarm D marreur ou alarme 1 way Only connect for 1 Way D2D Branchez pour D2D 1 voie seulement CONN 2 2 D2D PORT VEHICLE V HICULE wire to wire Always connect Toujours bran...

Page 7: ...oivent tre branch s au d marreur distance Ne pas brancher le fil Jaune et le fil Blue p le Noir du CHALL NOTE Dodge Dakota 2005 2006 Dodge Durango 2004 2006 Programming Button Bouton de Programmation...

Page 8: ...RS AND ALARM INTERFACE 8 Tach Brake Status Frein tat Trunk Status Valise tat E Brake Status Frein Main tat Hood Status Capot tat Door Status Porte tat CHALL CHTH2 E CONNECTION Connect the immobilizer...

Page 9: ...NPUT ENTR E 30 86 85 87 87a Programming Button Bouton de Programmation CONN 2 Remote Starter or Alarm D marreur ou alarme Starter While running While running Ignition 2 Ignition 2 Starter 1 Not used P...

Page 10: ...u d marreur Ground the Purple White wire of the 16 pin connector for 1 second Mettez la masse le fil Mauve Blanc du connecteur 16 pins pour 1 seconde Vehicles with OEM alarm V hicule avec alarme d ori...

Page 11: ...l 11 off Flash Press and release the programming button on the CHALL once Appuyez et rel chez le bouton de programmation du module CHALL Or Ou With OEM remote Avec T l commande d origine Without OEM r...

Page 12: ...O ANY CONSEQUENTIAL DAMAGES INCIDENTAL DAMAGES DAMAGES FOR THE LOSS OF TIME LOSS OF EARNINGS COMMERCIAL LOSS LOSS OF ECONOMIC OPPORTUNITY AND THE LIKE NOTWITHSTANDING THE ABOVE THE MANUFACTURER DOES O...

Reviews: