background image

15

installation

Installation

INSTALLATION CHART

WARNING

• Risk of bursting, resulting in injury. Never use Plastic pipe for 

compressed air.

CAUTION

• Never use lubricator for paint spraying or similar applications.

Summary of Contents for AC5060B

Page 1: ...this unit FAILURE TO COMPLY WITH INSTRUCTIONS IN THIS MANUAL COULD RESULT IN THE VOIDING OF YOUR WARRANTY AND PERSONAL INJURY AND OR PROPERTY DAMAGE THE MANUFACTURER OF THIS AIR COMPRESSOR WILL NOT BE...

Page 2: ...15 Installation Chart 16 Typical Installation Controls 17 Compressor Controls Electrical Power Requirements 18 Electrical Wiring 18 Main Power Panel 18 Main Power Disconnect Switch 18 Low Voltage Pro...

Page 3: ...ey Alignment 25 Adjusting Drive Belt Tension 25 Pulley Alignment 27 Cleaning the Air Filter 27 Checking the Relief Valve 27 Testing for Leaks 27 Storage 28 Maintenance Chart Troubleshooting 29 Trouble...

Page 4: ...owner s manual thoroughly will help avoid any personal injury or damage to your pump By knowing how best to operate this machine you will be better positioned to show others who may also operate the u...

Page 5: ...ce 1 866 770 1711 for information on servicing always provide the product model and identification numbers You will need to locate the model and serial number for the pump and record the information i...

Page 6: ...hich if not avoided might result in minor or moderate injury NOTICE indicates a situation that could result in equipment damage Follow safety messages to avoid or reduce the risk of injury or death Ha...

Page 7: ...ssor tank can severely impair tank strength and cause an extremely hazardous condition Welding or modifying the tank in any manner will void the warranty Check the manufacturer s maximum pressure rati...

Page 8: ...the compressor while tired or under the influence of drugs or alcohol warning Risk of Burns High temperatures are generated by the pump and manifold To prevent burns or other injuries DO NOT touch the...

Page 9: ...r birth defects and or reproductive harm warning Risk of Hearing Always wear hearing protection when using an air compressor Failure to do so may result in hearing loss warning Wash hands after handli...

Page 10: ...to tank and compressor on stationary models the tank must be shimmed to the pump base is level within 1 8 to distribute oil properly All feet must be supported shimming where necessary prior to attach...

Page 11: ...nutes then press never force the motor reset switch to restart the motor The pump see B compresses the air and discharges it into the tank The tank see C stores the compressed air The pressure switch...

Page 12: ...12 overview basic air compressor components FIG 1...

Page 13: ...used This ensures maximum power to the compressor and maximum air pressure to the tool If both of these conditions cannot be met it is better to locate the compressor close to the power panel and use...

Page 14: ...14 assembly FIG 2 4 Connect an air hose or distirbution line not included to the compressor...

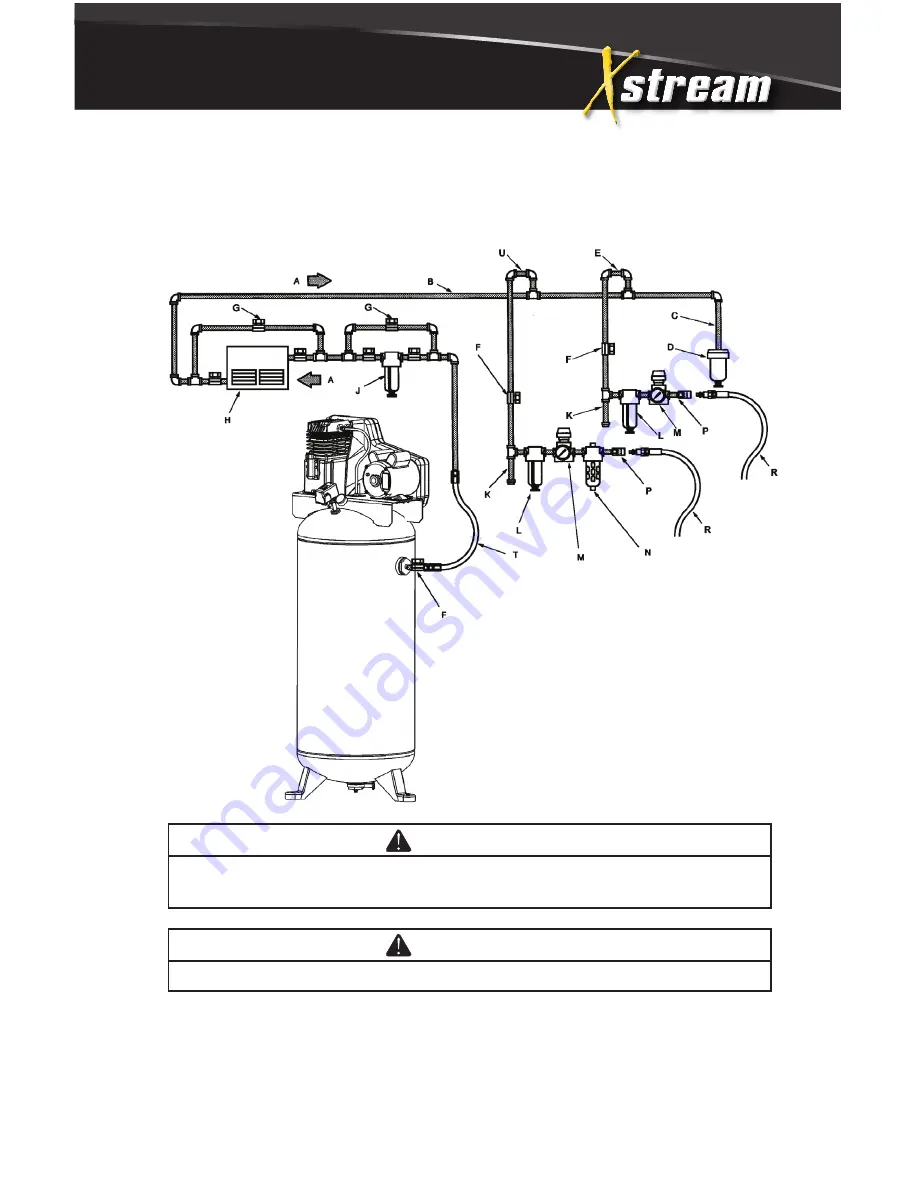
Page 15: ...installation Installation installation chart warning Risk of bursting resulting in injury Never use Plastic pipe for compressed air caution Never use lubricator for paint spraying or similar applicati...

Page 16: ...ure must be removed before it reaches the tool being used To remove this moisture run the main air line downhill to a moisture trap and drain Air water filters should also be installed in the position...

Page 17: ...ver pressurization To operate manually pull the ring on the valve to relieve air pressure in the tank Tank Pressure Gauge see C This gauge measures the pressure level of the air stored in the tank It...

Page 18: ...equipment running on the same line or inadequate wiring If any other electrical devices are drawing from the compressor s circuit it may fail to start Low voltage to the compressor can be caused by a...

Page 19: ...19 ents electrical power requirements grounding instructions This product must be connected to a grounded metallic permanent wiring system or an equipment grounding terminal or lead on the product...

Page 20: ...6 Shut OFF the main power disconnect 7 Close the petcock see E Turn in the clockwise direction 8 Turn ON the main power disconnect switch Turn the pressure switch to the AUTO position The compressor...

Page 21: ...21 FIG 6 break in of the pump Open Close F E...

Page 22: ...NOT touch the compressor while it is running Allow it to cool before handling or servicing Keep children away from the compressor at all times shutdown 1 Turn the pressure switch to the OFF position s...

Page 23: ...23 caution Escaping air and moisture can propel debris that may cause eye injury Wear safety goggles when opening petcock operating instructions Open Close F E...

Page 24: ...e in the tank To prevent corrosion of the tank from the inside this moisture must be drained at the end of every workday Be sure to wear protective eyewear Relieve the air pressure in the system and o...

Page 25: ...ig 8 This deflection can be adjusted by the following procedure The pulley should be carefully aligned with the flywheel and all setscrews should be kept tight 1 Remove the belt guard 2 Loosen the mot...

Page 26: ...and E Both distances should be the same as at point C If D or E are different from C there is a misalignment which must be corrected before the compressor is run To correct a pulley misalignment use t...

Page 27: ...ny possible obstructions testing for leaks Check that all connections are tight A small leak in any of the hoses transfer tubes or pipe connections will substantially reduce the perfor mance of your a...

Page 28: ...URE DAILY 100 hours Inspect and clean air filter X Check pump oil level X Change pump oil use synthetic non detergent air compressor oil X Operate the pressure relief valves X Check belt tension X Dra...

Page 29: ...the check valve Seized pump Contact authorized service center Low discharge pressure Air leaks Tighten or replace leaking fittings or connections Do not overtighten Leaking valves Contact authorized...

Page 30: ...place transfer tubes and or unloader Excessive belt wear Pulley out of alignment Realign pulley with compressor flywheel Improper belt tension Readjust Pulley wobbles Replace the pulley and check for...

Page 31: ...ange for danger ous exhaust or vapors Dedicated circuit An electrical circuit reserved for the exclusive use of the air compressor ASME American Society of Mechanical Engineers Indicates that the comp...

Page 32: ...GAL Voltage Amps Phase Kick In pressure Kick Out Pressure AC5060B NLA3706056 3 7 60 227 1 230 15 1 125 8 62 bar 155 10 69 bar parts list List of Parts Compressor Torque to 85 90 lb in Note Tighten com...

Page 33: ...0042 1 Bushing 2 NPSM x 3 8 NPT 513 0001 1 O Ring 2 14 059 0010 4 Bolt 5 16 18 x 1 1 4 15 040 0354 1 Pump assembly 755H 16 068 0092 1 Connector 17 058 0007 2 Nut 3 8 O D tube 18 145 0313 1 Tube trans...

Page 34: ...34 parts list 755H pump assembly Torque to 25 27 lb ft Torque to 14 16 lb ft Torque to 9 12 lb ft Torque to 8 lb ft Torque to 5 lb ft...

Page 35: ...15 12 Screw M8x20 14 050 0061 1 Cylinder 15 046 0281 1 Gasket crankcase 16 049 0048 1 Crankcase includes item 22 17 056 0074 1 Breather 18 077 0185 1 Cap 19 059 0418 6 Screw M6 x 20 20 060 0220 6 Lock...

Page 36: ...Kits Part No Description 38 165 0264 Overhaul kit includes 1 5 8 11 35 37 and 40 39 042 0116 Head and valve plate assy includes 1 5 8 10 11 and 12 40 046 0279 Gaskets complete set includes 10 12 15 21...

Page 37: ...32 0025 1 Gauge 300 1 4 bottom connect 2 034 0184 1 Switch pressure 155 PSI includes 3 4 and 7 3 071 0033 1 Strain relief 4 061 0216 1 Screw 5 136 0077 1 Valve ASME 6 062 0035 1 Plug 1 4 7 136 0090 1...

Page 38: ...38 If you need assistance with the assembly or operation of your Compressor please call 1 866 770 1711...

Reviews: