background image

REV.12-D 202002  |  Copyright © 2020 by Core Distribution, Inc.  |  COVERED BY ONE OR MORE PATENTS  |  All Rights Reserved  |  Page 

7

OPERATIONAL AND SAFETY INSTRUCTIONS

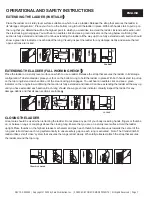
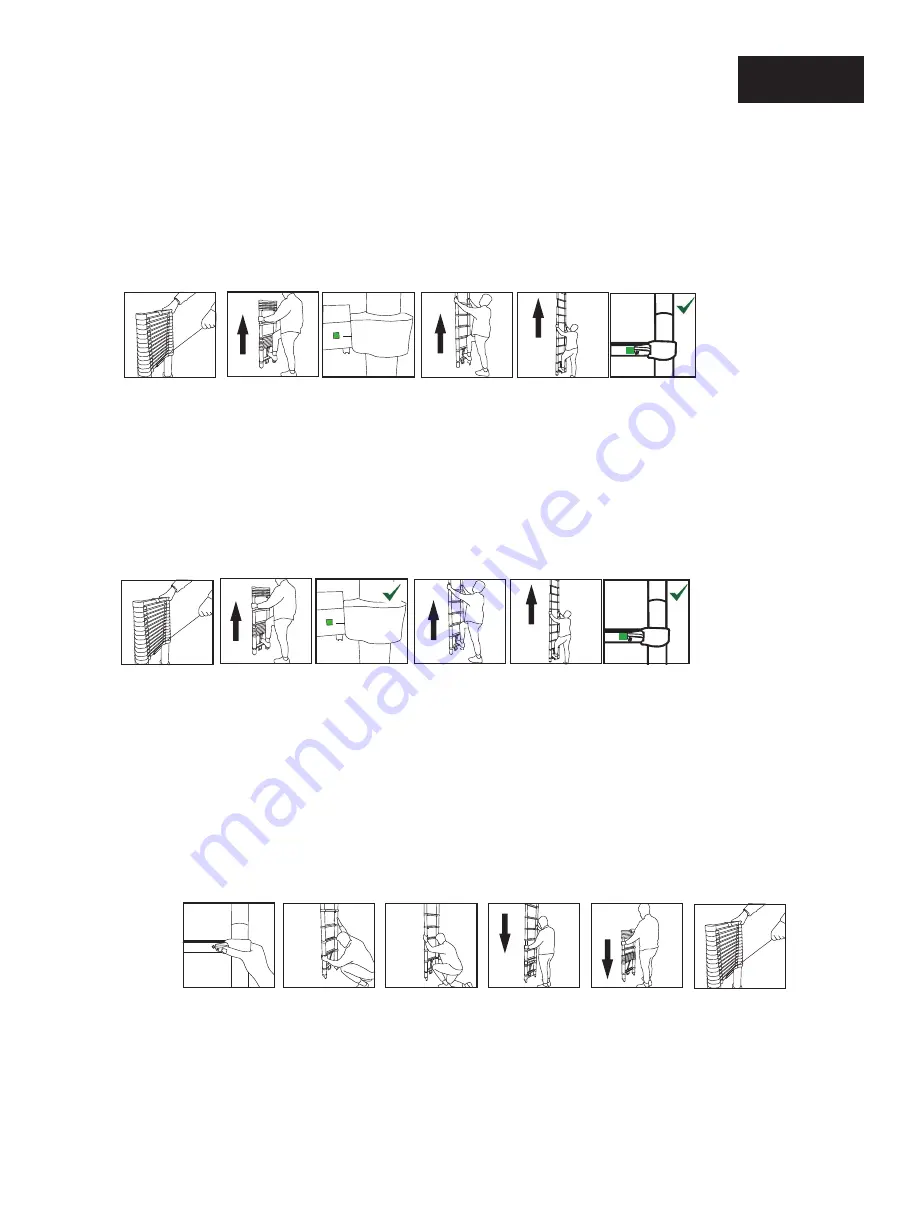
EXTENDING THE LADDER (PARTIALLY

)

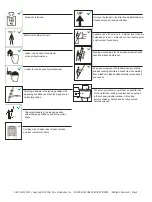
Place the ladder on a sturdy level surface suitable on which to use a ladder. Release the strap that secures the ladder in 

its”storage configuration.”  Place your foot on the bottom rung to hold the ladder in place. With both hands start to pull up on 

the rung that you determine will be the highest point to which you would like to extend the ladder. Extend each section until 

the steel locking pin engages. You will hear an audible click and see a green indicator on the rung below confirming that 

section is fully extended and locked. Continue extending the ladder all the way up. Once fully extended, each section should 

show a green lock indica tor. on each side of  the rung . Visually inspect the ladder for any damage, debris and ensure that all 

open sections are locked.

EXTENDING THE LADDER (FULL WORKING HEIGHT

)

Place the ladder on a sturdy level surface on which to use a ladder. Release the strap that secures the ladder in its”storage 

configuration. To Extend ladder, place your foot on the bottom rung to hold the ladder in place. With both hands start to pull up 

on the top rung. Extend each section until the steel locking pin engages. You will hear an audible click and see a green 

indicator on the rung below confirming that section is fully extended and locked. Continue extending the ladder all the way up 

until you have extended each section. Each rung should show a green lock indicator. Visually inspect the ladder for any 

damage, debris and that all open sections are locked

.

CLOSING THE LADDER

Great care should be used when retracting the ladder. Do not place any part of your body including hands, fingers or thumbs, 

on, or between rungs or couplings above the closing rung. Ensure that you are on a sturdy level surface. Hold the ladder 

upright. Place thumbs on the 

highest 

release mechanism

 and push each thumb tab simultaneous towards the center of the 

rung and retract down each rung systematically to unsure safety gap on each rung is activated.


Note: The Xtend+Climb® 

ladder utilizes a “soft close” system that ensures the rungs retract slowly. When fully retracted, attach the strap that secures 

the ladder around the top rung. 

Thumb tab 

Latch

Green

ENGLISH

Locked

Green

Locked

Summary of Contents for HOME 750P PLUS

Page 1: ...IES TELESCOPING LADDERS IMPORTANT Refer to instruction manual All instructions must be read carefully before using your XTEND CLIMB telescopic ladder WARNING FALLS FROM THE LADDER FAILURE TO UNDERSTAND AND FOLLOW ALL SAFETY RULES AND OPERATIONAL INSTRUCTIONS COULD RESULT IN SERIOUS INJURY OR DEATH ANSI TYPE 1 250 LB LOAD CAPACITY ENGLISH Ladder may differ from actual product ...

Page 2: ...e ladder that encloses the upper stile Lock Indicator Window on front of rung that displays green indicator that when the section is locked Rung Horizontal section used for climbing the ladder Stile Vertical member used to support the rungs and the ladder structure Coupling The section that connects the rung to the stile of the ladder Grip Handle Ergonomic pad on the bottom of the second rung from...

Page 3: ...ther exposed electrical equipment and do not use the ladder where electrical risks occur Do not lean the ladder against unsuitable surfaces Do not use the ladder if you are not fit enough Certain medical conditions or medication alcohol or drug abuse could make ladder use unsafe Do not wear unsuitable footwear when climbing a ladder Do not stand on the top three feet of a telescopic ladder Do not b...

Page 4: ...s indicated only if necessary due to design of ladder Ladders used for access to a higher level shall be extended at least 1 meter above the landing point and secured if necessary Locking mechanisms for all extended rungs shall be checked locked before use Keep a secure grip on the ladder when ascending and descending Maintain a handhold while working from a ladder or take additional safety precau...

Page 5: ...er design Do Not move a ladder while standing on it For outdoor use caution to the wind Ladder shall never be moved from the top Prevent damage of the ladder when transporting e g by fastening and ensure they are suitably placed to prevent damage Ensure the ladder is suitable for the task Do not use the ladder if contaminated e g with wet paint mud oil or snow Do not use the ladder outside in adve...

Page 6: ...f contaminated Check that guide brackets are not missing damaged loose or corroded and engage properly on the mating stile Check that ladder feet end caps are not missing loose excessively worn corroded or damaged Check that the entire ladder is free from contaminants e g dirt mud paint oil grease wet paint or snow Check that locking latches if fitted are not damaged or corroded and function corre...

Page 7: ...t secures the ladder in its storage configuration To Extend ladder place your foot on the bottom rung to hold the ladder in place With both hands start to pull up on the top rung Extend each section until the steel locking pin engages You will hear an audible click and see a green indicator on the rung below confirming that section is fully extended and locked Continue extending the ladder all the...

Page 8: ...correctly Wait a few minutes and close the ladder Never use a petroleum based product it will damage the internal mechanism of your ladder PAINT OR OTHER SUBSTANCES STICKING TO STILES If paint residues were left on the ladder they must be removed using a sponge Do not use steel wool since it might damage the opening closing mechanism After all residues have been removed from the stiles apply a sil...

Page 9: ... the ladder Then open and close the ladder to ensure the spray reaches every area of the ladder WINTER CONDITIONS If the opening closing of the ladder is affected by winter conditions open the ladder in a dry area until the stiles reach room temperature i e 18 to 21 C Ensure there is no humidity left on the stiles and couplings if there is humidity or oxidation please refer to section Wet Ladder o...

Reviews: