background image

- 2 - 

Contents 

1. Product Instruction ................................................................................ 3 
2. Installation Instruction ........................................................................... 3 

2.1 Open-case Inspection ................................................................. 3 
2.2 HDD Installation .......................................................................... 3 
2.3 Front Panel and Rear Panel Instruction

Chyba! 

Záložka  není 

definována.


3. Local Operation Guide .......................................................................... 4 

3.1 Start/Shutdown System ............................................................... 4 
3.2 System Login ............................................................................... 4 
3.3 Menu Operation........................................................................... 5 

3.3.1 Start Setup ...................................................................... 11 
3.3.2 Display Setup.................................................................. 12 
3.3.3 PTZ Setup ....................................................................... 12 
3.3.4 System Setting................................................................ 13 

3.3.4.1 Device Parameters .............................................. 14 
3.3.4.2 Channel Parameters ............................................ 14 
3.3.4.3 Network Parameters ............................................ 16 
3.3.4.4 Alarm&Exception .................................................. 19 
3.3.4.5 Account Parameters ............................................. 19 
3.3.4.6 HDD Settings ....................................................... 20 
3.3.4.7 System Management ........................................... 20 
3.3.4.8 Device Log ........................................................... 21 

3.3.5 Playback ......................................................................... 21 
3.3.6 Record Backup ............................................................... 22 
3.3.7 Manual Record ............................................................... 23 
3.3.8 Alarm Information ........................................................... 23 
3.3.9 Snapshot ......................................................................... 24 
3.3.10 File Manager ................................................................. 24 

4 Network Operating Instruction ............................................................. 25 
5 Mobile View Operation Guide .............................................................. 26 

5.1 Client Software Obtaining.......................................................... 26 
5.2 The Parameter Settings of the DVR which Supports Mobile Surveillance
 ......................................................................................................... 26 
5.3 Android Mobile System ............................................................. 26 
5.4 Blackberry Mobile System ......................................................... 28 
5.5 Symbian Mobile System ............................................................ 30 
5.6 Windows Mobile System ........................................................... 32 
5.7 iphone Mobile System ............................................................... 33 

6 Appendix .............................................................................................. 35 

6.1 HDD Capacity Calculation Method for Reference ..................... 35 
6.2 Remote Control Instruction .............................................................. 37 
6.3 Technical Data ........................... 

Chyba! Záložka není definována.


Summary of Contents for NVR-1602F

Page 1: ...NVR 902F Network digital video recorder User manual...

Page 2: ...SET Button RESET Take reset operation Power indication light POWER Light will be on after power up Network indication light LINK The NET light indicates the network connected normal USB To connect USB...

Page 3: ...k 4 Network port RJ 45 Network port 5 VGA port VGA video signal output port 6 Power supply input Power supply input port 1U with DC12V 1 5U 2U with 220V 7 Connecting terminal Include alarm input alarm...

Page 4: ...port function is shown as follow Item No Parameter Description 1 Alarm input Alarm input port connected to the alarm 2 GND Ground port 3 Alarm output Alarm output port 4 RS 485 RS 485 output port conn...

Page 5: ...or metal on the DVR in case short circuit inside or fire The device does not include any hard disk and you need to properly install the hard disk before using it otherwise you cannot record and playb...

Page 6: ...nt Parameters 19 3 3 4 6 HDD Settings 20 3 3 4 7 System Management 20 3 3 4 8 Device Log 21 3 3 5 Playback 21 3 3 6 Record Backup 22 3 3 7 Manual Record 23 3 3 8 Alarm Information 23 3 3 9 Snapshot 24...

Page 7: ...nd monitoring simultaneously realizing synchronous video and audio with advanced control technology and powerful network data transmission ability 1 2 Main Functions The following functional character...

Page 8: ...r power supply of any other type or brand 3 1 2 Shutdown System Click click Shutdown Note this method is suggested when shutdown device in order to avoid damage to the device from electricity cut off...

Page 9: ...re configuration before configure the IP channel please make sure that the IP device has been connected with the network of the NVR and the IP device is in the same network section as the NVR 3 3 1 Co...

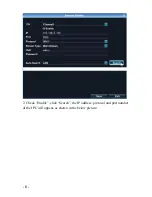
Page 10: ...6 2 Check Enable click Search the IP address protocol and port number of the IPC will appear as shown in the below picture...

Page 11: ...7 3 After double click fill in the password in the password field 4 Click Save The image will appear on the preview interface as shown in the below picture...

Page 12: ...8 Second Method add IPC manually 1 Click Remote Setting will show the below interface...

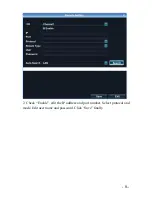
Page 13: ...9 2 Check Enable edit the IP address and port number Select protocol and mode Edit user name and password Click Save finally...

Page 14: ...10 3 The image will appear on the preview interface as shown in the below picture...

Page 15: ...ot and document The device enters the real time monitoring screen after normal booting There are superposed date time the channel name of every channel Icons of record 3D positioning and alarm status...

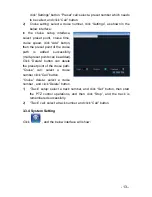
Page 16: ...creen 3 3 3 PTZ Setup Click will show the below interface 3 3 3 1 PTZ Control Before starting the PTZ control please firstly confirm the PTZ parameter settings PTZ protocol and the correct connection...

Page 17: ...ise path is added successfully multi preset points can be added Click Delete button can delete the preset point of the cruise path Cruise call select a cruise number click Call button Cruise delete se...

Page 18: ...uration parameter of every channel can be modified 1 Camera Name You can modify the name of the specified channel 2 Time Format You can select different time formats for the specified channel 3 Date F...

Page 19: ...t recording 2 All Day Recording Tick the small box before All Day Recording to start all day recording then you can select schedule recording motion recording alarm recording command recording etc 3 R...

Page 20: ...parameters to other channels Onvif protocol does not dupport above function 3 3 4 3 Network Parameters Network Settings The network basic parameters of the device can be modified 1 NIC Type there are...

Page 21: ...address1 and DNS server address 2 11 Enable 3G Tick the box before Enable 3G click 3G to enter the following interface a The access number of the China Unicom is 99 APN address is 3GNET b The access...

Page 22: ...erver Dyndns Peanuthull for selection 2 Input the server name 3 Input the port 4 Input the user name 5 Input the password 6 Confirm the password 7 Input the standby domain name NTP Settings Enable NTP...

Page 23: ...rresponding linkage type 3 Network Broken When there is network broken alarm it can trigger corresponding linkage type 4 IP Address Conflict When there is network IP conflict alarm it can trigger corr...

Page 24: ...ess 3 3 4 6 HDD Settings You can format the HDD and view the HDD capacity the free space and status etc 3 3 4 7 System Management Update Insert the USB storage device into the DVR click Browse to find...

Page 25: ...e Alarm Exception and Operation for selection 2 Sub Type According to different main types there are corresponding sub types for selection 3 From You can select the start time of a log you want to sea...

Page 26: ...es 3 Fast Accelerate playback there are 2 4 8 16 times 4 Snapshot You can snapshot in any playback channel 5 Backup You can backup the recording of any channel Insert USB storage device click Refresh...

Page 27: ...auto start backup and show the progress 3 3 7 Manual Record Click and the interface on the right will show Manual the priority is the highest No matter which status each channel is under after carryi...

Page 28: ...iew channel click Snapshot you can snapshot on any preview channel 3 3 10 File Manager Click and the below interface will show The backup files in the external storage device and the snapshot pictures...

Page 29: ...k Parameters Please make sure that the IP address setting is correct When the IP address setting is complete you can use the system own ping tool to check if the DVR is connected to the network correc...

Page 30: ...e surveillance client of Window system MEYE_Android apk mobile surveillance client of Android system MEYE_RIM rar mobile surveillance client of BlackBerry system Note Iphone uses Vmeye downloaded from...

Page 31: ...d in the picture directory of the mobile phone by default Setting Set IP address of the DVR or DDNS port user name password and device name Last Group Can select the channel of last group Next Group C...

Page 32: ...0 including model 8900 9000 9700 9630 and so on 5 4 1 Installation and Operation Instruction 1 1 Install the vMEye cod and vMEye alx packages into the Blackberry mobile through the Desktop Manager Cli...

Page 33: ...ferent devices Address The public IP address or DDNS of the DVR Port The server port of the DVR User ID The same as the user name on IE Password The same as the password on IE Network Type Select the...

Page 34: ...the video of any channel of the device PTZ Control Control PTZ up down left and right Zoom Zoom in and zoom out Focal Length Increase or decrease the focal length Iris Increase or decrease the iris 5...

Page 35: ...el Select to play the video of any channel of the device Coordinating with the Next Group you can switch to 8ch or 16ch PTZ Control Control PTZ up down left and right Zoom Focal Length Iris Zoom in an...

Page 36: ...cription Connect and Play Program connects the device and start to play the video Setting Set IP address of the DVR or DDNS port user name password and device name Disconnect Program disconnects the v...

Page 37: ...ed to differentiate different devices 4 After successful setting press OK button to enter the connection interface The image will appear if connected successfully 5 7 iphone Mobile System Mobile clien...

Page 38: ...of the mobile phone by default Setting Set IP address of the DVR or DDNS port user name password and device name Last Group Can select the channel of last group Next Group Can select the channel of n...

Page 39: ...Install the digital video recorder for the first time please make sure whether the HDD is installed inside the host 6 1 1 The Capacity of the HDD The digital video recorder requires a single HDD with...

Page 40: ...channels timing recording for a whole day Unit GB t q 16 q i m 16 7648GB If select 500G HDD 16 pieces of HDD will be required to full record User selects appropriate HDD according to the capacity The...

Page 41: ...ol Key 10 Fast Play Key 4 ESC Exit Key 11 QUAD Quad Key 5 Up 12 Play Key 6 Left 13 II Pause Key 7 Down 14 REC Record Key Number Icon Description Number Icon Description 1 REC Record Key 13 I Last Sect...

Page 42: ...ront if the number is not up to 3 digit then press the ENTER button After completing the code corresponding operation you can operate the DVR according to the functions on the remote control 6 2 5 Tur...

Page 43: ...port manual auto dynamic detection alarm trigger record mode Backup Way Support U disk USB mobile HDD USB DVD RW network storage and backup Recording Storage Local HDD Network Video Input 4ch 9ch 16ch...

Page 44: ...trigger record mode Backup Way Support U disk USB mobile HDD USB DVD RW network storage and backup Recording Storage Local HDD Network Video Input 9ch 16ch Network Audio Input 9ch 16ch External Ports...

Page 45: ...port U disk USB mobile HDD USB DVD RW network storage and backup Recording Storage Local HDD Network Video Input 16ch Network Audio Input 16ch External Ports Video Output 1ch VGA 1ch HDMI Audio Output...

Page 46: ...check if the remote address of the DVR matches the address of the remote control PTZ cannot control Possible causes 1 Incorrect cable connection of the RS 485 port A B ports are connected oppositely...

Page 47: ...etwork Possible causes 1 Please check if the network physical connection is correct or not 2 Please check the DVR network parameter configuration 3 Please check if IP conflict exists in the network Th...

Reviews: