background image

14 


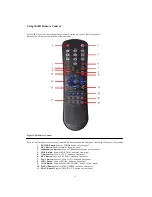
12.   DIRECTION/ENTER  Buttons: 

Same as DIRECTION/ENTER  buttons on front panel. 

13.   PTZ Button: 

Same as PTZ/IRIS-  button on front panel. 

14.   ESC Button: 

Same as ESC button on front panel. 

15.   RESERVED: 

Reserved. 

16.   F1 Button: 

Same as F1/LIGHT  button on front panel. 

17.   PTZ CONTROL  Buttons: 

Buttons to adjust the iris, focus and zoom of a PTZ camera. 

18.   F2 Button: 

Same as F2/AUX  button on front panel. 


Aim the remote control at the IR receiver  located at the front of the unit to test operation.  If there is no response: 

1.  

Using the front control panel or the mouse, go into Menu > Settings > General > More Settings. 

2.  

Check and remember  DVR ID#. The default ID# is 255. This ID# is valid for all IR controls. 

3.  

Press the DEV button on the remote. 

4.  

Enter the DVR ID# from step 2. 

5.  

Press the ENTER  button on the remote. 


If the Status indicator  on the front panel turns blue, the remote control is operating  properly.  If the Status  indicator  does 
not turn blue and there is still no response  from the remote,  please check the following: 


1.  

Batteries  are installed  correctly  and the polarities  of the batteries  are not reversed. 

2.  

Batteries  are fresh and not out of charge. 

3.  

IR receiver  is not obstructed. 


Using a USB Mouse


A regular 3-button  (Left/Right/Scroll-wheel) USB mouse can also be used with this DVR. To use a USB  mouse: 


1.  

Plug USB mouse into one of the USB ports on the front panel of the DVR. 

2.  

The mouse should automatically  be detected.  If in a rare case that the mouse is not detected,  please 

refer to the recommended  device list from your provider. 


The buttons on the mouse corresponds  to: 


1.  

Left Button:


• 

Single-Click: 

Select a component  of a menu, such as a button or an input field. This is similar to 

pressing  the ENTER  button on the remote/front  panel controls. 

• 

Double-Click: 

Switch between  single screen and multi-screen  mode in Preview/  Playback  mode. 

• 

Click and Drag: 

Clicking  and dragging  the Left mouse button can be used to control the pan/tilt of 

a PTZ camera as well as to vary the position of digital zoom area and camera  OSD. It can also be 
used to setup the alarm areas. 

2.  

Right Button:


• 

Single-Click: 

Shows pop-up menu. 

3.  

Scroll-Wheel:


• 

Scroll Up: 

In Preview  mode, scrolling  up will switch to the previous  screen.  In Menu mode, it will 

move the selection  to the previous  item. 

• 

Scroll Down: 

In Preview  mode, scrolling  down will switch to the next screen. In Menu mode, it 

will move the selection  to the next item. 


Using the Soft Keyboard


When a mouse is used to perform  task on the DVR, clicking  on a text input field will bring up the Soft Keyboard, 
shown in Figure 6. 

Summary of Contents for XL-HDVR series

Page 1: ...XL HDVR Series USER S MANUAL...

Page 2: ...2...

Page 3: ...from the DVR Ensure environmental conditions meet factory specifications Ensure unit is properly secured to a rack or shelf Major shocks or jolts to the unit as a result of dropping it may cause dama...

Page 4: ...splays 27 Setting Camera Order 28 C H A P T E R 4 30 Record Settings 30 Configuring Settings for Recording 31 Initializing Record Settings 31 Scheduling a Recording 32 Starting a Manual Recording 33 P...

Page 5: ...Controls 69 Navigating PTZ Menus 70 Configuring PTZ Settings 70 Setting PTZ Presets Patrols Patterns 71 Understanding PTZ Controls 71 Customizing Presets 72 Customizing Patrols 72 Customizing Pattern...

Page 6: ...96 Importing Exporting Configuration 96 Updating System Firmware 96 Restoring Default Settings 98 Viewing System Information 98 Viewing System Logs 99 C H A P T E R 1 2 101 Appendix 101 Glossary 102...

Page 7: ...7 C H A P T E R 1 Introduction...

Page 8: ...network cameras and can be used as a standalone DVR hybrid DVR or as an NVR Product Key Features Compression Support PAL NTSC video input Adopt H 264 video compression standard XL HDVR support both a...

Page 9: ...e and non cycle recording mode Supports normal and event video encoding parameters Supports multiple recording types including manual continuous alarm motion motion alarm and motion alarm recording et...

Page 10: ...n support remote import and export of DVR settings Supports remote acquisition of device status system log and alarm status Supports remote button operation remote locking and unlocking of panel butto...

Page 11: ...ndicator turns blue when DVR is functioning properly Status Status indicator turns blue when DVR is controlled by an IR remote Indicator turns red when controlled by a keyboard and purple when IR remo...

Page 12: ...tton The MAIN SPOT ZOOM button is used to switch between main and spot output In PTZ Control mode it can be used to zoom the camera out PREV FOCUS Button The PREV FOCUS button is used to switch betwee...

Page 13: ...front panel 2 DEV Button Enables Disables Remote Control 3 Alphanumeric Buttons Same as Alphanumeric buttons on front panel 4 EDIT Button Same as EDIT IRIS button on front panel 5 A Button Same as A F...

Page 14: ...d Using a USB Mouse A regular 3 button Left Right Scroll wheel USB mouse can also be used with this DVR To use a USB mouse 1 Plug USB mouse into one of the USB ports on the front panel of the DVR 2 Th...

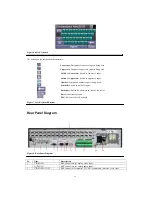
Page 15: ...Number Designates number input is being used Symbols Switch to symbols input Backspace Delete the character in front of the cursor Enter Confirm selection ESC Exit out of Soft Keyboard Figure 7 Soft K...

Page 16: ...ut 5 VGA DB9 connector for VGA output Display local video output and menu 6 Loop Out Optional DB15 interface for connection video matrix and monitor 7 RS 232 Interface Connector for RS 232 devices 8 e...

Page 17: ...17 C H A P T E R 2 Getting Started...

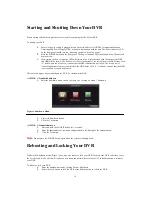
Page 18: ...of the screen will show the HDD status If an X is shown it means that the HDD is not installed or cannot be detected There are two proper ways to shutdown the DVR To shutdown the DVR OPTION 1 Standard...

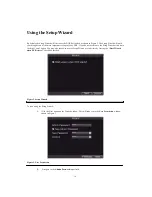
Page 19: ...o use the Setup Wizard at this time click the Cancel button You may also choose to use the Setup Wizard at a later time by leaving the Start Wizard when DVR starts checkbox checked Figure 2 Setup Wiza...

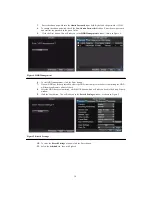
Page 20: ...Management 6 To start HDD management click the Enter button 7 If a new HDD was recently installed select the HDD from the list to initialize it Initializing the HDD will format and remove all data fro...

Page 21: ...will enable the recording schedule and have it record continuously all day Figure 7 Edit Schedule Settings 14 Click the OK button This will take you back to the Schedule tab To copy the schedule to a...

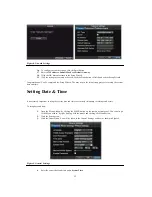
Page 22: ...l setup process is to setup the system date and time Setting Date Time It is extremely important to setup the system date and time to accurately timestamp recordings and events To setup date and time...

Page 23: ...23 5 Click the Apply button to save the setting...

Page 24: ...24 C H A P T E R 3 Live Preview...

Page 25: ...nt channel is in the spot output mode Figure 1 Live Preview Icons Note Status for video loss is only valid with analog cameras Event icons will only be displayed when armed except for the video loss a...

Page 26: ...itch to the next set of displays Playback Enter into Playback mode PTZ Enter PTZ Control mode Digital Zoom Enter Digital Zoom interface Menu Enter Main menu Start Auto switch Enable sequencing in Live...

Page 27: ...an be selected from a drop down list Next Screen When displaying less than the maximum number of cameras in Live Preview clicking this feature will switch to the next set of displays Playback Enter in...

Page 28: ...detect if a VGA display is connected Note When a VGA display is connected to the DVR the VGA display will become the main output All the Live Preview operations will be available Main video VIDEO OUT...

Page 29: ...Figure 6 Menu Setting Display 2 Click the Set button 3 Select the display mode you would like to set the camera order for under Mode 4 Using the up and down button at each display select the camera y...

Page 30: ...30 C H A P T E R 4 Record Settings...

Page 31: ...be taken to the Record Settings menu shown in Figure 1 Figure 1 General Record Settings 3 Select the camera you would to configure the settings for 4 Configure settings for Encoding Parameters Select...

Page 32: ...able redundant recording on the particular channel Record Audio Select to record audio of the camera or not 7 Click the OK button to finish and return to the previous menu 8 Select the Advanced tab th...

Page 33: ...me and triggered by motion detection and or alarm Motion detected and alarm triggered recordings are further explained in Configuring Alarms 9 Click the OK button to finish configuration 10 Repeat ste...

Page 34: ...ts be protected from deletion Recorded files can either be locked or the HDD that the files reside on can be set to read only Locking and Unlocking Recorded Files To lock or unlock a recorded file 1 E...

Page 35: ...e shown with a closed lock while unlocked files opened lock 6 Click Cancel to exit out of the Video Search menu Figure 7 Video Search Result List Setting HDD to Read Only To set a HDD to read only 1 N...

Page 36: ...HDDs are used the DVR will automatically record to the next HDD that is not set to read only Configuring Advanced HDD Settings Setting up HDD Redundancy To insure unexpected failures of hard disk driv...

Page 37: ...R W read write 7 Click the OK button to save settings and return to the previous menu Figure 11 HDD Property Settings 7 Navigate to the Record Settings menu by clicking Menu Setting Record Setting 8...

Page 38: ...38 Figure 12 Additional Record Settings 11 Set Redundantly Record to Yes 12 Click the OK button to save settings 13 Repeat steps 8 12 for other cameras you would like to redundantly record...

Page 39: ...39 C H A P T E R 5 Playback...

Page 40: ...file type and by log Understanding the Playback Interface There are various controls on the Playback interface that makes viewing recordings more efficient A screenshot of the Playback interface is sh...

Page 41: ...eras to search video file type and the start end time as shown in Figure 3 Figure 3 Video Search Menu 3 Click the Play button to start playback of all the files found with the specified search criteri...

Page 42: ...he Play button to view the day s recording for the selected channel 3 You may also select additional channels for playback from the channel list on the right hand side of the Playback interface as sho...

Page 43: ...e Slow Forward button on the Playback Control Panel until the speed changes to Single frame 2 Click the Pause button to advance the video frame by frame Using the Front Panel Remote 1 Rotate the inner...

Page 44: ...44 Figure 7 Digital Zoom Area Selection...

Page 45: ...45 C H A P T E R 6 Backup...

Page 46: ...Figure 1 Export Video Menu 2 Select desired parameters to search for files to export 3 Press the Export button This will take you to the Video Search menu 4 Select the files to export as shown in Fig...

Page 47: ...If backup device is not recognized Click the Refresh button Reconnect device Check for compatibility from vendor 7 Click Start to begin backup process shown in Figure 4 Figure 4 Backup Progress 8 Aft...

Page 48: ...layback 3 Repeat for additional clips 4 Click the Quit Playback button to exit from the Playback interface You ll then be prompted to save the clips as shown in Figure 6 Figure 6 Video Clips Save Prom...

Page 49: ...n the Export menu shown in Figure 7 The Export menu can be accessed by following the steps shown in the previous section See Exporting Files Figure 7 Export Menu Once in the Export menu you may Create...

Page 50: ...50 C H A P T E R 7 Alarm Settings...

Page 51: ...Enter Camera Management Setting Using a XL HDVR Series DVR Enter the Camera Management interface shown in Figure 1 by navigating to Menu Setting Camera Select the channel to configure motion detectio...

Page 52: ...left click mouse hold and drag it to mask the Motion Detection area Using EDIT button and direction buttons can also help you to select Motion Detection area Figure 3 Motion Detection Area 6 Right cl...

Page 53: ...You may now add a schedule to start recording when motion is detected See Scheduling a Recording Setting up Sensor Alarms Recordings can also be triggered from an external sensor alarm device To setu...

Page 54: ...Select cameras to trigger for recording when alarm occurs by checking the checkboxes under the desired cameras as shown in Figure 8 Figure 8 Triggered Cameras Menu 7 Click the OK button to complete se...

Page 55: ...t OK to save and exit Note If the Hold For option is selected as Manually Stop the alarm will only stop when you manually stop it See Triggering Alarm Outputs Manually Note Triggering an IP camera wil...

Page 56: ...to the previous menu Detecting Video Loss Your DVR can be setup to detect video loss and trigger an action To setup video loss detection 1 Enter Camera Management Settings menu Figure 12 by clicking M...

Page 57: ...Select the Schedule tab Set the schedule of when you want video loss detection to be enabled Schedule can be set for all week or any day of the week with up to 8 time periods per day 8 Click the Appl...

Page 58: ...the Set button 3 Select the Advanced tab 4 Check the Tamper Detection checkbox as shown in Figure 16 Figure 16 Camera Settings Menu 5 Click the Area Settings button to enter the area setup 6 Setup ta...

Page 59: ...n Trigger Options Figure 18 Exception Handle Menu 11 Select the Schedule tab Set the schedule of when you want video loss detection to be enabled Schedule can be set for all week or any day of the wee...

Page 60: ...ude Pop up Image on Monitor When an alarm is triggered the local monitor VGA or BNC monitor will display an image under Live Preview mode This alarm can be configured under the Popup Alarm Image handl...

Page 61: ...61 C H A P T E R 8 Network Settings...

Page 62: ...clicking Menu Setting Network Figure 1 Network Settings Menu 2 Select the General tab 3 If you have a DHCP server running and would like your DVR to automatically obtain an IP address and other netwo...

Page 63: ...t the Network Settings menu Configuring PPPoE Settings Your DVR also allows for Point to Point Protocol over Ethernet PPPoE access To set up PPPoE access 1 Enter the Network Settings menu by clicking...

Page 64: ...ngs menu You may be now asked to restart your DVR for settings to take place To check on the status of your PPPoE connection go to Menu Setting Network and select the Network Status tab Configuring DD...

Page 65: ...e 7 Under DVR Domain Name enter the domain obtained from the DynDNS web site Lastly enter the User Name and Password registered in the DynDNS network Figure 7 DynDNS Settings Configuring an NTP Server...

Page 66: ...e alarm host must have the Network Video Surveillance software installed To set up a remote alarm host 1 Enter Network settings menu by clicking Menu Setting Network 2 Select the Advanced tab 3 Click...

Page 67: ...and exit menu Configuring Server and HTTP Ports If you would like to change the server and HTTP ports from the default settings you can do so in the Network Settings menu The default server port is 80...

Page 68: ...o E mail to enter the E mail menu The E mail menu is shown in Figure 12 Figure 12 E mail Menu 4 Enter e mail settings Please refer to Figure 12 for details 5 Enable Attached JPEG File if you want to s...

Page 69: ...69 C H A P T E R 9 PTZ Controls...

Page 70: ...Camera Select a PTZ camera Call Preset Call a PTZ preset Call Patrol Call a PTZ sequence Call Pattern Call a PTZ pattern Patrol Setting Enter PTZ sequence configuration menu Pattern Setting Enter PTZ...

Page 71: ...Controls Before setting presets patrols and patterns it s important to understand some of the features of the PTZ control panel shown in Figure 3 Figure 3 PTZ Control Interface The controls on the PT...

Page 72: ...re 4 you may Configure Preset Use the PTZ control panel to adjust the position of the preset Select a Preset number and click the Set button to save preset location Clear Preset Select a Preset number...

Page 73: ...elect a Patrol Number to set 2 Select valid presets See Customizing Presets and click the Set button to enter the Patrol configuration menu A sequence should have at least 2 valid presets 3 Set the Ke...

Page 74: ...Call Patrol 1 Select a valid Patrol Number 2 Click the Start button to call the patrol select the stop button to stop the patrol as shown in Figure 7 Figure 7 Patrol Management Menu Customizing Patter...

Page 75: ...of the movements of the PTZ Use the PTZ control panel to move the PTZ The PTZ movements will be recorded until the Stop Record button is clicked 5 To run a pattern click the Run Pattern button on a va...

Page 76: ...76 C H A P T E R 1 0 Camera Management...

Page 77: ...s to disable Please note that in order to add more than 8 channels of 4CIF IP cameras or 4 channels of 720p IP cameras you will need to disable some analog channels Disabling one analog channel will e...

Page 78: ...you may manually enter the camera parameters in the fields below 6 Enter IP camera parameters This includes the IP address ports user name and password of the IP camera 7 Select OK to save and return...

Page 79: ...ord Figure 5 Record Settings Menu 2 Select the General tab 3 Select the IP camera to configure next to the Camera label 4 Adjust IP camera compression settings If the IP camera was added successfully...

Page 80: ...On Screen Display OSD settings can be configured in the Camera Management menu The OSD is shown in each display during Live Preview mode and includes the time and date as well as the camera name To c...

Page 81: ...ra 2 Select channel to setup privacy mask under Channel Click the Set button 3 Select the Advanced tab to enter the Advanced Camera Settings menu shown in Figure 8 Figure 8 Advanced Camera Settings Me...

Page 82: ...ng Camera 2 Select channel to adjust display settings under Channel Click the Set button 3 Select the Advanced tab to enter the Advanced Camera Settings menu shown in Figure 8 4 Click the Set button n...

Page 83: ...83 C H A P T E R 1 1 HDD Management...

Page 84: ...ize 3 Click the Init button 4 Select OK button to begin initialization After the HDD has been initialized the status of the HDD will change from Abnormal to Normal Setting HDD Groups Your DVR can sepa...

Page 85: ...can be set to redundancy read only or read write R W Setting HDD to Read Only A HDD can be set to read only to avoid important recorded files from being overwritten when the HDD becomes full To set a...

Page 86: ...nd exit menu Note The HDD that is set to redundancy is used to store an extra copy of the recording If a HDD is set to redundancy at least one HDD should be set to the R W status Checking HDD Status Y...

Page 87: ...ter Start Time and End Time 5 Click the Search button to begin log search A result list similar to that of Figure 5 will be returned Figure 5 Log Search Results 6 Select log item to view and click the...

Page 88: ...is uninitialized or in an abnormal state To set HDD alarms 1 Enter Exception menu shown in Figure 7 by clicking Menu Exception Figure 7 Exception Menu 2 Select HDD Error under Exception Type 3 Select...

Page 89: ...89 C H A P T E R 1 2 DVR Management...

Page 90: ...Standard Video output standard NTSC and PAL VGA Resolution VGA output resolution Time Zone Time zone to use for DVR Menu Date Format Format to use for date System Time System time and date Mouse Point...

Page 91: ...For example if timeout time was set to 5 minutes after 5 minutes of inactivity in the General Settings menu you ll be returned to the Live Preview Enable Output Hint To display output status in previ...

Page 92: ...Please note that the remote control features through the RS 232 port are limited Managing User Accounts By default your DVR comes with one user account the Administrator account The Administrator use...

Page 93: ...enter the Privilege Settings menu shown in Figure 6 Figure 6 Privilege Settings Menu 6 Configure privileges for local settings under Local Permission tab The local settings include Local Log Search S...

Page 94: ...Alarm and exception settings must be configured properly to upload to host Remote Advanced Management Remotely manage hard disk drives initializing and setting properties for HDDs Ability to remote up...

Page 95: ...user from the DVR 1 Enter the User Settings menu by clicking Menu Settings User 2 Select user to delete 3 Click the Delete button to delete user 4 Click the OK button to exit menu Modifying a User To...

Page 96: ...tion file to USB device USB device must be connected at this point to the DVR 3 To import a configuration file select the file from the USB device and click the Import button After the import process...

Page 97: ...the same Local Area Network Run the 3rd party TFTP software on the PC and copy the firmware into the root directory of TFTP 2 Enter the Firmware Update menu by clicking Menu Maintenance Upgrade 3 Sel...

Page 98: ...cking Menu Maintenance Default Figure 13 Default Settings Menu Select OK to restore factory defaults Note Network information such as IP address subnet mask and gateway will not be restored Viewing Sy...

Page 99: ...Log Search Figure 15 Log Search Menu 2 Set search parameters 3 Click the Search button to begin search If logs matching the search criteria are found it will be displayed in a list similar to that of...

Page 100: ...file to export and click the Export button This will take you to the Log Search Export menu shown below in Figure 17 Click the Export button to export log onto USB device The exported file will be nam...

Page 101: ...101 C H A P T E R 1 2 Appendix...

Page 102: ...Ethernet and in plain Metro Ethernet networks DDNS Dynamic DNS is a method protocol or network service that provides the capability for a networked device such as a router or computer system using th...

Page 103: ...ck that the dome decoder type is correct 3 Check that the dome decoder speed configuration is correct 4 Check that the dome decoder address bit configuration is correct 5 Check to make sure that the m...

Page 104: ...Auxiliary Monitor 27 B Backup 45 49 Managing Backup Devices 49 C Cameras IP Cameras 77 80 CD RW See Backup D Date 22 Digital Zoom 26 43 Display Configuring Displays 27 28 Display Settings 82 DVD RW S...

Page 105: ...Motion Detection 51 53 Mouse 13 N Network 61 68 DDNS 64 65 Multicast 66 PPPoE 63 64 Server HTTP Ports 67 NTP Server 65 66 O OSD Settings 80 P Pan See PTZ Playback 39 43 Frame by Frame Playback 42 43...

Page 106: ...tem Defaults 98 S Setup Wizard 19 22 HDD Management 20 Network Settings 22 Record Settings 20 21 Schedule 21 User Permission 19 Shutdown DVR 18 Soft Keyboard 14 15 Starting DVR 18 System Information 9...

Reviews: