Rec Room Masters www.recroommasters.com
email: support@recroommasters.com
page 5
HELPFUL TIPS WITH SETING UP YOUR CONTROLLER USING
RETRO PIE SOFTWARE
For Raspberry Pi and Retro Pie Software Using D-Input Mode
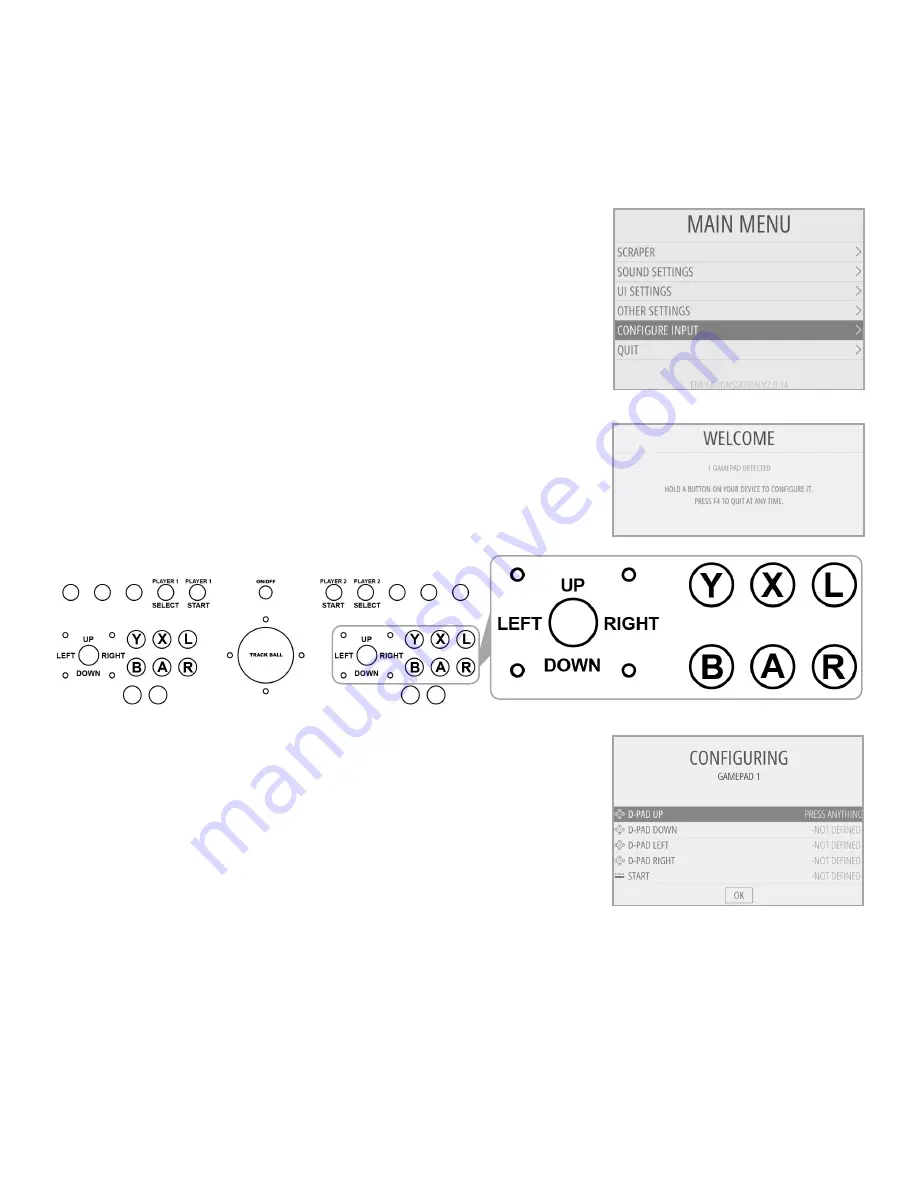
TIP 1: When attempting to “CONFIGURE INPUT”, set up
your player 2 first and do not configure a “HOT KEY”. When
Retro Pie asks what you want for your “HOT KEY”, just hold
down any button to skip this step and no “HOT KEY” will be
assigned. When setting up your player 1, you will then want to
assign your “HOT KEY” to the controller’s “COIN ONE” button.
This will then allow you to exit games by pressing “Player 1
Start” and “COIN ONE” simultaneously.
TIP 2: If you are using a fresh new install of Retro Pie on your
Raspberry Pi, and this is the first ever controller that was
plugged into the pi, then upon plugging in your controller’s
primary USB you should see a “WELCOME” screen instruction
for you to hold ANY button on your controller.
TIP 3: We suggest setting up your configuration to the
mapping example displayed above.
TIP 4: If you already previously set up a different controller and
would now like to use the Xtension controller, you will need
to use the original controller you originally set up with your
Retro Pie software with and navigate to the “MAIN MENU”
by pressing “START” on your original controller. Then scroll
down and select to “CONFIGURE INPUT” using your original
controller. Then unplug your original controller from the
Raspberry Pi and plug in your Xtension controller. Then hold
down the “A” button shown above and proceed to start the
“CONFIGURE INPUT” process with your Xtension Controller.
VERY IMPORTANT:
The information on this
page is only helpful tips as
we do not offer any official
support on setting up your
3rd party software.
Use This Mapping For Both Player 1 & 2


