background image

FUNCTIONAL  DESCRIPTION 

CAUTION:  Always  be  sure  that  the  tool  is    switched  off  and  the  battery  cartridge  is  removed  before 

adjusting or checking function on the tool. 

Installing or removing  battery  cartridge 

CAUTION: Always switch off the tool before  installing or removing of the battery cartridge.

CAUTION: Hold the tool and the battery car-  tridge firmly when installing or removing battery  cartridge. 

Failure to hold the tool and the battery  cartridge firmly may cause them to slip off your hands  and result in 

damage to the tool and battery cartridge  and a personal injury.

CAUTION: Always install the battery cartridge fully. If not,  it may accidentally fall out of the tool, causing 

injury to  you or someone around you. 

CAUTION: Do not install the battery cartridge  forcibly. If the cartridge does not slide in easily, it is  not 

being inserted correctly. 

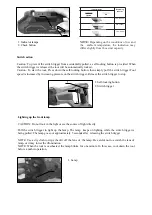
To remove the battery cartridge, slide it from the tool  while sliding the button on the front of the cartridge. 

To install the battery cartridge, align the tongue on the  battery cartridge with the groove in the housing and 

slip  it into place. Insert it all the way until it locks in place  with a little click.  

1


2


1. Button

2. Battery cartridge

Battery protection system 

The tool is equipped with a battery protection system.  This system automatically cuts off power to the 

motor to  extend battery life. The tool will automatically stop during operation if the  tool and/or battery are 

placed under one of the following  conditions: 

Overload protection:

The  tool  is  operated  in  a  manner  that  causes  it  to  draw    an  abnormally  high  current. 

In this situation, turn the tool off and stop the application  that caused the tool to become overloaded. Then 

turn  the tool on to restart. If the tool does not start, the battery is overheated. In  this situation, let the 

battery cool before turning the tool  on again. 

Overheat protection:

When the tool/battery is overheated, the tool stops  automatically. In this situation, let the tool/battery cool  

before turning the tool on again. 

Overdischarge protection:

The  remaining  battery  capacity  is  too  low  and  the  tool    will  not  operate.  In  this  situation,  remove  and 

recharge  the battery. 

Indicating the remaining battery  capacity 

Press the check button on the battery cartridge to indi-  cate the remaining battery capacity. The indicator 

lamps light off immediately when release the check button.

NOTE: Depending on the conditions of use and the  ambient temperature, the indication may differ slightly 

from the actual capacity. 

Summary of Contents for LCR777-9

Page 1: ...ez potrub 100 mm d evo 120 mm m kk kovy 10 mm LED indik tor stavu baterie ANO Baterie NE Hladina akustick ho tlaku LpA 79 dB Hladina akustick ho v konu LwA 90 dB Izolace t da ochrany II Kryt IPX0 Sou...

Page 2: ...vody zvy uj nebezpe razu elektrick m proudem e Je li elektrick n ad pou van venku pou vejte prodlu ovac p vod vhodn pro venkovn pou it Pou v n prodlu ovac ho p vodu pro venkovn pou it omezuje nebezpe...

Page 3: ...slu enstv pracovn n stroje atd pou vejte v souladu s t mito pokyny a takov m zp sobem kter byl p edeps n pro konkr tn elektrick n ad a to s ohledem na dan podm nky pr ce a druh prov d n pr ce Pou v n...

Page 4: ...zbyte n napr zdno 14 V dy pou vejte vhodn typ respir toru obli ejov masky vzhledem k povaze materi lu se kter m pracujete 15 N kter materi ly obsahuj chemick l tky kter mohou b t toxick Dbejte na to a...

Page 5: ...en p eru te pr ci a nechte akumul tor dob t 2 Nikdy nenab jejte pln nabit akumul tor P eb jen zkracuje ivotnost akumul toru 3 Nab jejte akumul tor p i pokojov teplot v rozmez 5 C 45 C P ed nab jen m n...

Page 6: ...zk a za zen se nespust V takov m p pad vyjm te akumul tor a nechte jej nab t 1 Kontrolky ukazatele kapacity 2 Kontroln tla tko Ukazatel zb vaj c kapacity baterie Stiskn te kontroln tla tko na akumul t...

Page 7: ...voln n sp na e Pozn mka Pro o i t n o ky pracovn ho sv tla pou vejte such had k D vejte pozor aby nedo lo k po kr b n sv tla co by mohlo sn it jeho innost Pozn mka Pokud dojde k p eh t p stroje pracov...

Page 8: ...u N sledn m zata en m za pilov pl tek se pro jistotu ujist te e je spr vn uchycen Pozor Pokud nevlo te pilov pl tek v dostate n hloubce m e b hem pr ce doj t k neo ek van mu uvoln n pilov ho pl tku To...

Page 9: ...y Hroz riziko p eh t a po kozen p stroje Pozn mka Pokud dojde k pou v n p stroje a do pln ho vybit baterie nechte p stroj zchladnout po dobu cca 15 minut p ed vlo en m nov baterie DR BA Pozor P ed pro...

Page 10: ...plate of motor 12 sti elektrick ho obvodu asti elektrick ho obvodu Cz ci obwodu elektrycznego Circuit board welding 12 1 Stator 18V Stator 18V Stator 18V Stator 18V 12 2 Hlavn sp na Hlavn sp na Wy cz...

Page 11: ...Sch matick pohled...
Page 12: ...ed 2 Automatick elektrick dic za zen pro dom cnost a podobn ely st 1 V eobecn po adavky 2001 10 01 SN EN 60730 1 ed 3 Automatick elektrick dic za zen pro dom cnost a podobn ely st 1 Obecn po adavky 2...

Page 13: ...ols for household and similar use Part 1 General requirements 2012 11 01 EN 60730 1 ed 4 Automatic electrical controls Part 1 General requirements 2017 09 01 EN 61558 1 ed 2 Safety of power transforme...

Page 14: ...0 mm m kk kovy 10 mm LED indik tor stavu bat rie ANO Bat rie NIE Hladina akustick ho tlaku LpA 79 dB Hladina akustick ho v konu LwA 90 dB Izol cia trieda ochrany II Krytie IPX0 S as balenia 1 x p lov...

Page 15: ...pr vody zvy uj nebezpe enstvo razu elektrick m pr dom e Ak je elektrick n radie pou van vonku pou vajte predl ovac pr vod vhodn pre vonkaj ie pou itie Pou vanie predl ovacieho pr vodu pre vonkaj ie p...

Page 16: ...ezpe n e Elektrick n radie pr slu enstvo pracovn n stroje at pou vajte v s lade s t mito pokynmi a tak m sp sobom ak bol predp san pre konkr tne elektrick n radie a to s oh adom na dan podmienky pr ce...

Page 17: ...ne napr zdno 14 V dy pou vajte vhodn typ respir tora tv rovej masky vzh adom na povahu materi lu s ktor m pracujete 15 Niektor materi ly obsahuj chemick l tky ktor m u by toxick Dbajte na to aby nedo...

Page 18: ...ajte akumul tor dobi 2 Nikdy nenab jajte plne nabit akumul tor Preb janie skracuje ivotnos akumul tora 3 Nab jajte akumul tor pri izbovej teplote v rozmedz 5 C 45 C Pred nab jan m nechajte hor ci Tipy...

Page 19: ...tiu Zost vaj ca kapacita akumul tora je pr li n zka a zariadenie sa nespust V takom pr pade vyberte akumul tor a nechajte ho nabi Ukazovate zost vaj cej kapacity bat rie Stla te kontroln tla idlo na a...

Page 20: ...a a Pozn mka Na o istenie o ovky pracovn ho svetla pou vajte such handri ku D vajte pozor aby nedo lo k po kriabaniu svetla o by mohlo zn i jeho innos Pozn mka Pokia d jde k prehriatiu pr stroja praco...

Page 21: ...pl tku N sledn m zatiahnut m za p lov pl tok sa pre istotu uistite e je spr vne uchyten Pozor Pokia nevlo te p lov pl tok v dostato nej h bke m e po as pr ce d js k neo ak van mu uvo neniu p lov ho pl...

Page 22: ...vory Hroz riziko prehriatia a po kodenia pr stroja Pozn mka Pokia d jde k pou vaniu pr stroja a do pln ho vybitia bat rie nechajte pr stroj vychladn po dobu cca 15 min t pred vlo en m novej bat rie DR...

Page 23: ...metale mi kkie 10 mm Wska nik stanu baterii LED TAK Bateria NIE Poziom ci nienia akustycznego LpA 79 dB Poziom mocy akustycznej LwA 90 dB Izolacja klasa ochrony II Ochrona IPX0 Zestaw zawiera 1 x brz...

Page 24: ...o pora enia pr dem g Podw jnie izolowane urz dzenie jest wyposa one w uziemion wtyczk jeden wtyk jest szerszy od drugiego Je li z cze nie jest w pe ni dopasowane do gniazda nale y przekr ci wtyczk Nie...

Page 25: ...j i bezpieczniej b Nie u ywaj elektronarz dzi kt rych nie mo na w cza i wy cza wy cznikiem Ka de elektronarz dzie kt rego nie mo na obs ugiwa za pomoc prze cznika jest niebezpieczne i musi zosta napra...

Page 26: ...ekaj a ruchome cz ci ca kowicie si zatrzymaj 12 Nie dotykaj brzeszczotu bezpo rednio po ci ciu Brzeszczot pi y zostanie nagrzany do wysokiej temperatury z powodu tarcia i mo e spowodowa oparzenia sk r...

Page 27: ...e wybuchn w ogniu 8 Uwa aj aby nie upu ci ani nie uderzy baterii 9 Nie u ywaj uszkodzonej baterii 10 Zawarte w nich baterie litowo jonowe podlegaj wymogom przepis w towar w niebezpiecznych Do transpo...

Page 28: ...ie jest w o ony prawid owo Aby wyj wk ad baterii wysu go z narz dzia przesuwaj c jednocze nie przycisk z przodu wk adu Aby zainstalowa wk ad akumulatora wyr wnaj wypust na wk adzie akumulatora z rowki...

Page 29: ...ra w narz dziu nale y zawsze sprawdzi czy spust prze cznika dzia a prawid owo i powraca do pozycji OFF po zwolnieniu UWAGA Dla Twojego bezpiecze stwa narz dzie to jest wyposa one w przycisk blokuj cy...

Page 30: ...Lampka ga nie oko o 5 sekund po zwolnieniu w cznika UWAGA U yj suchej szmatki aby wytrze brud z soczewki lampy Uwa aj aby nie zarysowa soczewki lampy poniewa mo e to obni y o wietlenie UWAGA Gdy narz...

Page 31: ...szczot jest nieruchomy Nast pnie poci gnij za brzeszczot aby upewni si e jest dobrze zamocowany Uwaga Je li nie w o ysz brzeszczotu na wystarczaj c g boko brzeszczot mo e nieoczekiwanie poluzowa si po...

Page 32: ...dzenie UWAGA Je li narz dzie jest u ywane w spos b ci g y do roz adowania wk adu akumulatora przed przyst pieniem do wymiany nale y pozostawi je na 15 minut w spoczynku UTRZYMANIE UWAGA Przed przyst p...

Page 33: ...my o oddzielenie produktu od innego typu odpad w oraz odpowiedzialny recykling w celu promowania ponownego u ycia zasob w materialnych jako sta ej praktyki W celu uzyskania informacji na temat miejsca...

Page 34: ...y status indicator YES Battery NO Sound pressure level LpA 79 dB Sound power level LwA 90 dB Insulation Protection class II Protection IPX0 The product includes 1 x wood cutting saw blade 1 x metal cu...

Page 35: ...ng is wider than the other If the connector does not fully suit the socket turn the plug Do not change the plug by any means Double insulation eliminates the need for grounding of the power cord and p...

Page 36: ...re may make exposed metal parts of the power tool live and could give the operator an electric shock 2 Use clamps or another practical way to secure and support the workpiece to a stable plat form Hol...

Page 37: ...paration of the item being shipped consult ing an expert for hazardous material is required Please also observe possibly more detailed national regulations Tape or mask off open contacts and pack up t...

Page 38: ...little click 1 2 1 Button 2 Battery cartridge Battery protection system The tool is equipped with a battery protection system This system automatically cuts off power to the motor to extend battery li...

Page 39: ...f 75 to100 25 to50 10 to25 NOTE Depending on the conditions of use and the ambient temperature the indication may differ slightly from the actual capacity Lighting up the front lamp CAUTION Do not loo...

Page 40: ...Cutting action change lever ASSEMBLY CAUTION Always be sure that the tool is switched off and the battery cartridge is removed before carrying out any work on the tool Installing or removing the recip...

Page 41: ...re to always wear suitable eye protection which conforms with current national standards CAUTION Always use a suitable coolant cutting oil when cutting metal Failure to do so will cause premature blad...

Page 42: ...risk of injury to persons Only use accessory or attachment for its stated purpose If you need any assistance for more details regarding these accessories ask your local Service Center Wood cutting sa...

Reviews: