6
Visit our website at http://xtm.globalhobby.com or for Customer Service at http://globalservices.globalhobby.com
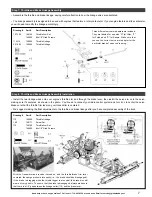
Step 5: Installing the Clutch Assembly
●
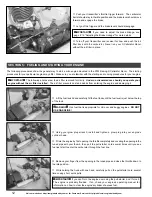
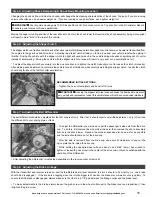
Install the flywheel, clutch shoes and clutch bell assembly onto your engine, keeping in mind that you have the choice of using a 15T,
16T or 17T clutch bell.
●
Install the engine mounts onto your engine, paying close attention to the orientation of the engine mounts, as shown in the drawing.
Drawing #
Part #
Part Description
160
149171
Screw Set
92
148334
Collet for Flywheel
94
149069
Flywheel w/Clutch Posts
182
149068
Steel Washers
95
149074
Clutch Nut
96
149066
Clutch Shoes
97
149147
Flanged Ball Bearings
99
149073
Clutch Nut Bushing & Clip
100
149067
Clutch Spring
201
149162
Split Washers
Before installing the clutch bell, lightly sand the inside surface of the
clutch bell, using 600 grit sandpaper , then clean it thoroughly, using
rubbing alcohol. Doing this will allow the clutch shoes to "bite" better,
reducing clutch slipping.
We strongly suggest applying Thread-
Lock to the engine mounting screws to
prevent them from loosening during use.
Step 6: Installing the Engine
●
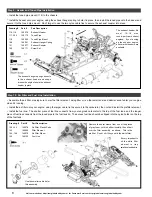
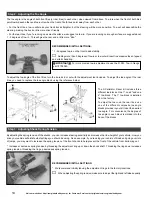
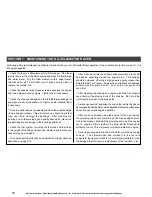
Install your engine to the chassis, taking care to ensure that the engine is lined up properly and that the gear mesh between the clutch
bell and the spur gear is correct. It's important that the gears do not bind.
Tighten the clutch nut firmly,
using a pair of pliers, before
installing the bushing and
retaining clip.
Drawing #
Part #
Part Description
183
1149176
Engine Mount Screws
To set the gear mesh, place a piece of notebook paper
between the two gears. When set properly, there should be
a very slight play between the gears. If the gears are too
tight they will bind and if they are too loose they will strip out.
We strongly suggest applying Thread-
Lock to the engine mounting screws to
prevent them from loosening during use.


