background image

8

9

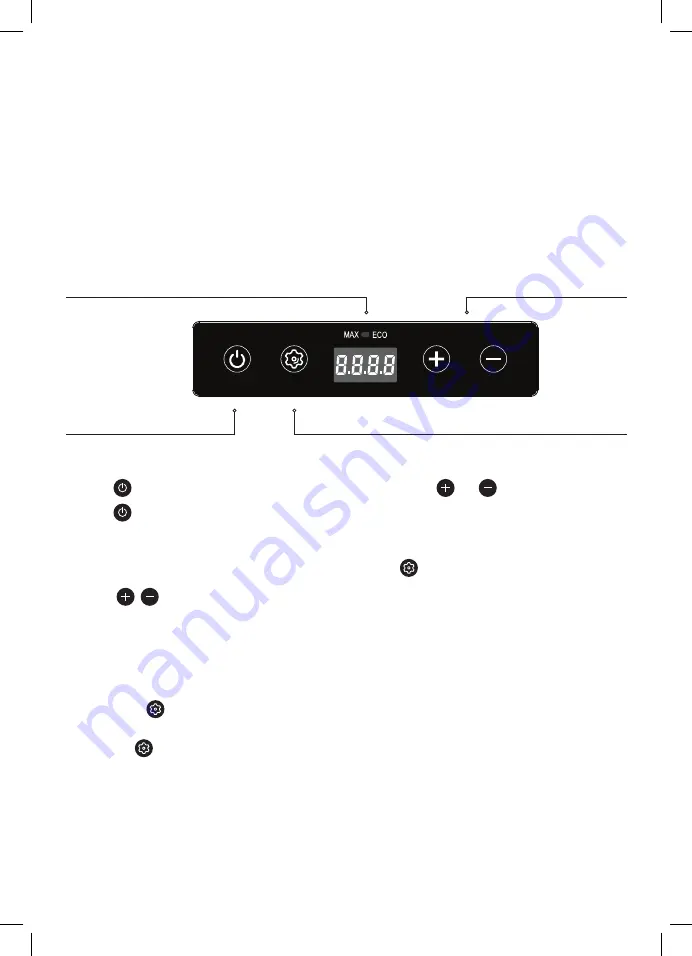
CONTROL PANEL AND OPERATION

POWER

1.   Press 

 button to turn fridge ON.

2.   Press 

 button again to turn

  fridge OFF.

TEMPERATURE SETTING 

1.   Press  


 to set temperature. Wait for 3  

  sec for display to stop flashing, then setting  
  will be saved and display will change to actual  
  temperature reading

BATTERY PROTECTION

1   Press & hold 

 button for 3 seconds to enter  

  battery protection setting mode

2   Press the 

 button again to cycle between the  

  3 protection levels - H1 (Hi) -> L3 (Low) ->  
  N2 (Med)
3   Wait for 3 seconds for the display to stop  
  flashing, then the setting will be saved and the  
  display will show the actual temperature reading

TEMPERATURE SCALE

1. Press & Hold 

 and 

 buttons for 3 sec to 

switch between Celcius (°C) or Fahrenheit (°F)

MAX/ECO MODE

1. Press 

 button to switch between MAX mode or 

ECO mode
MAX - Indicator will show green light 
ECO - Indicator will show white light

POWER OFF MEMORY

If power is cut to the fridge, the ON/OFF status, 
mode and temperature settings will resume to the 
previous settings as soon as the power is restored.

SET BUTTON

POWER ON/OFF BUTTON

UP AND DOWN BUTTONS

TEMP. DISPLAY

When your fridge is first connected to the DC power 
input the appliance will automatically switch on 
and the LCD control panel will display the current 
cabinet temperature and cooling speed setting as 
well as the current input voltage.

+   The Temperature Controller provides the ability  
  to set the desired temperature level and display  
  the current cabinet temperature. The electronic  
  controller has been programmed to maintain an  
  average of the set temperature.
+   The compressor will start up when the internal  
  cabinet temperature increases 0.5 to 1.5 degrees  
  above the set temperature and will run until the  
  temperature is 0.5 to 1.5 degrees below the set  
 temperature.

Summary of Contents for CFR1030XTM

Page 1: ...04642 10 23 FRIDGE FREEZER 35L PLU 677679 CFR1030XTM...

Page 2: ...ity assurance processes Every care has been taken to ensure that it reaches you in perfect condition However in the unlikely event that you should experience a problem or if you require any assistance...

Page 3: ...the appliance itself in water or other liquid Ensure your hands are dry before handling the plug or switching on the appliance Do not use it on wet surfaces Protect the power cord Do not kink or dama...

Page 4: ...4 APPLIANCE AND ACCESSORIES CONTROL PANEL INTERNAL LED LIGHT FRIDGE LID HANDLE 12V 24V DC POWER CONNECTION 12V 24V DC POWER CORD FRIDGE COMPARTMENT FRIDGE COMPARTMENT DIVIDER...

Page 5: ...of the appliance requires heat to be radiated away from the condenser located at the end of the cabinet Adequate airflow is required around the compressor at all times so it is important to keep the...

Page 6: ...o the DC power socket as highlighted over page on the end of the fridge and then connect to the vehicle cigarette lighter socket or suitable 12V or 24V DC power source The fridge will automatically tu...

Page 7: ...t protects a battery against excessive discharging when the fridge is connected to 12V or 24V DC power source such as a vehicle battery IMPORTANT When using the fridge with DC power supply or power pa...

Page 8: ...de MAX Indicator will show green light ECO Indicator will show white light POWER OFF MEMORY If power is cut to the fridge the ON OFF status mode and temperature settings will resume to the previous se...

Page 9: ...panel as it will not work Connection must be via the battery USING PORTABLE GENERATORS It is important that the your fridge is never connected directly to a generator This fridge is designed to operat...

Page 10: ...e ambient temperature is 30 C the interior of the vehicle can reach 55 C MAINTENANCE AND SERVICE Your fridge will be delivered cleaned from the factory you nevertheless should clean prior to initial u...

Page 11: ...han 75 E1 Low Input Voltage Power cord was inserted into the cigarette socket before car starts wait for car engine to start before plugging in Battery protection level setting is too high adjust the...

Page 12: ...8 00am 5 00pm AEST Do not return to place of purchase Keep your purchase receipt this will be required to make any claims under the 2 Year warranty AUST 1300 174 876 Manufactured in China for SUPER R...

Reviews: