background image

                                                                                                                                  PS2 Heavy Duty 


16 

E. connect PS2 to diagnosis vehicle 

1

connecting test with PS2 

Please check if the SD card is put into the mainframe correctly


Connect mainframe with VCI diagnostic box by main testing line


find out the


corresponding testing connector in the PS2 suitcase according to the type of 

vehicle  diagnostic  block,    then  connect  VCI  box  with  vehicle  diagnostic  block    by  testing 

connector


 you can use the universal jumper box to test if in case there is no suitable connector in 

suitcase, but please pay special attention: 

a.  please  test  the  diagnostic  block  by  multimeter  before  connecting,  so  as  to  confirm  its 

anode, Negative electrode, K communication line or CAN BUS communication line


b.  please  pay  more  attention  to  avoid  shaking  hand  lead  to  short  circuit  and  destroy  the 

electronic components as the distance of diagnostic block’s terminals is very small. 

c.  Wrong  connection  will  destroy  ECU  or  the  electronic  compolents  in  mainframe,  for 

example, wrong connection with anode and negative electrode, or treat anode as K line, which 

would  destroy  diagnostic  equipment.  While  it  will  lead  to  no  way  to  enter  into  the  system  if H 

line is wrongly instead connect with L line of CAN BUS communication . 

d.  more  illustration  about  diagnostic  block  compolents  and  jumer  line,  please  check  page 

38.


  Its  ready  to  diagnose  vehicle  as  the  electricity-  light  switch  turned  on  and  the  power 

button pressed down 


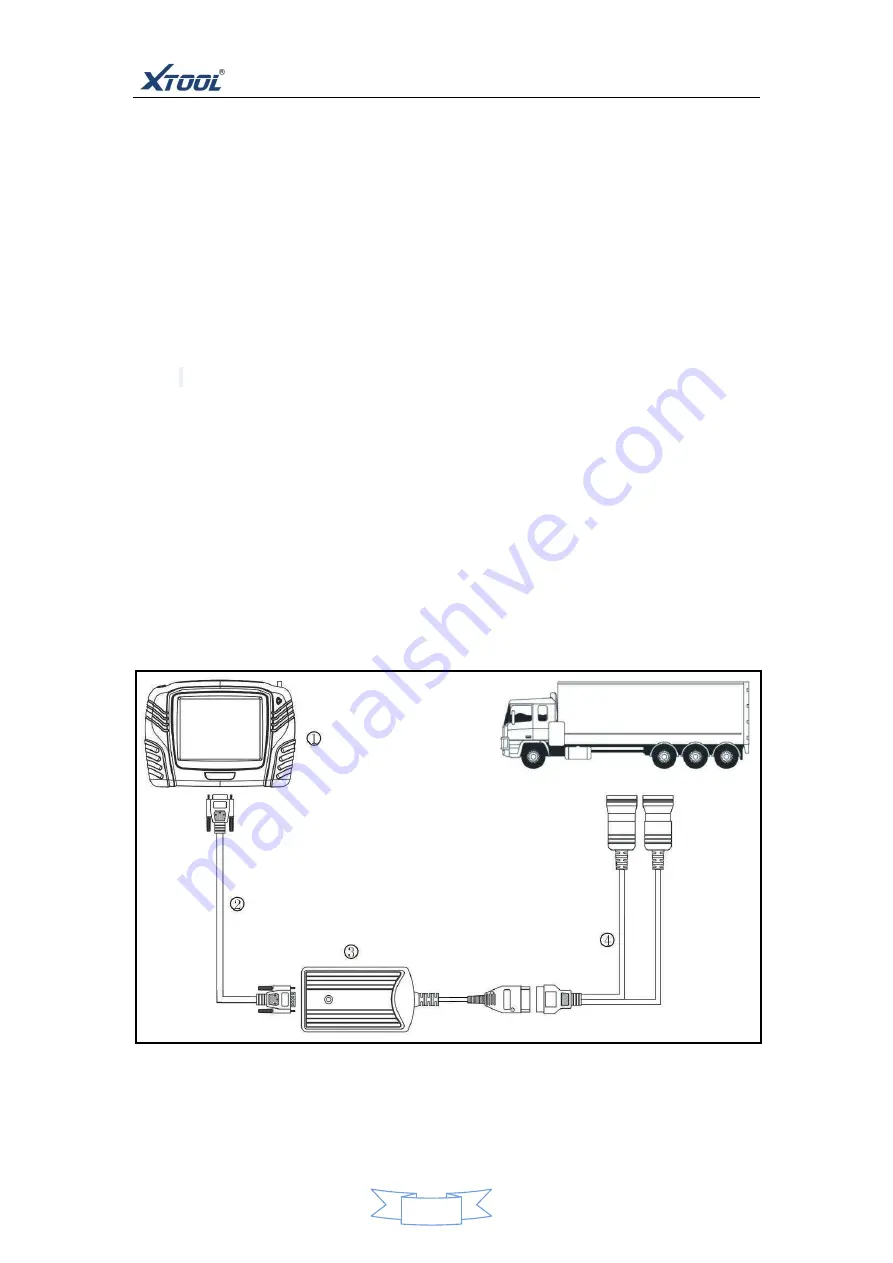
The connecting diagram is shown as follows: 


PS2

主机


:主测试线


VCI

诊断盒


:测试接头


2

Notes of connecting diagnosis


Summary of Contents for PS2

Page 1: ...s The forward looking design of PS2 meets the need not only for the present but also for the future automobile main line examination The drivers of diagnostic module can be updated through the internet The formidable compatibility reduces the equipped adapter PS2 is easy to handle and users will experience the unique design from our R D team We also provides wireless communication version of PS2 T...

Page 2: ... or wrong operating not guide by manual etc 5 The manual is based on the existing configuration and functions and it will also be subject to change if the tool is added new configuration and new features but please pay attention that we wont notice it specially 6 XTOOLTECH Company has conducted a registration of trademarks the logo is 7 XTOOLTECH Company claim that it still owns the ownership of t...

Page 3: ...s of setting function menu 10 D install printing paper 15 1 notice 15 2 the installation of printing paper 15 E connect and diagnose with vehicles by PS2 16 1 testing of connecting vehicle 16 2 notes of connecting and diagnosis vehicle 16 F the method and function of using PS2 17 1 selecting menu 17 2 operating the testing function 20 3 Read vehicle information 31 Chapter three Places of diagnosti...

Page 4: ...eavy Duty 4 Chapter one acquaintance of Product A diagram of PS2 mainframe appereance 1 Front View Figure 2 Back view Figure B PS2 mainframe Interface Schematic 1 The upward side connection of the mainframe ...

Page 5: ...ternal monitor 800 600 pixels Main test connection Uses the testing line to carry on the vehicles diagnosis power connection Uses for the exterior power supply touching pen Uses in clicking on the touching screen 2 The lower side connection of the mainframe Schematic diagram notes serial port Uses in the main body debugging SD card slot uses for SD card paper outlet use for mini printer C Schemati...

Page 6: ...d be changed to the wireless diagnosis mode on the menu serial port Uses in the main body debugging D PS2 technical parameters operating system WINCE 5 0 operating platforms CPU SAMSUNG 32 bits processors basic frequency is 400MHZ random memory SDRAM 64M programming memory FLASH 64M supports SD card slot in and slot out mainframe battery rechargeable battery 3500m Ah mainframe power supply DC12V 2...

Page 7: ...en upper left lower left lower right upper right corner of the five points Each click will move the cross cursor to the next position more accurate you click better the function of calibration will be the screen will mention you to click on anywhere to store the current calibration value after five directions are followed by click then the main interface will turn into the boot As shown below Tip ...

Page 8: ...is powered B main screen and function keys notes 1 PS2 main interface Main interface is shown as below after PS2 is turned on 2 PS2 sub menu You can click PgUp or PgDn key to select the page as it enter into the Diesel sub menu the interface as shown below 3 The main interface Function Keys Function keys Function notes ...

Page 9: ...in interface Capture key click on this button display pictures could be captured and be stored in the Snapshot folder of SD card Help button click on this button can check the relevant using assistance and technical information Return key click on this button can return to the previous screen from the current screen Flip key click on the button will turn the current interface is based on the previ...

Page 10: ...e main interface to display the host software and hardware version release date and product serial number Information as shown below 2 setting interface Click the button below then showes the host settings menu can choose setting as shown below 3 notes of setting function menu menu Notes of menu ...

Page 11: ...e opening or closing set And the toggle menu to enter the menu to the public can switch the EN METRIC Display settings menu to enter the menu are subject to choose and the control buttons place setting User to enter the menu and can enter a user information USB connection settings menu to enter the menu can be set up pc host and connectivity communications and data synchronization Online diagnosis...

Page 12: ...rface choose the language as shown B click the display calibrated on setting screem the calibration method is introduced before screemshot is shown as C adjust Screen brightness Click the brightness on the setting interface click the brightness strip from left to right to choose he brightness you need screemshot is shown as ...

Page 13: ...osin Screemshot is as shown E EN METRIC switch click the EN METRIC In the interface menu to choose your need screemshot is as shown F Display settings click Display menu In the interface to choose the theme selected or to set control button on the left or right as you used to Screemshot is as shown ...

Page 14: ...cally pop up as you enter the menu the information will be printed out when it s print H USB connection settings click USB Connect In the interface host can be set prohibited or permitted to connect with the pc communication I Online diagnosis Click PC Connect in the interface host can be set diagnostic testing by wired or wireless ...

Page 15: ...Take the printer cover off from the mainframe back hold down the printer cover to push back toward the direction of the arrow to open as shown below Stretch out some typing paper and ensure that the edge of typing paper is on a parallel with printing box then push back the cover as shown below take out the printer roller install the printing paper positively then plug the roller into the inner hol...

Page 16: ...unication line or CAN BUS communication line b please pay more attention to avoid shaking hand lead to short circuit and destroy the electronic components as the distance of diagnostic block s terminals is very small c Wrong connection will destroy ECU or the electronic compolents in mainframe for example wrong connection with anode and negative electrode or treat anode as K line which would destr...

Page 17: ...se check out the correct ECU model then choose it to correspond with the menu Maybe it should update the software If you cant find out the vehicle model or diesel electronic control system in the menu Or contact with technical service department No using the harness not produced by xtooltech in order to avoid unnecessary loss No plugging out SD card in terms of diagnostic testing in order to avoid...

Page 18: ...HINO choose engine then see HINO logo if not please click PgUp or PgDn to find it shown as follows If the screen display multiple versions usually choose a higher edition click on OK then enter into HINO menu and then choose what you want the menu is shown as follows ...

Page 19: ... after select Engine menu PS2 diagnostic box will communicate with ECU of the car meanwhile the screen will display a communication status as the picture shows below If the communication between PS2 and ECU of the car is failed the screen will show test failed as the picture shows below ...

Page 20: ...c seats are not connecting successfully please recheck if the connection is good Testing menu was wrongly selected make sure the electronic control system is good and then select the correct menu to test The testing software is not yet updated please update the software in time 2 Operation the Testing Functions If the communication is regularly working the screen will show relating information or ...

Page 21: ...ading ECU information This function is to read the ECU information it s shown as system identification or system information in some drive by wire 电控 however they have the same meaning which is to read the information such as software version hardware version etc of ECU The picture shows as below Function of reading fault code Selecting read fault code function to read the fault code saved in the ...

Page 22: ...r faults which can not be detected by ECU mostly those undetected faults are machine system faults or executive circuit faults also it is possible that sensor causes some signal windage in a certain scale We can judge the fault from data stream function If there are fault code existing in ECU the screen will show all the fault codes and its definition when reading the fault codes the picture is as...

Page 23: ...hen erase the fault codes and read the fault code again If there are still some fault codes can not be erased it means that this fault code indicates some problem that should be fixed If all fault codes can be erased but the problems are still existing there then we can start off the car and connect to the equipment to read the fault codes after driving Provided that a certain fault code keep show...

Page 24: ...the serviceman to understand under what situation does the fault code happen it s helpful to analyze the fault codes Function of erase fault code Go back and select erase fault code to erase the current and history memory saved in ECU this function will erase all current and history fault codes please make sure if you have recorded the fault codes before erasing As the picture shows below After pr...

Page 25: ...elect read data stream to dynamic and static Data stream of this system Note Optional read can be selected when reading the data stream you can select the items in accordance with your need When reading the data stream normally the engine will keep running some data items can be read when the engine is static as the picture shows below After the data items are selected press OK to show the real ti...

Page 26: ...ceman to have a good understanding on the sensor data Control signal and control method of every system of the car it s also the basic knowledge for the serviceman to use data stream function Actuation test function Go back to the testing function menu after select actuation test it would show the available actuation tests of the system ...

Page 27: ...o as to judge whether the executive sensor or wire are working good or not Taking EGR solenoid valve test as example press EGR solenoid valve menu to test EGR solenoid valve and the wire then observing that whether the EGR solenoid valve has the movements in correspondence with the diagnostic tool command or not so as to make sure whether this sensor and wire are working normally or not As the pic...

Page 28: ... the operation must be carefully read tips and precautions and strictly follow the prompts Some features test is under the condition of engine static item is executed while some function testing items is in the engine operating state implementation Some functional test must be met to perform corresponding conditions For example the water temperature in the normal working temperature of 80 105 rele...

Page 29: ...mpted for functional testing it can be start test after confirm as shown below Read and write of Nozzle code QR code In the test function menu screen select injector data function to display the read write Nozzle Data menu as shown below After selecting read QR menu immediately you can read the data out of the engine nozzle as shown below ...

Page 30: ...nu you can write code injector take writing the sixth cylinder injector coding as an example as shown below Before entering a new nozzle coding it needs to check whether the code is correct or not the error code will not be allowed to write into the injector ECU it will work after the confirmation and click OK As shown below ...

Page 31: ...rite of Nozzle code QR code maintenance staff in the preparation of the nozzle into the new coded nozzle should be further encoded to read read out of the nozzle confirm whether the newly written code into the nozzle coding write code to determine the correct nozzle 3 Read vehicle information In the test function menu select vehicle data menu to read the basic information of vehicles and vehicle d...

Page 32: ...PS2 Heavy Duty 32 Read basic information about the vehicle as shown below Read vehicle data as shown below ...

Page 33: ... utility vehicle location map Location seat small car diagnostics Tip Each vehicle manufacturer may select additional pin used to diagnose a variety of systems We can not guarantee that every manufacturer to comply in all respects the same standard Therefore this pin will be allocated with a different distribution as described Pin assignments specified by the manufacturer according to the specific...

Page 34: ...ck gMANg 您 Terminals 2 10 2 and 10 for SAE diagnosis 4 5 Negative 6 14 6 and 14 for CAN diagnosis 7 15 ISO KWP K ISO KWP L diagnosis 16 positive 12V 24V 您 Terminals 1 Positive 2 Negative 8 7 5 K Diagnosis 11 CAN H diagnosis 12 CAN L Diagnosis 您 Terminals Other pins not for diagnostic features A negative D positive a Engine Control System K line Z Engine Control System L line L auxiliary heater K l...

Page 35: ...etarder K Line 7 combination instrument L line 8 Combination meter odometer K Line 9 secondary supplementary heating L line 10 auxiliary supplementary heater K Line 11 15 terminals 12 start acceleration protection K line 13 HVAC L line 14 HVAC K Line 21 CAN BUS high 22 CAN BUS LOW 27 terminal 30 positive 28 Speed 29 speed signal 30 ground negative 您 Terminals A ground negative B power supply posit...

Page 36: ...on a jumper box to the jumper connection test click on that connection as follows the multi jumper box note of the side hole on multi jumper box it is visible on the label place of the box back Jumper box side hole Definition Jumper box side hole Definition 1 CAN H2 9 232 TX 2 BUS 10 BUS 3 K line2 11 CAN L2 4 GND negative 12 RS485 5 GND negative 13 RS485 6 CAN H1 14 CAN L1 7 K line1 15 L line 8 23...

Page 37: ...ed in the diagnosis of vehicle seat multimeter voltage measurement terminals to determine the diagnosis of Block the negative electrode and the socket Confirm the connection before the test the use of cross wiring connected to the corresponding box with a jumper side air Typically the power for the 12V or 24V K communication line is 12V or 24V CAN H and CAN L to about 2 5V the voltage sum of the t...

Reviews: