background image

41

2.5  M

EDICAL


AND


ATHLETIC


INFORMATION


AND


ADVICE

Exercising regularly has a positive effect on
blood pressure, on the amount of cholesterol
in the blood, on heart and blood vessel
functioning, on the capacity to burn fats and
carbohydrates. In thus reducing the risk of
heart disease, it contributes to a better and
longer life.

To benefit from aerobic exercise, you must
do it regularly, at moderate intensity and
for an adequately long time (at least 20
minutes).

Specifically, aerobic exercise should be
done 3 to 5 times a week, 20 to 50 minutes
per session at an intensity between 60 and
80% of your theoretical maximum HR (see
section 2.5.2).

Workloads should be increased gradually,
whenever you manage to finish the workout
without overtiring yourself.

W

ARNING

Do not overdo it, especially at the
start, because overly strenuous
workouts can be harmful.

2.5.2 How to choose aerobic workout intensity

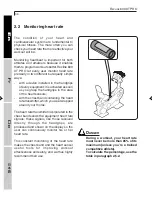
Being fit means having frequently subjected
your body to enough heavy stimulus to
provoke changes in your organs and your
body’s systems.

To improve aerobic capacity, it is important
to keep your heart rate between 60 and 80%
of the maximum while exercising. In fact,
exercising too lightly is not enough of a
stimulus, while exercising too intensely

produces large amounts of lactic acid whose
accumulation overtires your muscles and
makes you stop exercising.

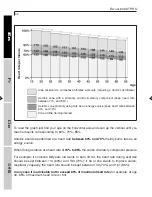
The following table shows the optimal pulse
rate levels in relation to age and the goal
being pursued. Theoretical maximum heart
rate (100%) is calculated on the basis of age
using the formula: 220 - age.

2_Recline_En.P65

30/05/2002, 13.50

41

Summary of Contents for RECLINE 600 XT PRO

Page 1: ...RECLINE 600 XT PRO User s manual Manuel de l utilisateur Benutzerhandbuch ...

Page 2: ...talie et pour les autres pays La désignation clé TGS se réfère à la marque de forme représentée ci contre Cardio Theater est une marque déposée de Cardio Theater Copyright Technogym s r l juin 2002 Technogym suit une politique d amélioration continue et se réserve le droit de modifier ses produits et leur documentation sans aucune obligation de préavis Die Bezeichnungen Technogym XTPRO Rotex CPR T...

Page 3: ...User s manual 5 Manuel de l utilisateur 69 Benutzerhandbuch 133 197 ...

Page 4: ......

Page 5: ...hysical condition It is now commonly accepted that regular aerobic exercise is the best way to prevent all pathologies that afflict the cardiovascular respiratory and muscle systems To improve aerobic exercise the XT PRO line of products is equipped with a heart rate monitor that lets users keep their heart rate under constant control All you have to do is grasp the handgrips in the heart sensor a...

Page 6: ...ookup to another equipment or device 23 1 4 Maintenance 25 1 4 1 Routine maintenance 25 1 4 2 Extraordinary maintenance 27 1 4 3 Troubleshooting 28 1 5 Technical Support Service 30 1 6 Storage 31 1 7 Disposal of the equipments 31 2 USING RECLINE 600 32 2 1 Precautions for safe use 32 2 2 Monitoring heart rate 34 2 2 1 How to put on the chest band 36 2 2 2 Correct use of chest band 36 2 3 User adju...

Page 7: ...sing in simplified mode 54 3 4 Exercising with QUICK START 55 3 5 The level test 56 3 6 Manual workout 57 3 7 Exercising with predefined profiles 59 3 8 Exercising at a constant heart rate CHR 61 3 9 Exercising with the Smartkey 63 3 10 Performance Index P I 64 3 11 Other messages appearing on the display 65 3 12 Access codes for technical information 67 ...

Page 8: ... back problems The seated position makes it possible to work the upper part of the leg muscles and gluteus more effectively than the traditional indoor cyclette Thus thanks to its simplicity and safety Recline 600 is appropriate for use by a wide variety of persons from professional athletes to those undergoing rehabilitation in addition to sedentary types seniors and people suffering from heart d...

Page 9: ...st correctly instruct the users concerning the correct and improper uses of the equipment The user must wear appropriate clothing Towels or other such items must not be placed on the equipment Rehabilitation exercises must be performed in the presence of qualified personnel ...

Page 10: ...anual contains valuable information and useful suggestions about workout methods as well as medical athletic advice It is therefore a guide for both professional users and beginners with no athletic knowledge These titles will serve as a guide in reading the manual WARNING This tag highlights important information that must not be ignored DANGER This tag highlights the rules to follow scrupulously...

Page 11: ...1 Technical information 1 1 Manufacturer and equipment identification A Maker s name and address B EC conformity mark C Serial number D Warnings E Class of the equipment 01325008 A B C D E ...

Page 12: ...ts in height E Transmission belt the transmission belt is connected to the alternator for regulation of its electromagnetic resistance F Pedals these are equipped with adjustable straps for a surer foothold G Feet they support the equipment frame and its components H Lateral handles these can be grasped during the workout to help improve posture Sensors I have been built into them for reading the ...

Page 13: ...ng of current under normal conditions max 250 µA Europa America Power 110 230 V 50 60 Hz 110 Vac 50 60 Hz Absorbed power 150 VA Maximum mechanical power output of the equipment 500 W Fuses 2 x F3A 5 x 20mm EMI EN 60601 1 2 Safety EN 60601 1 EN 957 1 UL 2601 1 Directives 73 23 CEE 93 68 CEE Weight 90 kg 198 lb Recommended speed 70 80 RPM Noise level below 70 dB Electromagnetic resistance system Adj...

Page 14: ...supplied in the Service Box A Set of tools B User s manual C Warranty certificate D Serial cable for connection with another equipment E Chest band with transmitter for the heart rate meter F Race way to cover the cable G Replacement fuses F 3A 5x20 mm H Power cable 01241002 B F A C E H G D ...

Page 15: ... programs based on the user s specific needs and aims B Personal Code Device heart rate detection system used by the equipment to harmonize itself solely with the heart rate of the user It is activated by putting on the chest band with the code type transmitter If the Personal Code Device is installed the sticker illustrated above is affixed to the control panel 86 Pcd ...

Page 16: ...ral switch turns power on and off C Fuses they protect the equipment s electrical parts When power surges the fuses blow preventing damage to the electronics inside D Beep a beep informs the user that the Recline 600 is being turned on an exercise session has started or ended or his or her heart rate is high 87 ...

Page 17: ...xplains how to connect the equipment to the power source B The sign beneath the control panel contains specific instructions on how to put on the chest band for the heart rate meter C The label attached to the power cord contains the electrical specifications D The stickers behind the saddle warn of a CRUSHING HAZARD 01325001 99834121_0E000026 99834121_0E000026 0E000245 ING B A D D C ...

Page 18: ...rature is between 10 and 25 C 50 and 77 F enough air is circulating to keep humidity during exercise between 20 and 90 the lighting is sufficient to make the space a pleasant and relaxing place to exercise in there is a wide margin of free space all around the equipment to ensure safety that the floor is flat stable and vibration free with enough support for the equipment plus user If the equipmen...

Page 19: ...ination As indicated on the packaging itself to unwrap the equipment packaged in cardboard and resting on a pallet remove the metal staples securing the outer carton to the pallet and then lift up the carton Visually inspect the packaging material to make sure it is not damaged To unwrap the material remove the fasteners and place the packaging materials on the ground and specifically all the wrap...

Page 20: ...indicated in the illustration and let it slide onto the ground This procedure must be performed by at least two persons DANGER Great caution must be exercised while moving and positioning it on the ground since the equipment could lose its balance The equipment is equipped with mounted front wheels To move the equipment you must grasp it as shown in the illustration and then push or pull it If flo...

Page 21: ... the auxiliary socket specifications 75 VA 4 Illustrates the main power switch I on 0 off 5 Indicates a device with a type B applied part 6 Indicates reference to user s manual 7 Indicates compliance with the CE directives 8 Indicates the IMQ certification agency marking 1 3 4 Power hookup Before connecting the equipment to the main power supply ensure that the electrical system is in compliance w...

Page 22: ... 0 off when plugging it in Connect the power cable first to the equipment socket and then to the wall socket If possible protect the cable from damage by using the supplied raceways 90 1 WARNING Periodically confirm that the cable is undamaged DANGER The power feed must be grounded If it has not been grounded already it must be by an electrician before hookup to the equipment ...

Page 23: ...ses Safety requires that you ensure that the grounded current on the main power cord does not exceed 500 µA 01325005 seriale 89 XT PRO line equipments can be connected not only with each other but also with an audio video receiving device such as Cardio Theater and Smartkey reader Three connectors are installed on the back of the control panel specifically for making these types of connections The...

Page 24: ...he central RJ45 socket may be connected only with the Cardio Theater in conformitywithinternational norms IEC 950 Only devices in compliance with the IEC 950 standard may be connected with the AUX socket These devices must be located at least 2 meters away from the equipment AUX seriale lettore TGS Cardio_U ...

Page 25: ...with a damp sponge move the equipment to vacuum the spot on which it stands If the chest band needs washing use a water and soap solution then let it dry for a few hours in a warm dry place far from direct sources of heat To sterilize the chest band use a disinfectant for surgical tools available in drugstores To clean the heart sensor use a disinfectant for the sanitization and antiseptic storage...

Page 26: ...ment and lubrication must be performed by Technogym Technical Support Service personnel Pos Description A Chain drive B Pedals C Transmission belt Type of work Inspection of lubrication Inspection of free play Inspection of wear and tear Frequency Monthly Monthly Monthly 01325008 C A B ...

Page 27: ...the equipment setting the switch at 0 and unplugging it from the wall socket Remove the fuse holder near the switch pushing on the lever Replace the blown fuse with a new one as supplied F 3A Return the fuse holder to its housing making sure it snaps in DANGER If the supply of fuses is exhausted use others having the same electrical characteristics with identical rating and certified F 3A 96 ...

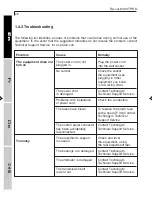
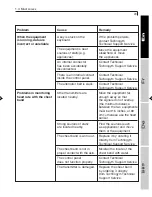
Page 28: ...has been accidentally disconnected The equipment s support is uneven The bearings are damaged The alternator is damaged The transmission belt is worn out Remedy Plug the power cord into the wall socket Check the socket the equipment uses plugging in other equipment you know is in working order Contact Technogym Technical Support Service Check the connection To replace the blown fuse with a spare F...

Page 29: ...The transmitter is damaged Remedy If the problem persists contact Technogym Technical Support Service Move the equipment elsewhere or move the appliances Contact Technical Technogym Support Service Contact Technical Technogym Support Service Contact Technical Technogym Support Service Move the equipment far enough away so that the signals do not overlap the minimum distance between the two equipme...

Page 30: ...id for on site servicing shipment of original spare parts When you contact the Technogym Technical Support Service you must give the following information equipment model date of purchase serial number precise description of the problem encountered WARNING Work on the equipment by persons unauthorizedbyTechnogyminvalidates the warranty 00350049 1 5 Technical Support Service ...

Page 31: ...ipment is unused for a long time or when you want to dispose of it deactivate it by unplugging it Disposing of the equipment in the environment in public areas or in private ones used by the public is prohibited Recline 600 XT PRO is made of recyclable materials such as steel aluminum and plastic which must be disposed of pursuant to urban waste and refuse regulations contacting a company speciali...

Page 32: ...imits on using the equipment Set up the workout on the basis of your state of health starting exercise at the appropriate rhythm and speed For certain physical conditions the equipment should be used only under the close supervision of a specialized physician If you feel ill during the workout dizziness chest pains etc stop exercising immediately and call your doctor If the audio signal sounds for...

Page 33: ...eave the equipment outdoors exposed to the elements rain sun etc The equipment must not be located near heat sources electromagnetic sources such as TVs electrical motors antennas etc medical equipment laser devices electro stimulators etc XT PRO line equipments are primarily intended for use at athletic clubs gyms and similar organizations in entirely indoor locations DANGER There is high voltage...

Page 34: ...the heart sensors with the chest band containing the heart rate transmitter which you wear wrapped around your thorax The heart rate transmitter incorporated in the chest band sends the equipment heart rate signals these signals like those received directly through the handgrips are processed and shown on the display so the user can continuously monitor his or her heart rate This constant monitori...

Page 35: ...d not any other As a result interference with nearby equipments is avoided and a more precise measurement of the heart rate is obtained WARNING The only function of the heart rate monitor either the chest band or the heart sensor is to show heart rate during exercise and excludes any diagnostic use of a medical nature it is not for detection of heart anomalies or problems The heart rate shown on t...

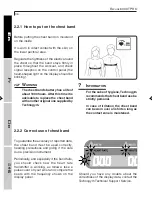
Page 36: ...e supplied by Technogym INFORMATION For the sake of hygiene Technogym recommends that chest band use be strictly personal In case of irritation the chest band can be worn over aT shirt so long as the contact zone is moistened 2 2 2 Correct use of chest band To guarantee the accuracy of reported data the chest band must be used correctly heeding precautions and giving it the care due a precision in...

Page 37: ...e care not to stretch or bend the rubber bad maintenance can cause the electrodes to lose their conductivity Only one transmitter should be within the receiver s reception range otherwise the receiver could get several signals at the same time and make errors in visualizing heart rate If there are several equipments with heart rate receivers in the same area the recommended minimum distance betwee...

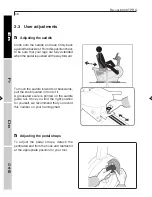
Page 38: ...d all the way forward To move the saddle forwards or backwards pull the knob located in front of it A graduated scale is printed on the saddle guide rail Once you find the right position for yourself we recommend that you record this number on your training chart Adjusting the pedal straps To adjust the pedal straps detach the perforated end from the hook and reattach it at the appropriate positio...

Page 39: ...rips placed on the sides of the saddle When the pedal is pushed all the way forward your leg must be almost completely extended Any other position such as using one foot only or not holding onto the side handgrips or stretching out or bending your legs too much can result in instability and or improper movement of the limbs leading to pain in different parts of the body 93 ...

Page 40: ...ram should include all three components in different proportions depending on the goal you want to achieve The XT PRO line of equipments let you do cardiovascular or aerobic workouts that is exercise large masses of muscles legs arms and torso through continual rhythmic contractions while at the same time stimulating your heart and respiratory and circulatory systems Other types of aerobic exercis...

Page 41: ...ally whenever you manage to finish the workout without overtiring yourself WARNING Do not overdo it especially at the start because overly strenuous workouts can be harmful 2 5 2 How to choose aerobic workout intensity Being fit means having frequently subjected your body to enough heavy stimulus to provoke changes in your organs and your body s systems To improve aerobic capacity it is important ...

Page 42: ...ing exercise should be kept between 114 60 and 133 70 if he or she wants to improve cardio respiratory capacity the heart rate should be kept between 133 70 and 161 85 In any case it is advisable not to exceed 85 of maximum heart rate for example at age 40 85 of maximum heart rate is 153 grafico per FC Area reserved to competitive athletes workouts requiring a doctor s certificate Aerobic zone wit...

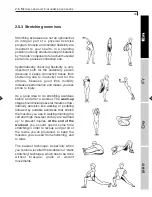
Page 43: ...od limb mobility increases performance and makes you less prone to injury It s a good idea to do stretching exercises before and after a workout The warm up stage should include several minutes of low intensity aerobics like walking or pedaling followed by suitable exercises that stretch the muscles you use in walking running the calf and thigh muscles so they are warmed up to prevent injuries At ...

Page 44: ... exercise into two parts first stage get comfortably into the correct position shown in the illustration hold the stretch for ten seconds and relax second stage after relaxing stretch a few more inches and hold that position for 10 to 30 seconds ...

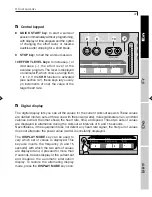
Page 45: ...or varying the level of difficulty and the QUICK START keys for starting exercise in the selected mode or resuming a function in pause and STOP to halt the workout session D Alphanumeric display area where all messages and requested or entered data are displayed during exercise this area shows the profile for the current session level of difficulty The lights on the left side show the selected fun...

Page 46: ...cal data requested during set up of the exercise program Left keypad 4 CHR function key for selecting an exercise session at a constant heart rate 5 PROFILE function key for selecting one of six different predefined workout profiles 6 MANUAL function key for selecting manual training where the user enters his or her own workout data and parameters 7 TEST function key for selecting the level test w...

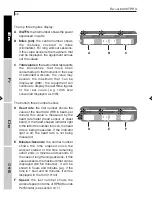
Page 47: ... workout session These values are divided into two sets of three one with the power watts miles kilometers run and total calories burned the other shows the heart rate time and speed These two sets of values are displayed in alternation during the workout at intervals of 5 and 15 seconds Nevertheless if the equipment does not detect any heart rate signal the first pair of values does not alternate...

Page 48: ...mbers show D Heart rate the first number shows the value of the heart rate HR in beats per minute this value is measured by the heart rate meter heart sensor or chest band If the heart shaped indicator light to the left of the number turns on the heart rate is being measured If the indicator light is off the heart rate is not being measured E Minutes Seconds the central number shows the time elaps...

Page 49: ...ght to the column of the effort level The equipment handles 12 effort levels represented on the display by 18 columns that are 8 LEDs high with their correspondence indicated in the table to the side If the total exercise time is known from the start as in the case of workout sessions corresponding to the 4 function keys it is subdivided by 18 columns If instead the total workout time is not known...

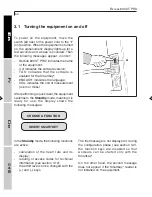
Page 50: ...orming a quick reset the equipment switches to the Standby mode meaning it is ready for use the display shows the following messages CHOOSE A FUNCTION INSERT SMARTKEY In the Standby mode the following functions are active calculation of the heart rate and its display reading of access codes for technical information see section 3 12 the effort level can be changed with the and keys 3 1 Turning the...

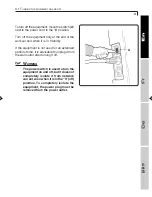
Page 51: ...n Standby If the equipment is not used for an extended period of time it is advisable to unplug it from the wall outlet after turning it off WARNING The power switch is used to turn the equipment on and off but it does not completely isolate it from network current even when it is in the 0 off position To completely isolate the equipment the power plug must be removed from the power outlet 32 A ...

Page 52: ...se setting the priority of the heart sensor and chest band you can choose whether during the first minute of training the equipment must harmonize with the signal coming from the heart sensor or the one from the chest band To change the settings with the equipment in Standby simultaneously press the number keys 3 1 4 The alphanumeric display will show PASSWORD 0 key in the password code 2406 and p...

Page 53: ...f Manual and CHR workouts with the ENTER key ENTERTO INCREASETIME ON To choose the setting press the corresponding number key 1 to disable the ENTER key OFF appears 2 to enable the ENTER key ON appears Then to save the setting press the ENTER key The priority of the heart sensor or chest band is then chosen for those times when both signals are detected CHEST BAND PRIORITY To select the setting pr...

Page 54: ... The last illuminated column corresponding to the current minute flashes From the 19th minute on the columns will start moving towards the left so that the column corresponding to the current minute is always displayed One of the four available functions can be selected during the first 60 seconds of the workout The digital display will show all the figures for the current workout the time shown i...

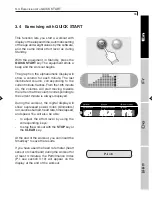
Page 55: ...the 19th minute on the columns will start moving towards the left so that the column corresponding to the current minute is always displayed During the workout the digital display will show expressed power miles kilometers run calories burned heart rate time elapsed and speed You will also be able to adjust the effort level by using the corresponding keys to stop the workout with the STOP key or t...

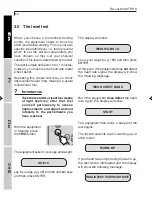
Page 56: ...self periodically to assess improvements and adjust workout intensity to the performance you have reached With the equipment in Standby press the TEST button The equipment asks for your age and weight AGE 0 key in you age e g 29 with the number keys and then press ENTER The display will show WEIGHT LBS O key in your weight e g 155 and then press ENTER At this point if the equipment does not detect...

Page 57: ... a cooling down period lasting 30 seconds The display will show the ideal effort level for the specific user LEVEL 6 3 6 Manual workout This function lets you set customized training programs with a maximum duration equal to the value set during configuration see section 3 2 With the equipment in Standby press the MANUAL funcion key If you use the heart rate meter heart sensor or chest band and th...

Page 58: ... the workout by pressing the STOP key twice If you pause after pressing STOP or CLEAR and then press the QUICK START key the workout resumes If you press STOP again the workout ends and the equipment returns to Standby The equipment guides the user with the following two messages STOP END QUICK START RESTART At the end of the workout the ENTER key lets you increase the remaining workout time in in...

Page 59: ...of the profiles shown by the columns on the display the height of the columns indicates the variation in effort level throughout the workout There are 6 available profiles as illustrated below Each column on the display corresponds to one step which has a duration of 1 18 of the total time DANGER It is recommended that the exercise not be performed at an effort level higher than the one indicated ...

Page 60: ...use the number keys to key in the duration of the workout in minutes e g 15 and then press ENTER The equipment emits a beep and the workout begins The columns of the altimetric profile proportionately show the effort level in terms of height They light up one after the other until they cover the entire amount of time set The flashing column represents the current level The index corresponding to t...

Page 61: ...eart rate is brought to the selected value and then kept there for the duration of the workout The CHR system is thus a useful tool for programming specific workouts Exercising at a constant heart rate is highly important in all those situations where for safety reasons specific heart rate levels must not be exceeded e g persons with heart disease and seniors It is also important in weight loss ae...

Page 62: ...f they have been enabled during configuration see section 3 2 during the workout the and keys let you vary in steps of one the value of the target heart rate the ENTER key lets you increase the remaining workout time in increments of 1 minute for each time you press the key At any time you can interrupt the workout for a pause with the STOP or CLEAR key end the workout by pressing the STOP key twi...

Page 63: ...t is planned when you insert the Smartkey this message appears H R 138 where H R 138 indicates the value 138 of the constant heart rate H R which must be maintained during the exercise If you perform a workout at constant power this message appears WATT 110 Afterwards the equipment behaves exactly as if the workout had been selected and set from the control panel At the end of the workout if other...

Page 64: ... based on a rating of 0 to 99 The better your performance the higher your aerobic capacity An increase in your performance index means that heart rate being equal you are able to exercise harder The criteria used to rate performance make it possible to compare tests taken by people of different ages In any case it is better to compare the results of different tests taken by the same person or diff...

Page 65: ...sence of heart rate signal If no heart rate signal is detected at the start of a CHR or Test workout this message appears on the display WEAR CHEST BAND If your heart rate still hasn t been detected after 1 minute the workout is cancelled The same message appears if the heart rate signal disappears during any workout started with the chest band Cool down At the end of each exercise the equipment s...

Page 66: ...ining what procedures to follow QUICK START RESTART The QUICK START key is used to resume the workout STOP END The STOP key is pressed for a second time to halt the workout once and for all If no key is pressed within 1 minute after the pause begins the equipment will definitively conclude the workout session Calories and speed during the entire workout During the workout these messages appear 2 4...

Page 67: ...word While the equipment is in Standby simultaneously press 3 1 4 on the number pad The display will show PASSWORD 0 key in the password code 1508 and press ENTER The following messages will appear HOURS ON 1512 indicates the total number of hours the equipment has been turned on Press the ENTER key to continue HOURS OF USE 342 indicates the number of hours of operation of the equipment Press the ...

Page 68: ......

Page 69: ...a meilleure façon de prévenir toutes les pathologies liées aux systèmes cardio vasculaire respiratoire et musculaire est d effectuer régulièrement un travail aérobie c est pourquoi toutes les machines de la ligne XT PRO permettent de contrôler en permanence la fréquence cardiaque pendant l entraînement grâce à un cardio fréquencemètre qui se présente soit sous la forme de capteurs heart sensor int...

Page 70: ...spositif 87 1 4 Entretien 89 1 4 1 Entretien ordinaire 89 1 4 2 Entretien extraordinaire 91 1 4 3 Recherche des pannes 92 1 5 Assistance technique 94 1 6 Stockage 95 1 7 Elimination de l appareil 95 2 UTILISATION DE RECLINE 600 96 2 1 Recommandations pour l utilisation correcte de l appareil 96 2 2 La mesure de la fréquence cardiaque 98 2 2 1 Comment mettre la ceinture thoracique 100 2 2 2 Utilisa...

Page 71: ...mode simplifié 118 3 4 Entraînement avec QUICK START 119 3 5 Le test de niveau 120 3 6 Entraînement manuel 121 3 7 Entraînement avec profils préétablis 123 3 8 Entraînement à fréquence cardiaque constante CPR 125 3 9 Entraînement avec la clé TGS 127 3 10 L indice de performance I P 128 3 11 Autres messages à l écran 129 3 12 Codes d accès pour les informations techniques 131 ...

Page 72: ... qui doivent faire des exercices d activation cardio vasculaire mais qui ressentent des douleurs dans cette partie importante du corps D autre part la position particulière de l assise permet de faire travailler la partie supérieure des muscles fessiers et des jambes de façon plus efficace que sur le cycle traditionnel En conséquence Recline 600 par sa simplicité et sa sécurité d emploi tient comp...

Page 73: ...effectués par du personnel qualifiéTechnogym ou agréé par le constructeur le responsable de la salle ou du centre de rééducation a correctement formé les utilisateurs de l usage correct et des usages erronés de l appareil l habillement est approprié aucune serviette ou autre accessoire n est positionné sur les appareils les exercices de rééducation sont exécutés en présence de personnel qualifié ...

Page 74: ...des conseils très utiles sur les méthodes d entraînement ainsi que pour ce qui concerne l aspect médico sportif il constitue donc un guide aussi bien pour l utilisateur professionnel que pour le débutant qui n a aucune connaissance sportive Des symboles serviront de guide dans la lecture de ce manuel AVERTISSEMENT Ce symbole annonce des informations importantes que l on ne doive pas négliger ATTEN...

Page 75: ...techniques 1 1 Identification du constructeur et de l appareil A Nom et adresse du constructeur B Marquage CE C Numéro de série D Recommandations E Classe d appartenance de l appareil d entraînement 01325008 A B C D E ...

Page 76: ...e et permet son réglage E Courroie d entraînement à la transmission par chaîne est relié l alternateur pour la régulation de la résistance électromagnétique F Pédales elles sont munies de cale pied réglables pour un maintien parfait du pied G Socles ils supportent le châssis de l appareil et ses composants H Poignées latérales elles peuvent être saisis pendant l exercice pour garantir une posture ...

Page 77: ...nt de fuite vers la terre en conditions normales maxi 250 µA Europe USA Alimentation 110 230 V 50 60 Hz 110 Vac 50 60 Hz Puissance absorbée 150 VA Puissance mécanique maximum fournie par l appareil 500 W Fusibles 2 x F3A 5x20 mm EMI EN 60601 1 2 Sécurité de machine EN 60601 1 EN 957 1 UL 2601 1 Directives 73 23 CEE 93 68 CEE Poids 90 kg 198 lb Vitesse conseillée 70 80 RPM Niveau de bruit inférieur...

Page 78: ...ervice Box A Un jeu de clés B Un manuel d utilisation C Le certificat de garantie D Cordon de liaison avec un autre appareil E Ceinture thoracique avec transmetteur pour cardio fréquencemètre F Un protecteur de câble G Des fusibles de rechange F 3A 5x20 mm H Un cordon d alimentation 01241002 B F A C E H G D ...

Page 79: ...t des objectifs spécifiques de l utilisateur B Personal Code Device système de mesure du rythme cardiaque grâce auquel l appareil se syntonise exclusivement avec la fréquence cardiaque de l utilisateur il s active en portant une ceinture thoracique munie d un émetteur de type codifié La présence du Personal Code Device sur l appareil est signalée sur le panneau de commande de celui ci par l autoco...

Page 80: ...e l appareil C Fusibles ils protègent les parties électriques de l appareil Quand le courant atteint une intensité excessive les fusibles grillent pour empêcher l électronique embarquée de s endommager Des fusibles de rechange sont fournis avec l appareil D Signale sonore il signale à l utilisateur la mise sous tension de Recline 600 ou le début ou la fin de l exercice ou encore que la fréquence c...

Page 81: ...pliquée à proximité de l interrupteur général fournit les indications pour le branchement électrique de l appareil B L étiquette posée sous le panneau de commande illustre la façon de porter la ceinture thoracique pour le cardio fréquencemètre C L étiquette posée sur le cordon d alimentation indique les caractéristiques électriques D Les étiquettes situées derrière la selle signalent le DANGER D E...

Page 82: ...de l air suffisant et pouvant contenir une valeur d humidité durant l exercice oscillant entre 20 et 90 éclairage suffisant de manière à ce que l exercice physique soit effectué dans des conditions agréables et reposantes un espace libre tout autour de l appareil suffisamment ample pour des raisons de sécurité une surface plane stable et sans vibrations avec une capacité adéquate au poids à suppor...

Page 83: ...ler l appareil Comme indiqué sur la caisse carton pour le déballage de l appareil il faut d abord enlever les agrafes métalliques de fixation de l emballage sur la palette puis soulever la caisse carton Examiner bien l emballage pour déceler d éventuels endommagements pendant le transport Pour sortir le matériel déposer les éléments de fixation et poser au sol les composants de l emballage à savoi...

Page 84: ...r au sol en faisant glisser voir la figure ci contre Cette opération doit être effectuée par 2 personnes ATTENTION Déplacer et positionner au sol l appareil avec soin Les arrêts brusques contraintes ou irrégularités duplancherpourraientprovoquerune chute de l appareil L appareil est muni à l avant de roulettes de transport fixes Pour déplacer l appareil le saisir comme représenté sur la figure et ...

Page 85: ...s de la prise auxiliaire 75 VA 4 Représentation de l interrupteur général I allumé 0 éteint 5 Indique un appareil avec partie appliquée de type B 6 Symbole indiquant de consulter le manuel utilisateur 7 Indique la conformité aux directives CE 8 Représente la marque IMQ organisme de certification 1 3 4 Branchement électrique Avant de brancher l appareil au réseau il faut s assurer que les caractéri...

Page 86: ...d alimentation d abord au connecteur de l appareil puis à la prise murale Si cela est possible protéger le cordon d alimentation avec les protecteurs qui sont fournis avec l appareil afin d éviter qu il soit endommagé 90 1 AVERTISSEMENT Contrôler périodiquement le cordon d alimentation ATTENTION La prise de courant doit être pourvue d une mise à la terre Si ce n est pas le cas celle ci doit être i...

Page 87: ... Par raison de sécurité s assurer que le courant de fuite vers la terre sur le cordon d alimentation principale ne dépasse par 500 µA 01325005 seriale 89 Les appareils de la ligne XT PRO outre la possibilité de raccordement entre eux peuvent être connectés à un dispositif de réception audio vidéo comme le Cardio Theater et à un lecteur TGS Les raccordements à ces dispositifs s effectuent par les c...

Page 88: ...l le dispositif Cardio Theater conforme à la norme internationale IEC 950 peut être connecté à la prise RJ45 centrale Seuls les appareils conformes à la norme IEC 950 peuvent être connectés à la prise AUX Ces appareils doivent être placés à au moins 2 mètres de hauteur AUX seriale lettore TGS Cardio_U ...

Page 89: ...ver la poussière qui se serait éventuellement accumulée à l aide d un aspirateur Si la ceinture thoracique doit être lavée utiliser de l eau savonneuse laisser ensuite sécher pendant quelques heures dans un endroit chaud et sec à l écart de toutes sources directes de chaleur Stériliser la ceinture thoracique avec un désinfectant pour la stérilisation et la conservation aseptique du matériel chirur...

Page 90: ...dique de réglage et de graissage doivent être effectuées par le SAVTechnogym Reps Désignation A Chaîne de transmission B Pédalier C Courroie d entraînement Opération Contrôle du graissage Contrôle du jeu Contrôle de l usure Périodicité Tous les mois Tous les mois Tous les mois 01325008 C A B ...

Page 91: ...ncher le cordon d alimentation de la prise murale Enlever le boîtier porte fusible qui se trouve à droite de l interrupteur en appuyant sur le levier Remplacer le fusible qui a grillé par un des fusibles neufs fournis avec l appareil F 3A Remettre le boîtier porte fusible en place en s assurant de sa parfaite insertion à pression ATTENTION Si tous les fusibles fournis avec l appareil ont été utili...

Page 92: ...ment débroché L appareil ne repose pas au sol de manière uniforme Les roulements son endommagés L alternateur est détérioré La courroie est usée Solutions Brancherlecordond alimentation danslaprisemurale Contrôler la présence de courant secteur à la prise à laquelle l appareil est branché en connectant des appareils dont vous êtes sur du bon fonctionnement S adresser au Service d Assistance Techni...

Page 93: ...ectement L émetteur est détérioré Solutions Si l inconvénient persiste s adresser au Service d Assistance Technogym Déplacer l appareil aux sources de magnétisme S adresser au Service d Assistance Technogym S adresser au Service d Assistance Technogym S adresser au Service d Assistance Technogym Déplacer l appareil pour prévenir le risque d interférence des signaux la distance minimale entre deux ...

Page 94: ...un service d assistance à domicile l envoi de pièces de rechange d origine Lorsque l on contacte le Service d Assistance Technique Technogym il faut toujours préciser le modèle de l appareil la date d achat le numéro de série l origine ou la nature précise du problème AVERTISSEMENT Toute intervention sur l appareil effectuée par du personnel non autorisé parTechnogym en annulent la garantie 003500...

Page 95: ...ille se débarrasser de l appareil il faut le désactiver en débranchant le câble d alimentation Il est interdit d abandonner l appareil dans la nature dans des lieux publics ou dans les lieux privés destinés à l usage public Recline 600 est construit avec du matériel recyclable comme l acier l aluminium et le plastique qui doivent être éliminés selon les normes prévues par les lois en vigueur conce...

Page 96: ...ion de ses proprescaractéristiquesergonomiquesetdeson propre état de santé en commençant l exercice avec des rythmes et une vitesse appropriés Dans des conditions physiques particulières l utilisation de l appareil n est autorisée que sous l étroite surveillance d un médecin ayant des compétences spécifiques en la matière Si vous ressentez des malaises vertiges douleurs thoraciques etc durant l en...

Page 97: ...nts atmosphériques pluie soleil etc L appareilnedoitpasêtreplacéprèsdesources de chaleur près de sources électromagnétiques comme les appareils de télévision les moteurs électriques les antennes etc près d un appareillage médical de dispositifs laser d électrostimulateurs etc Les appareils de la ligne XT PRO sont principalement destinés à l activité sportive auprès des salles de sport ou autres ce...

Page 98: ... poignées par une ceinture thoracique palpeur cardiaque munie d un émetteur L émetteur intégré dans la ceinture envoie à l appareil les signaux correspondant au rythme des pulsations ces signaux à l instar de ceux relevés directement par les poignées sont traités et affichés sur le panneau de commande l utilisateur peut ainsi surveiller la fréquence cardiaque à tout instant Le contrôle permanent d...

Page 99: ... utiliser Cela pour éviter toute interférence entre appareils rapprochés et une mesure plus précise du rythme cardiaque AVERTISSEMENT Le cardio fréquencemètre que ce soit la ceinture ou le heart sensor a pour seule fonction d afficher les battements du cœur pendant l exercice et il exclut toute utilisation diagnostique à caractère médical il ne sert donc pas à relever des anomalies ou des problème...

Page 100: ...ture d origine fournie parTechnogym INFORMATIONS Pourdesraisonsd hygiène Technogym conseille une utilisation strictement personnelle de la ceinture thoracique En cas d irritations il est possible de mettre la ceinture sur un tricot sans oublier d humidifier la zone de contact 2 2 2 Utilisation correcte de la ceinture thoracique Pour que les données soient précises il est indispensable d utiliser c...

Page 101: ...aoutchouc les électrodes pourraient perdre leur conductibilité à cause d un mauvais entretien Dans le rayon de réception du récepteur il ne devrait pas y avoir plus d un émetteur en effet le récepteur pourrait recevoir plusieurs signaux à la fois et afficher les pulsations de manière erronée Dans l éventualité où plusieurs appareils pourvus de récepteurs de la fréquence cardiaque se trouvent dans ...

Page 102: ...Pour régler la position de la selle en avant ou en arrière tirer le pommeau situé sous celle ci L échelle graduée gravée sur la tige montant permet un réglage précis de la selle après le réglage il convient d inscrire la hauteur sur la fiche d entraînement Réglages des cale pied Pour régler les cale pied décrocher la languette et la faire passer dans la rainure adaptée de manière à maintenir parfa...

Page 103: ... La jambe doit être complètement allongée lorsque la pédale est en avant Toute autre position par exemple pédaler avec un seul pied ou ne pas saisir les poignées latérales ou encore pédaler avec les jambes trop allongées ou fléchies est la cause d instabilité et ne permet pas d exécuter des mouvements corrects ce qui peut procurer des douleurs dans différentes parties du corps 93 ...

Page 104: ...ondant à l objectif que l on désire atteindre Avec les appareils de la ligne XT PRO il est possible d effectuer une activité cardio vasculaire ou aérobie c est à dire un exercice physique en mesure de solliciter les grandes masses musculaires jambes bras et torse avec des contractions rythmiques et continues et de stimuler à la fois l appareil respiratoire le cœur et le système circulatoire D autr...

Page 105: ...s que l on parvient à terminer l exercice sans fatigue excessive AVERTISSEMENT Il est conseillé de ne pas exagérer surtout au début parce que des charges de travail trop intenses peuvent être néfastes 2 5 2 Comment choisir l intensité de l entraînement aérobie Etre entraîné signifie avoir soumis son corps à des stimulations d intensité et de fréquences à même de provoquer des modifications dans le...

Page 106: ...nce cardiaque pendant l exercice entre 114 60 et 133 70 si au contraire il désire améliorer la capacité cardio respiratoire il doit maintenir la fréquence entre 133 70 et 161 85 Dans tous les cas il est conseillé de ne pas dépasser 85 de la fréquence cardiaque maximale à 40 ans par exemple le 85 du rythme maximum des pulsations est égal à 153 grafico per FC Zone réservée à l entraînement pour spor...

Page 107: ...qu une bonne mobilité articulaire permet d augmenter l efficacité du geste athlétique et diminue les risques d accident Il convient d effectuer des exercices de stretching aussi bien avant qu après l entraînement La phase d échauffement warm up devra comprendre quelques minutes d activité aérobie à basse intensité comme marcher ou pédaler suivis par des exercices d étirement des muscles sollicités...

Page 108: ...phases première phase après avoir atteint la position correcte indiquée par les figures garder l étirement pendant dix secondes puis se relaxer deuxième phase après la relaxation continuer à s étirer de quelques centimètres et rester sans bouger pendant 10 à 30 secondes ...

Page 109: ...odifier le niveau de difficulté la toucheQUICK START pour lancer un exercice dans le mode correspondant ou reprendre l exercice en pause et la touche STOP pour arrêter l exercice D Ecran alphanumérique zone où sont affichés tous les messages et données demandées ou entrées pendant l exercice l écran visualise le profil de l entraînement en cours niveau de difficulté Les témoins lumineux ou LED à g...

Page 110: ...ndant le paramétrage des programmes d entraînement Clavier gauche 4 Touche de fonction CPR permet de sélectionner l entraînement à fréquence cardiaque constante 5 Touche de fonction PROFIL permet de sélectionner un des six différents entraînements à profil prédéfini 6 Touche de fonction MANUEL permet de sélectionner l entraînement manuel où l utilisateur introduit les données et les paramètres d e...

Page 111: ...sées toutes les valeurs de l exercice en cours Ces valeurs sont réparties par groupe de trois le premier groupe comprend la puissance watt les kilomètres parcourus distance et les calories totales dépensées alors que le second groupe comprend la fréquence cardiaque la durée et la vitesse Les deux groupes sont affichés tour à tour à un intervalle de temps de 5 à 15 s Toutefois si l appareil ne déte...

Page 112: ...e inférieur de valeurs montre D Fréquence cardiaque le premier chiffre indique la valeur de la fréquence cardiaque FC en pulsations par minute cette valeur est mesurée par le cardio fréquencemètre heart sensor ou ceinture thoracique l allumage du témoin en forme de cœur indique l activation de la mesure du rythme cardiaque son extinction au contraire indique l absence de mesure E Minutes Secondes ...

Page 113: ...ellement au niveau de difficulté L appareil gère 12 niveaux de difficulté représentés sur l écran par 18 colonnes d une hauteur de 8 LED dont la correspondance est indiquée dans le tableau ci contre Si la durée totale de l exercice est connue dès le départ comme c est le cas dans les entraînements associés aux 4 touches de fonction celle ci sera répartie dans les 18 colonnes en revanche si elle n ...

Page 114: ...areil se met en Attente prêt à fonctionner sur l écran apparaissent tour à tour les messages suivants CHOISIR UNE FONCTION INSERER LA CLE TGS En Attente ou stand by les fonctions suivantes sont actives le calcul de la valeur de la fréquence cardiaque et sa visualisation la lecture des codes d accès pour les informations techniques paragraphe 3 12 la variation du niveau de difficulté à l aide des t...

Page 115: ...endant une période de temps prolongée il conviendra non seulement d éteindre l appareil en agissant sur l interrupteur mais aussi de débrancher le cordon d alimentation de la prise murale AVERTISSEMENT L interrupteur sert à allumer et à éteindre l appareil Toutefois il ne l isole pas complètement de sa source d alimentation en énergie secteur même lorsqu il est mis en position 0 éteint Pour sa mis...

Page 116: ...ments de type Manuel et CPR programmation de la priorité entre heart sensor et ceinture thoracique possibilité de choisir si pendant la première minute d entraînement en présence des deux signaux l appareil doit se syntoniser sur le signal provenant du heart sensor ou sur celui de la ceinture thoracique Pour changer les programmations en attente appuyer simultanément sur les touches numériques 3 1...

Page 117: ... touche ENTREE pour mémoriser Après quoi s ensuit la programmation de la possibilité d augmenter la durée de l exercice avec la touche ENTREE dans les entraînements de type Manuel et CPR ENTREE AUGMENTERTEMPS ON Pour sélectionner le réglage appuyer sur la touche numérique correspondante 1 pour désactiver la touche ENTREE OFF apparaît alors 2 pour activer la touche ENTREE ON apparaît alors puis app...

Page 118: ...la dernière colonne illuminée correspondant à la minute en cours clignote A partir de la 19ème minute les colonnes se déplaceront vers la gauche pour avoir toujours la colonne de la minute en cours visible Pendant les premières 60 s dès le début de l exercice il est possible de sélectionner une des quatre fonctions disponibles Sur l écran numérique apparaîtront les données de l exercice en cours l...

Page 119: ... se déplaceront vers la gauche pour avoir toujours la colonne de la minute en cours visible Pendant l exercice apparaîtront sur l écran numérique la puissance développée les kilomètres parcourus les calories dépensées la fréquence cardiaque le temps d exercice écoulé la vitesse d exécution il sera d autre part possible de modifier le niveau de difficulté à l aide des touches correspondantes de ter...

Page 120: ...raînement léger d au moins deux semaines effectuer successivement le test de façon régulière pour évaluer les progrès et adapter l intensité de travail aux valeurs obtenues Avec l appareil en stand by appuyer sur la touche TEST Entrer à présent l âge et le poids AGE 0 taper au bloc numérique l âge 29 par exemple puis appuyer sur ENTREE L écran suivant apparaît POIDS KG O taper au bloc numérique le...

Page 121: ...appareil est prêt à être utilisé pour une phase de détente de la durée de 30 s Sur l écran apparaît le niveau de difficulté idéal adapté à l utilisateur NIVEAU DE DIFFICULTE 6 3 6 Entraînement manuel Cette fonction permet d établir des programmes d entraînement personnalisé d une durée maximale égale à la valeur paramétrée point 3 2 Avec l appareil en stand by appuyer sur la touche MANUEL Si l on ...

Page 122: ...s sur la touche ARRETEZ En cas de pause c à d après avoir enfoncé la touche ARRETEZ ou EFFACER l exercice reprendra si l on appuie sur QUICK START si l on réappuie sur ARRETEZ l exercice termine et l appareil reviendra en Attente L appareil guide l utilisateur à travers les deux écrans suivants ARRETEZ POUR TERMINER QUICK START POUR REPARTIR A la fin de l exercice l action sur la touche ENTREE per...

Page 123: ...isir un des profils visualisés par les colonnes de l écran la hauteur des colonnes indiquant la fluctuation du niveau de difficulté pendant l exercice Les profils disponibles sont au nombre de 6 comme représenté ci après Chacune des colonnes de l écran correspond à un palier dont la durée est égale à un 1 18 de la durée totale ATTENTION Il est déconseillé d effectuer l exercice à un niveau de diff...

Page 124: ...urée de l entraînement en minutes 15 par exemple puis appuyer sur ENTREE L appareil émet un signal sonore et l exercice commence Les colonnes du profil altimétrique sur l écran qui affichent le niveau de difficulté s allument progressivement jusqu à couvrir la durée préréglée la colonne clignotante indique le palier en cours L indice correspondant au niveau de difficulté et le témoin lumineux asso...

Page 125: ...choisie et de la maintenir ainsi tout au long de l exercice Le système CPR est donc un instrument valable pour programmer des entraînements spécifiques L entraînement à pulsations est très important dans toutes les situations où par raison de sécurité on ne doit pas dépasser certaines valeurs de fréquence cardiaque pour les cardiaques et les personnes âgées par exemple Son importance est tout auss...

Page 126: ...s touches et permettent de varier par palier d une unité la valeur de la fréquence cardiaque cible la touche ENTREE permet d augmenter la durée de l exercice restante par palier de 1 minute pour chaque frappe de la touche A tout moment il est possible d interrompre pour une pause l exercice avec la touche ARRETEZ ou avec la touche EFFACER de terminer l exercice en appuyant deux fois sur la touche ...

Page 127: ... est prévu un entraînement de type CPR lorsque l on insèrera la clé TGS l écran suivant apparaîtra F C 138 où F C 138 indique la valeur 138 de la fréquence cardiaque F C qui devra rester constante pendant l exercice Dans le cas d entraînement à puissance constante l écran suivant apparaît WATTS 110 Ensuite l appareil se comporte exactement comme si l exercice avait été sélectionné et établi à part...

Page 128: ... 99 Plus le résultat est élevé plus la capacité aérobie sera importante Une augmentation de l indice de performance signifie que avec une même fréquence cardiaque on est en mesure d effectuer un exercice à une plus grande intensité Les critères choisis pour trouver l indice de performance permettent de comparer les résultats des sujets d âges différents Dans tous les cas il est conseillé de compar...

Page 129: ...n signal de fréquence cardiaque n est relevé l écran suivant apparaîtra METTRE CEINTURE Si aucun signal de fréquence cardiaque n a été relevé après 1 minute l exercice sera annulé Le même écran apparaîtra si aucun signal de la fréquence cardiaque n a été relevé pendant un exercice quelconque effectué avec la ceinture thoracique Détente ou relâchement A la fin de chaque exercice l appareil propose ...

Page 130: ...en alternance à l écran QUICK START POUR REPARTIR L action sur la touche QUICK START fait repartir l exercice ARRETEZ POUR TERMINER Après la refrappe de la touche ARRETEZ l exercice sera considéré comme terminé Si pendant la pause aucune action sur la touche n est accomplie dans un laps de temps de 1 minute l exercice sera considéré comme terminé Calories et vitesse de l exercice Pendant le déroul...

Page 131: ...reil en Attente appuyer simultanément sur les touches numériques 3 1 4 L écran suivant apparaît MOT CLE 0 taper au bloc numérique le code 1508 mot de passe et appuyer sur la touche ENTREE Les écrans suivants apparaissent HEURES EN SERVICE 1512 indique les heures totales de mise sous tension de l appareil Appuyer sur ENTREE pour continuer HEURES UTILISATION 342 indique les heures de fonctionnement ...

Page 132: ......

Page 133: ... ist allgemein anerkannt dass regelmäßiges Ausdauertraining die geeignetste Form der Vorbeugung von Herz Kreislauf Atemwegs und Muskelerkrankungen ist Um die Qualität des Ausdauertrainings noch zu steigern ermöglichen die Produkte der Serie XT PRO eine konstante Kontrolle der Herzfrequenz während des Trainings anhand des Herzfrequenzmessers Es müssen lediglich die Griffe in den Sensorbereichen umf...

Page 134: ...ere Vorrichtung 151 1 4 Wartung 153 1 4 1 Regelmäßige Wartung 153 1 4 2 Außerordentliche Wartung 155 1 4 3 Abhilfe bei Störungen 156 1 5 Technischer Kundendienst 158 1 6 Aufbewahrung 159 1 7 Entsorgung des Geräte 159 2 DER GEBRAUCH VON RECLINE 600 160 2 1 Ratschläge zum korrekten Gebrauch des Geräts 160 2 2 Die Feststellung der Herzfrequenz 162 2 2 1 Anlegen des Brustgurts 164 2 2 2 Korrekter Gebr...

Page 135: ...odus 182 3 4 Training mit QUICK START 183 3 5 Ermittlung des Schwierigkeitsgrades 184 3 6 Manuelles Training 185 3 7 Training mit den voreingestellten Profilen 187 3 8 Training bei konstanter Herzfrequenz CPR 189 3 9 Training mit dem TGS Schlüssel 191 3 10 Leistungsindex P I 192 3 11 Sonstige Anzeige Meldungen 193 3 12 Zugriffscodes für technische Informationen 195 ...

Page 136: ...dungserscheinungen des Rückens hervorzurufen Das Gerät eignet sich somit insbesondere für Personen die ein Herz Kreislauftraining durchführen möchten jedoch unter Beschwerden im Rückenbereich leiden Die besondere Sitzposition gestattet im Vergleich zum herkömmlichen Fahrrad Ergometer ein wirksameres Training der oberen Beinmuskeln sowie der Gesäßmuskeln Recline 600 eignet sich somit aufgrund seine...

Page 137: ...von einer Fachkraft der Fa Technogym oder durch eine von dieser Fachkraft beauftragten Person vorgenommen werden der Leiter des Fitness oder Reha Centers muss die Benutzer hinsichtlich des vorgesehenen und nicht vorgesehenen Einsatzes des Gerätes genau unterrichtet haben der Benutzer muss bei Benutzung des Gerätes eine angemessene Kleidung tragen Handtücher oder andere Gegenstände dürfen nicht auf...

Page 138: ...en und nützliche Anweisungen für das Training sowie sportmedizinische Ratschläge es dient daher als Anleitung sowohl für Profisportler als auch für Einsteiger ohne sportliche Vorkenntnisse Einige Symbole sind als Lesehilfe für dieses Handbuch zu verstehen ACHTUNG Dieses Symbol weist auf wichtige Informationen hin die unbedingt beachtet werden müssen GEFAHR Dieses Symbol bedeutet dass der Anleitung...

Page 139: ...1 Technische Informationen 1 1 Angaben zu Hersteller und Gerät A Name und Anschrift des Herstellers B CE Konformitätsmarkierung C Seriennummer D Warnhinweise E Geräteklasse 01325008 A B C D E ...

Page 140: ... seine Einstellung E Antriebsriemen an den Kettenantrieb ist der Generator für die Regulierung des elektromagnetischen Widerstandes angeschlossen F Pedale mit verstellbaren Riemen ausgestattet um den Füßen besseren Halt zu geben G Basisplatten stützen den Geräterahmen und die entsprechenden Komponenten H Seitliche Griffe können während des Trainings umfasst werden um eine korrekte Position sicherz...

Page 141: ...rieb konzipiert Max Kriechstrom unter normalen Bedingungen 250 µA Europa Amerika Versorgung 110 230 V 50 60 Hz 110 Vac 50 60 Hz Leistungsaufnahme 150 VA Maximale über das Gerät erzielbare mechanische Leistung 500 W Sicherungen 2 x F3A 5 x 20 mm Elektromagn Störungen EN 60601 1 2 Sicherheit EN 60601 1 EN 957 1 UL 2601 1 Richtlinie 73 23 CEE 93 68 CEE Gewicht 90 kg 198 lb Empfohlene Geschwindigkeit ...

Page 142: ...n Zubehörteile befinden sich in der Service Box A Werkzeugset B Bedienungshandbuch C Garantiebescheinigung D Überbrückungskabel für den Anschluss an ein anderes Gerät E Brustgurt für Herzfrequenzmesser F Kabelkanal G Ersatzsicherungen F 3A 5x20 mm H Netzkabel 01241002 B F A C E H G D ...

Page 143: ...zifischen Erfordernisse und Ziele des Benutzers ausgearbeitet werden B Personal Code Device System zur Erfassung des Herzschlages bei dem sich das Gerät ausschließlich auf die Herzfrequenz des Benutzers einstellt Es wird durch Anlegen eines Brustgurtes mit integriertem codiertem Sender aktiviert Ist die Vorrichtung Personal Code Device vorhanden wird dies auf dem Bedienfeld durch den oben abgebild...

Page 144: ...ter dient dem Ein und Ausschalten des Geräts C Sicherungen schützen die elektrische Anlage des Geräts Bei Stromüberlastung glühen die Sicherungen durch und verhindern so Schäden an den Teilen im Geräteinnern D Signaltongeber weist den Benutzer auf die Einschaltung von Recline 600 den Beginn bzw das Ende einer Übung oder eine erhöhte Herzfrequenz hin 87 ...

Page 145: ...d enthält Hinweise für den elektrischen Anschluss B Die Abbildung unterhalb des Bedienfeld liefert spezifische Hinweise dazu wie der Brustgurt für den Herzfrequenzmesser angelegt werden muss C Das Klebeschild auf dem Netzkabel enthält die elektrischen Eigenschaften D Die hinter dem Sitz angebrachten Etiketten weisen auf eine QUETSCHGEFAHR hin 01325001 99834121_0E000026 99834121_0E000026 0E000245 T...

Page 146: ...s eine Luftfeuchtigkeit zwischen 20 und 90 aufweist eine ausreichende Beleuchtung die eine angenehme und entspannende Atmosphäre für das Training schafft ausreichend Abstand rund um das Gerät siehe Abbildung der aus Sicherheitsgründen eingehalten werden muss eine ebene stabile und schwingungsfreie Oberfläche mit angemessener Tragfähigkeit wobei auch das Gewicht des Benutzers mit einzubeziehen ist ...

Page 147: ...genständen zu gewährleisten Wie auf der Verpackung angegeben müssen zum Auspacken des mit Schutzkarton und auf Palette angelieferten Gerätes die Metallheftklammern entfernt werden mit denen der Außenkarton an der Palette befestigt ist heben Sie den Karton dann an Prüfen Sie die in derVerpackung enthaltenen Komponenten auf Unversehrtheit Um die Komponenten entnehmen zu können entfernen Sie die Befe...

Page 148: ...er Abbildung gezeigt an und ziehen Sie es auf den Boden Der Vorgang muss von mindestens zwei Personen ausgeführt werden GEFAHR Das Anheben von der Palette und Absetzen auf den Boden müssen sehr vorsichtig ausgeführt werden da das Gerät an Stabilität verlieren könnte Das Gerät verfügt vorne über nicht drehende Räder Zum Verschieben des Gerätes muss es wie in der Abbildung gezeigt umfasst und nach v...

Page 149: ...schaften des Hilfsanschlusses an 75 VA 4 Stellt den Hauptschalter dar I eingeschaltet 0 ausgeschaltet 5 Gibt an dass das Anbauteil des Gerätes vom Typ B ist 6 Empfiehlt das Handbuch zu konsultieren 7 Gibt die Entsprechung zu den CE Richtlinien an 8 Zeigt das IMQ Symbol der zertifizierenden Behörde 1 3 4 Netzanschluss Bevor Sie das Gerät an das Netz anschließen versichern Sie sich dass die Eigensch...

Page 150: ...schaltet sein Stecken Sie das Netzkabel erst in den Anschluss am Gerät und anschließend in die Wandsteckdose Decken Sie das Netzkabel nach Möglichkeit mit den Kabelkanälen aus dem Zubehör ab um es vor Schäden zu bewahren 90 1 ACHTUNG Überprüfen Sie regelmäßig den ordnungsgemäßen Zustand des Netzkabels GEFAHR Die Stromversorgung muss geerdet sein Ist keine Erdung vorhanden muss sie vor dem Anschlus...

Page 151: ... anderen Zwecke eingesetzt werden Es muss aus Sicherheitsgründen gewährleistet sein dass der Kriechstrom auf dem Netzkabel 500 µA nicht überschreitet 01325005 seriale 89 Die Geräte der Serie XT PRO können nicht nur untereinander verbunden sondern auch an ein Audio Videoempfangsgerät Cardio Theater an die TGS Lesevorrichtung angeschlossen werden Für diese Anschlüsse sind auf der Rückseite des Bedie...

Page 152: ... Vorrichtung Cardio Theater angeschlossen werden welche die Anforderungen der internationalen Norm IEC 950 erfüllt An die AUX Buchse dürfen nur Geräte angeschlossen werden die den Anforderungen der IEC Norm 950 entsprechen Die Geräte müssen in einer Entfernung von mind 2 Metern vomTrainingsgerät aufgestellt werden AUX seriale lettore TGS Cardio_U ...

Page 153: ...r Staub zu saugen Verwenden Sie bitte für eine eventuelle Reinigung des Brustgurtes Wasser und Seife Lassen Sie den Gurt anschließend an einem warmen und trockenen Ort jedoch fern von direktenWärmequellen einigeStundentrocknen Um den Brustgurt zu sterilisieren verwenden Sie bitte ein Desinfektionsmittel zur Reinigung von chirurgischem Besteck das in der Apotheke erhältlich ist Benutzen Sie zur Rei...

Page 154: ...d die Schmierung des Gerätes müssen vom Technischen KundendienstTechnogymdurchgeführt werden Wartungseingriff Schmierungskontrolle Spielkontrolle Verschleißkontrolle Fälligkeit des Eingriffs Monatlich Monatlich Monatlich 01325008 C A B Pos Beschreibung A Antriebskette B Pedalsystem C Antriebsriemen ...

Page 155: ... Stecker aus der Wandsteckdose ziehen Ziehen Sie den Sicherungshalter rechts neben dem Ein Ausschalter heraus indem Sie auf die Lasche drücken Ersetzen Sie die defekte Sicherung durch eine neue aus dem Zubehör F 3A Setzen Sie den Sicherungshalter in seine Position zurück und versichern Sie sich dass er vollkommen eingerastet ist GEFAHR Sollten keine Sicherungen mehr vorrätig sein so ersetzen Sie d...

Page 156: ...entlich herausgezogen Das Gerät steht nicht eben Die Lager sind defekt Der Generator ist defekt Der Riemen ist abgenutzt Abhilfe Führen Sie den Stecker des Kabels in die Wandsteckdose ein WeisenSiedasVorhandensein von Netzspannung nach indem Sie ein Gerät das zweifellos funktioniert an die Wandsteckdose anschlieflen WendenSiesich an denTechnischen KundendienstvonTechnogym Prüfen Sie den Anschluss ...

Page 157: ...nwandfrei Der Sender ist defekt Abhilfe Besteht das Problem fort wenden Sie sich an denTechn KundendienstTechnogym Stellen Sie das Gerät oder die Haushaltsgeräte woanders auf Wenden Sie sich an den Technischen Kundendienst Technogym Wenden Sie sich an den Technischen Kundendienst Technogym Wenden Sie sich an den Technischen Kundendienst Technogym BewegenSiedasGerät weitgenugweg damitkeine Signalüb...

Page 158: ...ie Kundendienst vor Ort Lieferung von originalen Ersatzteilen Bei Problem oder Schadensmeldungen geben Sie bitte folgende Daten an Gerätemodell Kaufdatum Seriennummer genaue Beschreibung des festgestellten Problems ACHTUNG Bei Reparaturen am Gerät durch nicht vonTechnogymautorisiertesPersonal verfällt der Garantieanspruch 00350049 1 5 Technischer Kundendienst ...

Page 159: ...legen Sie sie bitte still indem Sie das Netzkabel entfernen Es ist verboten das Gerät als Abfall in der Umwelt und in öffentlichen oder privaten zu öffentlichen Zwecken genutzten Bereichen zu entsorgen Recline 600 XT PRO bestehet aus recyclebaren Materialien wie Stahl Aluminium und Kunststoff Entsorgen Sie diese daher bitte gemäß der Verfahrensweisen für städtische und vergleichbare Abfälle und in...

Page 160: ... Bezug auf den Gebrauch des Geräts zu bestimmen Führen Sie das Training entsprechend Ihrem Gesundheitszustand aus Beginnen Sie die Übung mit einem angepassten Rhythmus und einer adäquaten Geschwindigkeit Bei bestimmten körperlichen Konditionen ist der Gebrauch des Geräts nur unter strenger fachärztlicher Aufsicht erlaubt Sollte während einer Übung Unwohlsein Schwindel Brustschmerzen etc auftreten ...

Page 161: ...nicht im Freien stehen und setzen Sie sie keinen Witterungseinflüssen Regen Sonne etc aus Recline 600 dürft nicht in der Nähe von Wärmequellen elektromagnetischen Quellen Fernsehgeräte Elektromotoren Antennen etc sowie medizinischen Apparaten Lasergeräten Elektrostimulatoren usw aufgestellt werden Die Geräte der Serie XT PRO sind in erster Linie für die sportliche Betätigung in Sportvereinen Fitne...

Page 162: ... die durch das Umfassen der Griffe im Sensorbereich Heart Sensor aktiviert wird mit dem Brustgurt mit integriertem Herzfrequenzsender Der Herzfrequenzsender überträgt entsprechend dem Herzschlag Signale an das Gerät Diese Signale werden wie die an den Griffen erfassten Signale verarbeitet und auf dem Bedienfeld angezeigt wodurch eine ständige Kontrolle der Herzfrequenz ermöglicht wird Diese konsta...

Page 163: ...bestimmtes Gerät wodurch Interferenzen mit benachbarten Geräten vermieden und eine genauere Erfassung der Herzfrequenz gewährleistet wird ACHTUNG Der Herzfrequenzmesser dient ausschließlich der Anzeige des Herzschlags während desTrainings und in keinem Fall der ärztlichen Diagnose oder der Feststellung von Herzanomalien oder störungen Der auf dem Bedienfeld angezeigte Herzfrequenzwert ist ausschli...

Page 164: ...zen INFORMATION Technogym empfiehlt aus hygienischen Gründen den ausschließlich persönlichen Gebrauch des Brustgurts Im Falle von Hautreizungen kann der Brustgurt auf einemT Shirt getragen werden wobei der Kontaktbereich angefeuchtet werden muss 2 2 2 Korrekter Gebrauch des Brustgurts Um die Genauigkeit der Daten zu gewährleisten muss der Brustgurt korrekt und gemäß der Anweisungen verwendet und m...

Page 165: ...uf das Gummi nicht zu spannen oder zu biegen bei unsachgemäßer Aufbewahrung besteht die Gefahr dass die Elektroden ihre Leitfähigkeit verlieren Im Empfangsbereich des Empfängergeräts sollte sich nicht mehr als ein Sender befinden andernfalls könnte der Empfänger unterschiedliche Signale gleichzeitig empfangen und folglich unrichtige Frequenzen anzeigen Sollten sich mehrere Geräte mit einem Herzfre...

Page 166: ...ckt sind Ziehen Sie zur Sitzeinstellung Verschieben nach vorn oder hinten den Einstellknopf vor dem Sitz Auf der Gleitführung des Sitzes befindet sich eine Anzeigeskala sobald Sie die richtige Einstellung gefunden haben sollten Sie den Wert in den Trainingsplan eingeben Einstellung der Pedalriemen Ziehen Sie zur Einstellung der Pedalriemen die Einstelllasche vom Pedal ab und stecken Sie sie je nac...

Page 167: ...lichen Griffe am Sitz Wenn sich das Pedal in der vorderen Position befindet muss das Bein fast völlig gestreckt sein Eine abweichende Position beispielsweise mit nur einem Fuß ohne Umfassen der seitlichen Griffe oder mit überstreckten oder zu stark angebeugten Beinen kann zu Instabilität und oder falschen Bewegungen der Gliedmaßen führen und dadurch Schmerzen in verschiedenen Körperteilen 93 ...

Page 168: ...2 5 3 Jedes gut ausgearbeitete Trainingsprogramm sollte diese drei Elemente enthalten wenn auch je nach individuellem Ziel des Benutzers in unterschiedlichem Ausmaß Die Geräte der Serie XT PRO ermöglichen Herz Kreislauftraining oder Ausdauer bzw aerobes Training d h eine Aktivität bei der große Muskelgruppen mit einbezogen werden Beine Arme und Rumpf Diese Trainingsart erfolgt anhand von rhythmisc...

Page 169: ... erhöht werden wenn der Nutzer die Übung ohne übermäßige Anstrengung beendet ACHTUNG Es wird empfohlen gerade in der ersten Zeit nicht zu übertreiben da übermäßige Trainingslasten der Gesundheit schaden 2 5 2 Auswahl der Intensität des aeroben Trainings Trainiert zu sein bedeutet den eigenen Körper Impulsen einer Intensität und Häufigkeit auszusetzen die zuVeränderungen von Organen und Apparaten d...

Page 170: ...alten werden wenn das Ziel die Fettverbrennung ist Soll dagegen das Herz Atemsystem trainiert werden sollte der Herzschlag zwischen 133 70 und 161 85 liegen In jedem Fall wird empfohlen das Niveau von 85 der maximalen Herzfrequenz nicht zu übersteigen im Alter von 40 Jahren liegen z B 85 der maximalen Herzfrequenz bei 153 grafico per FC Bereich ausschließlich für das Training wettkampforientierter...

Page 171: ...den wird aber auch für den Sportler da eine gute Flexibilität der Gelenke die Leistungsfähigkeit erhöht und das Unfallrisiko mindert Stretchingübungen sollten sowohl vor als auch nach dem Training durchgeführt werden Die Aufwärmphase Warm up sollteeinigeMinuten wenigintensive aerobeAktivitätwieGehenoder Pedaltritt umfassen auf die geeignete Dehnübungen der beim Gehen Laufen einbezogenen Muskeln Wa...

Page 172: ...m Sie in bequemer Stellung eine der auf der Abbildung angegebenen Positionen eingenommen haben dehnen Sie die Muskeln 10 Sekunden lang und entspannen Sie sich anschließend Zweite Phase Dehnen Sie dieselben Muskeln nach der Entspannungsphase noch etwas mehr und halten Sie diese Position 10 bis 30 Sekunden lang ...

Page 173: ...gkeitsgrades sowie den Tasten QUICK START zum Starten der Übung in der entsprechenden Modalität oder zur Wiederaufnahme derselben nach einer PauseundSTOP zumBeendenderÜbung D Alphanumerische Anzeige In diesem Bereich werden alle Meldungen sowie eingegebene und abgefragte Daten angezeigt WährendderÜbungsausführung wird hier das Höhenprofil des Trainings angezeigt Schwierigkeitsgrad Die Kontrollleuc...

Page 174: ...für die Einstellung des Trainingsprogramms LinkeTastatur 4 Funktionstaste CPR dient der Auswahl des Trainings bei gleichbleibender Herzfrequenz 5 Funktionstaste PROFIL dient der Auswahl eines der sechs verfügbaren Trainingsarten mit vordefiniertem Profil 6 FunktionstasteMANUELLESTRAINING dient der Auswahl der manuellen Trainingsart für die der Benutzer beliebige Übungsdaten und parameter eingeben ...

Page 175: ... Anzeige dient der Anzeige aller Werte für die laufende Übung Diese Werte sind in zwei Dreiergruppen unterteilt wobei die eine Leistung Watt zurückgelegte Kilometer und verbrauchte Kalorien und die andere Herzfrequenz Dauer und Geschwindigkeit umfasst Die beiden Wertegruppen werden während der Übungsausführung abwechselnd in Intervallen von 5 und 15 Sekunden angezeigt Erfasst das Gerät kein Herzfr...

Page 176: ...ruppe umfasst D Herzfrequenz Der erste Wert gibt die Herzfrequenz HF in Schlägen pro Minute an Diesen Wert misst der Herzfrequenzmesser Heart Sensor oder Brustgurt Wenn die herzförmige Kontrollleuchte links neben dem Wert leuchtet ist die Erfassung der Herzfrequenz aktiv leuchtet sie nicht wird die Frequenz nicht erfasst E Minuten Sekunden DermittlereWertzeigt die seit Beginn der Übungsausführung ...

Page 177: ...rigkeitsgrad Das Gerät verfügt über 12 Trainingsniveaus die auf der Anzeige durch 18 Reihen dargestellt werden die jeweils 8 LEDs hoch sind Der nebenstehenden Tabelle können Sie die Entsprechung zwischen aufleuchtenden LEDs und Schwierigkeitsgrad entnehmen Ist die Trainingsdauer von Anfang an bekannt wie bei den Trainingsarten die den 4 Funktionstasten entsprechen wird sie auf die 18 Reihen aufget...

Page 178: ... das Gerät auf Stand by und ist betriebsbereit Auf der Anzeige sind abwechselnd die folgenden Meldungen zu lesen FUNKTION AUSWÄHLEN TGS SCHLÜSSEL EINFÜGEN Während des Stand by bzw der Betriebsbereitschaft sind die folgenden Funktionen aktiv Ermittlung und Anzeige des Wertes für die Herzfrequenz Lesen der Zugriffscodes für technische Daten Abschnitt 3 12 Regulierung des Schwierigkeitsgrads an hand ...

Page 179: ...Stand by Modus aus Wird das Gerät für längere Zeit nicht verwendet sollte überdies der Stecker aus der Wandsteckdose gezogen werden ACHTUNG Der Schalter dient dazu das Gerät ein und auszuschalten aber er isoliert es auch in der Position 0 ausgeschaltet nicht vollständig von der Netzspannung Um das Gerät vollständig spannungslos zu setzen muss der Stecker des Stromkabels gezogen werden 32 A ...

Page 180: ...ining die Übungsdauer verlängert werden kann Einstellung Vorrang Heart Sensor Brustgurt Es kann eingestellt werden welches Signal während der ersten Trainingsminute erfasst werden soll wenn sowohl der Heart Sensor als auch der Brustgurt Signale senden Um die Einstellungen zu ändern drücken Sie gleichzeitig die Tasten 3 1 4 während das Gerät betriebsbereit ist Auf der alphanumerischen Anzeige ersch...

Page 181: ...ENTER Taste Einstellung der Möglichkeit die Übungsdauer während des manuellen oder CPR Trainings anhand der ENTER Taste zu erhöhen ENTER FÜR LÄNGERE DAUER ON Betätigen Sie zur Auswahl die entsprechende numerische Taste 1 zur Deaktivierung der Taste ENTER es erscheint OFF 2 zur Aktivierung der Taste ENTER es erscheint ON Drücken Sie anschließend zum Speichern auf ENTER Einstellung des Vorrangs zwis...

Page 182: ...enden Minute eine weitere LED Reihe wobei die letzte Reihe jeweils blinkt Ab der 19 Minute bewegen sich die Reihen nach links damit stets die letzte Reihe sichtbar bleibt die für die laufende Minute steht Während der ersten 60 Sekunden ab Übungsbeginn ist es jedoch noch möglich eine der vier verfügbaren Funktionen auszuwählen Auf der numerischen Anzeige werden dann alle Daten bezüglich der laufend...

Page 183: ...19 Minute bewegen sich die Reihen nach links damit stets die letzte Reihe sichtbar bleibt die für die laufende Minute steht Während der Übung erscheinen auf der numerischen Anzeige die folgenden Daten erbrachte Leistung zurückgelegte Kilometer verbrauchteKalorien Herzfrequenz verstrichene ZeitundAusführungsgeschwindigkeit zudemist esmöglich Den Schwierigkeitsgrad anhand der ent sprechenden Tasten ...

Page 184: ...st nach einer Phase leichten Trainings von wenigstens zweiWochen durch und anschließend in regelmäßigen Abständen um die erreichte Verbesserung zu ermitteln und die Trainingsintensität den festgestellten Werten anzupassen Betätigen Sie die Funktionstaste TEST während sich das Gerät in Stand by befindet Das Gerät fragt Alter und Gewicht ab ALTER 0 Geben Sie über die numerischen Tasten Ihr Alter bei...

Page 185: ...en Cool Down Phase Auf der Anzeige wird der ideale Schwierigkeitsgrad für den betreffenden Benutzer angezeigt NIVEAU 4 3 6 Manuelles Training Diese Funktion ermöglicht die Einstellung individueller Trainingsprogramme deren max Dauer während der Konfiguration festgelegt wurde Abschnitt 3 2 Betätigen Sie die Funktionstaste MANUELLES TRAINING während sich das Gerät in Stand by befindet Wird ein Herzf...

Page 186: ...OP Taste zu beenden Während einer Pause d h nach Betätigung von STOP oder CLEAR kann die Übungsausführung wiederaufgenommen werden wenn die Taste QUICK START gedrückt wird Wird jedoch die STOP Taste erneut gedrückt wird die Übung beendet und das Gerät schaltet wieder auf Stand by Die beiden folgenden Meldungen liefern eine Anleitung für den Benutzer STOP ENDE QUICK START RESTART Bei Übungsende kan...

Page 187: ...die LED Reihen auf der Anzeige dargestellten Profile Die Höhe der Reihen gibt dabei die Änderung des Schwierigkeitsgrads während der gesamten Übungsausführung an Die nachfolgend abgebildeten 6 Profile sind verfügbar Jede LED Reihe auf der Anzeige entspricht einer Trainingsstufe Step deren Dauer 1 18 der Gesamtzeit beträgt GEFAHR Es empfiehlt sich die Übung bei einem Schwierigkeitsgrad durchzuführe...

Page 188: ... über die numerische Tastatur die Trainingsdauer in Minuten ein beisp 15 und drücken Sie anschließend auf ENTER Es ertönt ein akustisches Signal und die Übung beginnt Die LED Reihen auf der alphanumerischen Anzeige die in der Höhe proportional dem Schwierigkeitsgrad entsprechen leuchten nacheinander auf bis die eingestellte Zeit abgelaufen ist Die blinkende Reihe stellt das aktuelle Niveau dar Die...

Page 189: ...diesem Wert gehalten wird Das CPR System stellt somit ein wichtiges Instrument für die Programmierung spezifischer Übungen dar Das Training bei konstanter Pulsfrequenz ist besonders in den Situationen wichtig in denen aus Sicherheitsgründen bestimmte Frequenzwerte nicht überschritten werden dürfen z B bei Herzkranken und älteren Menschen Dies gilt auch für das aerobe Training zum Zweck des Gewicht...

Page 190: ...s während der Übungsausführung möglich anhand der Tasten und den Soll wert für die Herzfrequenz einzustellen in Schritten von einer Einheit die verbleibende Übungszeit durch Betätigung der Taste ENTER zu erhöhen um jeweils 1 Minute bei jedem Tastendruck Es ist jederzeit möglich die Übung durch Betätigung der Taste STOP oder CLEAR zu unterbrechen um eine Pause einzulegen die Übung durch zweimaliges...

Page 191: ...gesehen ist wird nach Einführen des TGS Schlüssels die folgende Meldung angezeigt H F 138 Dabei ist H F 138 der Wert 138 der Herzfrequenz F C der während der Übung beibehalten werden muss Im Falle eines Trainings bei konstanter Leistung erscheint die folgende Meldung WATT 110 Anschließend arbeitet das Gerät genau so als wäre die Auswahl und Einstellung über das Bedienfeld erfolgt Bei Übungsende er...

Page 192: ...ngig davon um welche Trainingsart es sich handelt P I 36 Diesem Index liegt eine Skala von 0 99 zugrunde Je höher das Resultat desto besser die aerobe Leistungsfähigkeit Ein Anstieg des Leistungsindex bedeutet dass der Benutzer bei gleicher Herzfrequenz Übungen mit größerer Intensität ausführen kann Die Kriterien für die Auswertung des Leistungsindex ermöglichen es die Leistungen von Personen unte...

Page 193: ...r Übung vom Typ CPR oder eines Tests kein Herzfrequenzsignal empfangen erscheint die folgende Meldung auf der Anzeige BRUSTGURT ANLEGEN Wird nach 3 Minuten noch immer kein Herzfrequenzsignal empfangen wird die Übung annulliert Dieselbe Meldung erscheint wenn das Herzfrequenzsignal während einer unter Verwendung des Brustgurtes begonnenen Übung nicht mehr empfangen wird Cool Down Bei Ende jeder Übu...

Page 194: ...d abwechselnd die folgenden Meldungen zu sehen die das weitere Vorgehen anzeigen QUICK START RESTART Mit der Taste QUICK START wird die Übung wiederaufgenommen STOP ENDE Wird die STOP Taste ein zweites Mal betätigt gilt die Übung als beendet Wird während der Pause innerhalb von 1 Min keine Taste betätigt gilt die Übung als beendet Kalorien und Geschwindigkeit der gesamten Übun Während der Übungsau...

Page 195: ...igen Sie gleichzeitig die numerischen Tasten 3 1 4 Auf der Anzeige erscheint PASSWORD 0 Geben Sie über die numerische Tastatur den Code 1508 Passwort ein und drücken Sie auf ENTER Auf der Anzeige erscheinen die folgenden Meldungen BETRIEB IN STUNDEN 1512 Gibt die Gesamtzahl der Stunden an während derer das Gerät eingeschaltet war Drücken Sie auf ENTER um fortzufahren NUTZUNG IN STD 342 Gibt die ef...

Page 196: ......

Page 197: ...7種で構 成されます これら7種のマシンを使い スポーツ選手も また自分の運動能力を高めたい あるいは単純 に維持したいと考えている人々も 各種の トレーニングを行なうことができます 規則的なエアロビックトレーニングが心肺両機能および筋肉にかかわるさまざまな病気を防 止する上で最も効果的であることは事実として認識されています より良いエアロビックトレー ニングのために XTプロ ライン製品では運動中の心拍数をモニターできるようになっていま す 実際 センサー部分 ハンドセンサー を握るか トランスミッターが挿入されたチェストバン ドを装着するだけで 操作パネル上で心拍数を確認することができます Tutti gli attrezzi Manuale per l utente ...

Page 198: ...12 1 3 3 水平化 213 1 3 4 電気接続 213 1 3 5 他のマシンや装置との電気接続 215 1 4 メンテナンス 217 1 4 1 通常のメンテナンス 217 1 4 2 臨時メンテナンス 219 1 4 3 故障対策 220 1 5 アフターサービス 222 1 6 保管 223 1 7 マシンの分解 破棄 223 2 リ リ リ リ リク ク ク ク クラ ラ ラ ラ ライ イ イ イ イン ン ン ン ン6 0 0 6 0 0 6 0 0 6 0 0 6 0 0 の の の の の使用 使用 使用 使用 使用 224 2 1 マシンの正しい使用法 224 2 2 心拍数モニター 226 2 2 1 トランスミッターの装着方法 228 2 2 2 トランスミッターの正しい使用法 228 2 3 使用時の調整 230 2 4 マシン上での正しい姿勢 231 2 5...

Page 199: ...入と切断 242 3 2 操作パネルの設定を変更するには 244 3 3 簡易モード によるトレーニング 246 3 4 クイックスタートによるトレーニング 247 3 5 レベルテスト 248 3 6 マニュアル トレーニング 249 3 7 プリセット プロファイル トレーニング 251 3 8 一定心拍数 CPR トレーニング 253 3 9 TGSキー を用いたトレーニング 255 3 10 パフォーマンス指数 PI 256 3 11 ディスプレイに表示されるその他のメッセージ 257 3 12 技術情報取得のためのアクセスコード 259 ...

Page 200: ...ノジムがさらに一 歩前進させたマシンです その独自のシートポジションは自在に調整が可能であり これに よって背中の疲労を起こすことなくエクササイズを行なうことができます したがって 背中に 故障などをお持ちの方がカーディオトレーニングを行なう場合には特に最適なマシンです 独特のペダリング姿勢によって 従来の トレーニング用バイクに比べてずっと効率よく 大腿部 と臀部の筋肉を鍛えることができます リクライン600は その簡単な操作と安全性により利用者層が広 く プロのスポーツ選手から リハビリ用まで 普段座りがちな生活を送る方 高齢者 心臓疾患のある方も使用できます 簡単ですぐに使える操作パネルには トレーニングのデータが常に更新されながら分かりや す く 表示されます 操作パネルを使って 各人の身体条件や運動能力に合わせて徐々にト レーニングレベルを変更することができます トレーニングプロ...

Page 201: ...201 リクライン600 XT PRO ジムやリハビリセンターの責任者はマシンの正しい使用法 誤った使用法について ユーザに適切な説明を与えることを前提とします ユーザーは相応の服を着用します タオル等の物品はマシンの上に放置しないでください リハビリのエクササイズは資格のあるスタッフのもとで行ってください ...

Page 202: ...せん 担当者が取り出しやすい場所に 湿気や高温を 避けて保存して ください 本書はプロとしてこの製品をお使いになる方 そして スポーツ機器を使った経験のない初心 者の方向けのガイドとして作成され トレーニング方法に関する重要な情報や提案 健康とス ポーツに関するアドバイスが掲載されています 本書ではい くつかの記号を使って説明しています この記号は見落としてはならない重要な情報を示します この記号は人身やマシンに危険な状況が生じないよう必ず守らなければならない規 則を示します この記号はよくある疑問点に対する回答を示します ご使用の前に必ず本書を隅々までよくお読みください 重要 注意 インフォメーション ...

Page 203: ...1 技術情報 1 1 製造者と製品の識別 A 製造者の社名および所在地 B EC 認定マーク C シリアル番号 D 重要 E マシンの所属クラス 01325008 A B C D E ...

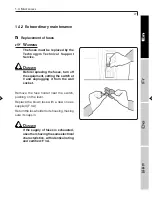
Page 204: ... もたれがあります D サドル支柱 サ ドルを支え 調節を可能 にしています E トランスミッションベルト チェーン 式トランスミッションにオルタネーターが 接続されており 電磁式の抵抗力を調節 しています F ペダル 調節可能なベルト が付いてお り 足を正しい位置にサポートします G フットボード マシンのフレームおよび そのコンポーネントを支えます H サイドグリップ トレーニング中 ここ につかまり正しい姿勢を保つことができま す サイドグリップには心拍数測定用の センサー I ハンドセンサー が取り付けら れています L リーディングラック ここに雑誌や本 を置いて読むことができます M タイディーラック トレーニング中 こ こにドリンクボトルやその他の小物をまと めてお くことができます Heart sensor recline H L M I ...

Page 205: ...ー ー ー ー ロ ロ ロ ロ ロ ッ ッ ッ ッ ッ パ パ パ パ パ ア ア ア ア アメ メ メ メ メ リ リ リ リ リ カ カ カ カ カ 電源 110 230 V 50 60 Hz 110 Vac 50 60 Hz 消費電力 150 VA 最大出力 500 W ヒューズ 2 x F3A 5 x 20mm EMI EN 60601 1 2 安全性 EN 60601 1 EN 957 1 UL 2601 1 適用される規則 73 23 CEE 93 68 CEE 重量 90 kg 198 lb 適正速度 適正速度 適正速度 適正速度 適正速度 70 80 RPM ノイズレベル70 dB未満 電磁式抵抗システム 抵抗力調整12 段階 プログラム数 5 最大使用体重 110 kg タイディーラックの最大使用重量 0 5 kg 88ori ...

Page 206: ...206 リクライン600 XT PRO 1 2 3 付属品 標準付属品 標準付属品はサービスボックスの中に入っています A レンチセット B ユーザー メンテナンスマニュアル C 保証書 D 他のマシンとの接続ケーブル E 心拍数モニター用 トランスミッター F 電源ケーブル保護用モール G スペアヒューズ F3A 5 x 20 mm H 電源ケーブル 01241002 B F A C E H G D ...

Page 207: ...TGSキーリーダーを介してマシンと相互動作します 各人のニーズや目標に合 わせてカスタマイズしたトレーニングプログラムを記憶させることができます B パーソナル コード デバイス この心拍信号検出システムにより マシンはそのユー ザーの心拍数データのみを受信することができます このシステムはコード式 トランスミッ ターを装着することにより起動されます パーソナル コード デバイスを装備したマシンの 操作パネルには これを図式化したシールが貼付されています 86 Pcd ...

Page 208: ...PRO 1 2 4 安全装置と注意ラベル A 固定ガード 内部の トランスミッションに触れないよう保護します B メインスイッチ マシンへの電源供給をオン オフします C ヒューズ マシンの電気コンポーネントを保護します 過大な電流が流れるとヒューズが 溶けて切れ 内部の電気回路の損傷を防ぎます D ブザー音 リクライン600の電源投入時 エクササイズの開始時や終了時 また心拍数 が上がりすぎた時に鳴音してユーザーに知らせます 87 ...

Page 209: ...れています ので注意してお読みください A メインスイッチの近 くに貼付されたラベルには電源接続に関する情報が記載されています B 操作パネルの下の図には心拍数モニター用 トランスミッターの装着方法が示されていま す C 電源ケーブルに貼付されたラベルには電気特性データが記載されています D シート 背面に貼付されたラベルは 手などをはさむ危険があることを警告しています 01325001 99834121_0E000026 99834121_0E000026 0E000245 GIA B A D D C 重要 ...

Page 210: ...いなければなりません 設置場所を決定する際は 特に次の 必要条件を念頭においてください 周囲の温度 10 から25 とします 十分な換気ができる場所 エクササイズ中 湿度を20 から90 に保てるようにします 十分な照明 快適なリラックスできる雰囲気でエクササイズが行なえるようにします 障害物のない空間 安全性のために各マシンの周囲に広いスペースをとることが必要で す 水平な床面 安定した 振動のない ユーザー自身の体重を含めた重量に耐えられる床 面が必要です 公共娯楽施設にマシンを設置する場合 設置場所はこれに関する現行の法律に定められ ているすべての要件を満たしていなければなりません ...

Page 211: ...防止するのに最も適したリフティング手段 と運搬手段を慎重に選択する必要がありま す パレット付き段ボールに入ったマシンを開 梱するには そのパッケージに記載されて いるとおり ダンボールをパレットベッドに 固定しているステイプルを取り外してからダ ンボールを持ち上げます パ ッケージと内容物を目視で点検し損傷がな いか確認して ください パッケージから資材を出すには まず固定 部材を取り外し 次のパッケージ内容物を床 に置きます 保護材に入ったままのマシン 付属品の入ったサービスボックス このパッケージは 将来マシン を移動させる時のために保管 しておくことをお勧めします 必 要が生じた場合は マシンを受 け取った時と同じ状態で梱包し てください パッケージを周辺に投棄しないで ください 廃棄の際は 現行の法 規に基く都市廃棄物の処理手順 に従ってください 9 重要 インフォメーション ...

Page 212: ...け るには 図のように所定の位置に正しく はめ込 んでから後部の2本のネジを締めます 1 3 2 マシンの移動 マシンを梱包のパレットから床面に降ろすに は 図のようにマシンを持ち上げた後 床へ 滑らせるようにして降ろします この作業は 少な くとも2名で行なって ください マシンのバランスを失わないよう 移動や床面へ降ろす作業は慎重に 行なってください マシンには固定式の前輪が付いています マシンを移動するには 図のようにマシンを 支えて前後に押します 床の状態により 車輪を使って移動すること ができない場合は 通常のリフティング手段 と運搬手段を使って移動してください 89 01325003 注意 ...

Page 213: ... 20 mm 2 主電源の電気特性を示します 110 230Vac 50 60 Hz 150 VA 3 サービスコンセント の電気特性を示します 75 VA 4 メインスイッチを示します オン 0 0 0 0 0 オフ 5 タイプBパーツを含む機器であることを示し ます 6 ユーザーマニュアルを参照するよう指示して います 7 EC基準を遵守していることを示します 8 認証のIMQマークを示します 1 3 4 電気接続 マシンを電気回線に接続する前に 電気設備の特性が現行の法規に適合していることを確 認して ください 電源スイッチ付近および電源ケーブル上に貼付された各ラベルに印刷されて いるデータを確認してください 01325004 2 3 5 1 7 4 01325001 8 6 ...

Page 214: ...てください 電源ケーブルをコンセントに接続す る際は マシンの電源スイッチは0 の方に押されている 電源オフになっ ている 必要があります 電源ケーブルをまずマシン側につないだ後 屋内コンセントに接続してください 電源ケーブルの損傷を防止するため できれ ば付属のモールを使って保護して ください 90 1 電源ケーブルの状態を定期的に点検してください 電源コンセントは必ずアースを備えていなければなりません そうでない場合 は マシンを電源に接続する前に 電気技師にアースの設置を依頼してください 注意 重要 注意 注意 ...

Page 215: ...イン 600に接続する必要があります 予備のコンセントはそれ以外の目的に使用できませ ん 主電源ケーブルによるアースへの漏れ電流が500 µ µ µ µ µA A A A A以下であることを確認し てください 01325005 seriale 89 XTプロラインのマシンは マシン同士を接続 する以外にも カーディオシアターなどの オーディオ ビデオ受信装置 TGSキーリー ダーと接続することが可能です これらの接続用として操作パネル背面に3つ のコネクターがあります これらのコネクター には保護キャップが被せられていますので コネクターを使用する場合以外は決して外 さないでください ソニー企業アフターサービス課の専門担当者 に限り 設置の際にこのキャップを外すこと が許可されています 取り外したキャップはお 客様の責任で保管して ください 重要 ...

Page 216: ...RO TGSコネクターにはTGSキー リーダー IEC 950 のみ接続 することができます RJ45コネクター 中央 には 国際規則 IEC 950 に適合し たカーディオシアター装置 のみ接続することができま す AUXコネクターには国際規則 IEC 950に適合した装置のみ 接続することができます これらの装置はマシンから2 m以上離して設置してくださ い AUX seriale lettore TGS Cardio_U 重要 ...

Page 217: ...毎週マシン全体を次の要領でクリーニング して ください マシンの電源を切り 湿らせたスポンジで 外面を拭きます マシンを移動し 床のほこりを掃除機で取 り除きます 必要に応じてトランスミッターを洗ってく ださい 洗浄には石鹸水を使用し その後は 暖か く乾燥した場所で数時間かけて乾燥させ ます ただし直接の熱源からは遠ざけてくだ さい トランスミッターを滅菌する場合は 外科手 術器具の消毒 無菌保存用の消毒剤 薬局 で市販されています を使用して ください ハートセンサーのクリーニングには外科手 術器具の消毒 無菌保存用の消毒剤 薬局 で市販されています を使用してください 化 学薬品や溶剤の使用は避けてください 操作パネル 模様 ラベルの注意 書きなどの表面は強くこすり過ぎ ないよう注意してください マ シ ン を 医 療 目 的 で 使 用 す る 場 合は トランスミッターおよびハー...

Page 218: ...218 リクライン600 XT PRO 注油と点検 定期メンテナンス作業 調整 注油 は必ずソニー企業アフターサービス 課にお任せください 01325008 C A B 点検 箇所 説明 作業内容 頻度 トランスミッ ションチェーン ペダルユニット トランスミッ ションベルト 注油状態の点検 あそびの点検 摩耗の点検 毎月 毎月 毎月 A B C 注意 注意 ...

Page 219: ...課にお任せくださ い ヒューズを交換する際は まず電源 スイッチを 0 の方に押してマシンの 電源を切り 電源プラグを屋内コン セントから抜いてください 電源スイッチの右にあるヒューズホルダー を タブを押して外します 切れたヒューズを付属の新品スペアヒューズ F3A と交換します ヒューズホルダーを元の位置に戻します こ のとき カチッとはまるまで確実に押し込んで ください 付属のスペアヒューズを使い切っ てしまった場合 交換には同一特性 の 同様に保証されたヒューズを使 用してください F3A 96 注意 注意 重要 ...

Page 220: ...接続に問題が ある ヒューズが切れている 操作パネルの接続コネクター が何らかの原因で外れた マシンのバランスが取れていな い ベアリングが損傷している オルタネーターが損傷してい る トランスミッションベルト が 摩耗している 電源ケーブルのプラグを屋内コ ンセント に差し込んで下さい 確実に動作することがわかっ ている装置などをそのコンセン トに接続してみて電気回線に 電圧が供給されているか確認 して下さい ソニー企業アフターサービス課 に御連絡下さい ソニー企業アフターサービス 課に御連絡下さい 接続状態を点検して下さい 切れたヒューズを付属のスペ アヒューズ F3A と交換する 際は ソニー企業アフター サービス課に御連絡下さい 水平状態を点検し 後部の 調整ピンを使って調整して下さ い ソニー企業アフターサービス 課に御連絡下さい ソニー企業アフターサービス 課に御連絡下さい ソ...

Page 221: ...ルが正しく 機能して いない トランスミッターが皮膚に正しく 接触していない 問題が解消されない場合は ソニー企業アフターサービス 課に御連絡下さい ソニー企業アフターサービス課 に御連絡下さい マシンを別の場所に移動する か または家電製品を移動し て下さい ソニー企業アフターサービス課 に御連絡下さい ソニー企業アフターサービス課 に御連絡下さい ソニー企業アフターサービス課 に御連絡下さい マシン間の距離を十分にとり 信号が干渉しないようにします 2台のマシン間の距離は80 cm 以上としてく ださい またはハ ンドセンサーを使用してく ださ い 外乱の発生源 家電製品など を特定しこれを別の場所に移 動するか またはマシンを移動 してく ださい 新しいトランスミッターをソニー 企業アフターサービス課から取 り寄せ 交換してく ださい トランスミッターが損傷している トランスミッター...

Page 222: ...ビス 補修用純正部品の送付 ソニー企業アフターサービス課にご連絡いた だ く 際は次の情報をお知らせ ください マシンの機種 お買い上げ日 シリアル番号 問題点の正確な説明 テクノジムの認定を受けた者以外が 製品に手を加えた場合 保証は無効 となります 00350049 重要 ソニー企業株式会社 ウエルネスプロモーション営業部 アフターサービス 108 6111東京都港区港南2 15 2 品川インターシティ B棟11F TEL 03 5769 6655 FAX 03 5769 6574 フリーダイヤル 0120 114536 Email TECsupport sec sony co jp ...

Page 223: ... ください 1 7 マシンの分解 破棄 マシンが危険の発生源とならないよう また子供たちの遊び道具にならないように注意して ください マシンを長期間使用しない場合や分解する場合には電源ケーブルを抜いて作動 しないようにする必要があります 周辺 公共区域または公衆の使用する私用区域への投棄を禁じます リクライン600 XTプロはスチール アル ミニウム プラスチック等の再利用可能な材料で構成 されています 廃棄時は 都市および環境衛生専門会社に依頼し 都市廃棄物に関する現 行の法規に従って処理して ください チェストバンドの処分 心拍数データ送信用 トランスミッターは再生可能ではないため 環境中に投棄しないでくださ い 廃棄は都市および環境衛生専門会社に依頼してください ...

Page 224: ...グプログラムを始める前に 医師の 診察を受け マシンの使用制限が必要ならば確 認 しておいて ください ご自分の健康状態に合わせてマシンを設定 し 能力に適 したペースと速度でエクササイズを始 めて ください 特殊な身体条件をお持ちの方は 専門医の監 視下でなければマシンをお使いになれない場合 があります トレーニング中 気分がすぐれない場合 めま い 胸の痛み等 は 直ちにエクササイズを 中止し 医師にご相談 ください エクササイズ中 アラーム音が約5秒続き シ ンパクスウガタカスギマス というメッセージが 表示 された場合は 心拍数が高 くなりすぎてい ることを意味するので必ずエクササイズの ペ ー ス を 落 と し て く だ さ い トレーニングシューズ とスポーツウ ェアを着用 し 発汗を阻害する着衣は使用 しないで ください エクササイズを始める前に 本書各 セクションをよく...

Page 225: ...シンを可燃性の液体やガスの付近で使用 すると 火花により火災が発生する恐れが ありますのでおやめ ください マシンに水を噴射しないで ください マシンを屋外に放置して外気条件 雨 日光 等 にさらさないで ください リクライン600を熱源 電磁エネルギー源 テ レビ 電気モーター アンテナ等 医療機 器 レーザー装置 ペースメーカー等の近 く に置かないで ください XTプロラインのマシンは主にスポーツクラブ やジム等で行なわれるスポーツ活動を用途 としており 必ず屋内で使用すべきもので す マシン内部には高電圧部分があるた め 許可を受けた担当者以外 筐体 を外すことはできません 14歳未満の方は大人の付き添いがなけれ ばマシンをご利用になれません この機器は個人の健康上 安全上の必要 性を考慮して設計 製造されていますが 不 慮の事故を引き起こす危険のある部分もあ ります 手足をはさん...

Page 226: ...す リクライン600 XTプロ では2通りのいず れも簡単な方法で心拍数を正確にモニター できます グリップに取り付けられた装置 センサー 部分を握るだけで作動します ハンドセン サー トランスミッターが挿入されたチェストバン ド 胸に装着します チェストバンドに挿入された トランスミッターは 検出した心拍数の信号を送信します グリッ プから直接検出される信号の場合も同じで すが この信号は処理されてディスプレイに 表示されますので ユーザーは常に心拍数 を確認することができます ハンドセンサーやトランスミッターを使って常 に心拍数を確認することにより トレーニング の効果と安全性を高めることができますの で これらをご使用になることを強 くお勧めし ます トレーニング中の心拍数は プロの スポーツ選手の場合を除き 必ず最 高心拍数の85 以下に保ってくださ い 値の計算には2 5 2項の...

Page 227: ...ス ミッターからは使用中のマシンに対してのみ コード化されたデータが送信され それ以外 のマシンへは送信されません これにより 接近したマシン間でのクロストークを防止し より正確な心拍数測定が可能になります トランスミッターとハンドセンサ ーのいずれの心拍数モニターも エ クササイズ中の心拍数を表示する目 的のみに使用されるものであり 医 療診断用ではないため心臓の異常や 機能障害を検出することはできませ ん ディスプレイに表示される心拍 数の値はあくまでも目安であり 確 定的なデータではありません Pcd 58 重要 ...

Page 228: ...約 1000時間です この期限後はテクノ ジム純正の新品のトランスミッター と交換することをお勧めします テクノジムでは衛生上の理由から トランスミッターを個人専用とす ることをお勧めしています 皮 膚 の か ゆ み を 感 じ る 場 合 は Tシャツの上からトランスミッター を 装 着 す る こ と が で き ま す が この場合も接触部を濡らしてくだ さい 2 2 2 トランスミッターの正しい使用法 正確なデータを得るためには トランスミッ ターは注意書きを守って正しく 使用し 精密 機器として慎重に保管することが重要です 定期的に またはトランスミッター を落とした 時は特に 心拍数モニターの動作を次の 手順で確認して ください 手首で脈拍を測定 し操作パネル上に表示される数値と比較し ます データに疑いがある場合は ソニー企業ア フターサービス課までお知らせ ください 60...

Page 229: ...数時間かけて乾 燥させます ただし直接の熱源からは遠ざけ て ください 通常のメンテナンス 電極ラバーを伸ばしたり折り曲げたりしない で ください 丁寧に扱わないと導電性が損な われる場合があります 受信機の受信範囲内に一度に複数の トラン スミッターがあってはなりません 複数の トラ ンスミッターがあると 受信機が同時にいく つかの信号を受信するため 誤った心拍数 が表示されます 心拍数受信機を装備したマ シンを1箇所に複数台設置する場合 マシン とマシンの間隔は最低80 cm確保してくださ い パーソナル コード デバイスを備えたマ シンではこの問題は起きません このシステ ムによりマシンはそのユーザーの心拍数 データのみを受信することができます オ プション付属品 Pcd ...

Page 230: ... シートに座り背中をしっかりと背もたれにつ けます この姿勢で ペダルが一番前方の 位置に来た時 脚がまっすぐに伸びなけれ ばなりません 調節するには シート前方にあるノブを引き ながらシートを前後に移動します シート のスライド式ガイドには目盛りがつい ています適切な調整が得られたら この値を トレーニングプログラムの中にメモしておき ましょう ペダルのベルトの調節 ペダルのベル トを調節するには 調節用タブ を外し ご自分の足に合う穴に入れなおしま す 92 1 92 ...

Page 231: ...の正しい姿勢 2 4 マシン上での正しい姿勢 シートに座り背中をしっかりと背もたれにつけ シート の両側にあるサイドグリップを握ります ペダルが一番前方の位置に来た時 脚がほぼ まっすぐに伸びなければなりません これ以外の姿勢 例えば 片足しか使わない サ イドグリップを握らない 脚が伸びすぎあるいは 曲がりすぎている等 では 安定を欠いたり脚の 動きが不自然になるため 体のさまざまな部分 に痛みを起こす原因となります 93 ...

Page 232: ... 心臓血管強化運動 エアロビック運動 筋力強化トレーニング ストレッチング 2 5 3項 目的によりその配分は違っても これら3要 素をすべて含んでいなければ良い トレーニン グプログラムとは言えません XTプロ ラインのマシンでは心臓血管強化運 動 エアロビック運動 を行なうことができま す すなわち 大量の筋肉 脚 腕および胴 体 をリズミカルに継続して伸縮させると同時 に 呼吸器系 心臓および循環器系を活性 化させます エアロビック運動の例としては他 にも水泳 ノ ルディックスキー サイクリン グ ボート 漕ぎなどがあります 正しいエアロビック運動を規則的に行なうこ とにより次のような効果が得られます 体調や身体機能が向上したことが感じら れ 精神状態も良 くなり自信にもつながり ます 毎日の生活の中でもアパート やオフィス の階段を息切れせずに上るなど きつい 運動をこなす能力が向...

Page 233: ...論的最高心拍数の60 80 の強度で行なってください 2 5 2項 トレーニング負荷は 過度の疲労を感じるこ とな くエクササイズを完了できた度に徐々に 増加して ください 高 す ぎ る ト レ ー ニ ン グ 負 荷 は 有 害となりますので 特に最初は控 えめに設定してください 2 5 2 エアロビック運動の強度選択 鍛えるということは自分の体にその機能や器 官を変化させるほどの強度と頻度の刺激を 与えることです 酸素消費能力を改善するためには エクサ サイズ中の心拍数をご自分の最高心拍数 の60 85 に保つことが重要です 事実 エ クササイズの強度が軽すぎれば十分な刺激 とはならず 反対に激しすぎれば体内には 大量の乳酸が生成され これが蓄積されると 筋肉疲労のためエクササイズを中止せざる をえな くなります 次の表は年齢と目的に応じた最適な心拍数 レベルを示しています 理論的最...

Page 234: ...環器系の機能向上が主 となります 例えば 年齢30歳の人が脂肪を燃やすために運動する場合 エクササイズ中の心拍数は 114 60 から133 70 に保たなければなりません また 心肺機能の向上が目的の場合 は心拍数を133 70 から161 85 に保つ必要があります いずれの場合も最高心拍数の85 を超えてはいけません 例えば 年齢40歳の場合 最高 心拍数の85 は153 grafico per FC 競技スポーツのためのトレーニングゾーン 医師の承認が必要です 心肺機能 理論的最高心拍数の70 85 を維持してく ださい 脂肪燃焼 理論的最高心拍数の60 70 を維持してく ださい トレーニング効果があまり 期待できないゾーン 心 拍 数 心 拍 数 心 拍 数 心 拍 数 心 拍 数 年 令 年 令 年 令 年 令 年 令 ...

Page 235: ...軟性をチェックすることが非常に重 要です これにより 座りがちな生活を送る 方は運動不足から生じる結合組織の収縮 を予防することができます またスポーツ選 手の場合は関節の柔軟性を高めることで 競技能力が向上する他 故障を受けにくく なります トレーニングの前後にストレッチングを行 なうこと が大切です ウォームアップで は ウォーキングや自転車こぎなど低強 度のエアロビック運動を数分間行なった 後 その後のト レーニングに使用する筋 肉群のストレッチングを行ない 筋肉を暖 めて故障を防ぎます トレーニング後に もストレッチングを行なうことで 生成され た毒素の回収と分解を促進し 使用した筋 肉が収縮するのを防止し リラックスする ことができます 最も容易な手法はアンダーソンの 静止ス トレッチング です これは急激な動きや弾 みを使わずにゆっくりと行なうものです 61 ...

Page 236: ...236 リクライン600 XT PRO ストレッチングは2段階に分けて行なって くだ さい 第1段階 図のように 快い状態で正しい姿勢 をとり 筋肉を10秒間伸ばしてから緩めます 第2段階 筋肉を緩めたら もう少し余計に 伸ばし そのまま10秒から30秒間維持しま す ...

Page 237: ...機能を選択するた めの機能キー C 中央キーボード 負荷レベル変更 のためのレベルキー クイックス タートモードでのエクササイズ開始 または再開のためのクイックスター トキー およびエクササイズ停止の ためのストップキー D 文字ディスプレイ メッセージや 入力データを表示します エクササ イズ中は その進行に合わせてト レーニングのプロファイル 負荷レ ベル が表示されます また ディス プレイ左のランプは選択した機能を 示します E ナンバーディスプレイ 現在実 行中のエクササイズに関して ワッ ト 走行距離 総消費カロリー 心 拍数 時間 経過時間または残り時 間 および速度を表示します F 負荷レベルインディケーター 12個のランプが現在実行中のエク ササイズの負荷レベルを示しま す 01417046 B A D E F C ...

Page 238: ...した機能を終了するのに使用し ます 3 ナンバーキー トレーニングプログラム を設定する際 数字によるデータを入力 するのに使用します 左キーボード 4 CPRキー 一定心拍数トレーニングを選 択するのに使用します 5 プロファイルキー プリセット プロファ イル トレーニングを選択するのに使用し ます 6 マニュアルキー マニュアル トレーニン グを選択するのに使用します マニュア ル トレーニングではユーザー自身がエク ササイズのデータやパラメータを選択して 設定します 7 レベルテストキー 理想的な負荷レベ ルを判定するためのレベルテストを選択 するのに使用します 01417048 01417049 4 5 6 7 3 2 1 ...

Page 239: ...は これら のキーで目標心拍数を変更 1刻みで増 減 することができます ナンバーディスプレイ ナンバーディスプレイは現在実行中のエクササイズに関する値をすべて表示します これら の値は2つのグループに分けられ 1つはワット 走行距離 および総消費カロリーです も う1つのグループは心拍数 時間 および速度です エクササイズ中はこの2つのグループ が交互に5秒間および15秒間ずつ表示されます ただし マシンが心拍数を検出できない場合 最初のペアは交互表示ではな くワットのみが継 続して表示されます 表示切換キーを押すとこの2 グループの 表示を切り替えることができます また こ のキーは各グループの表示時間 5秒間お よび15秒間 も逆にします 表示切換キー を2 秒以上押しつづけると 現在表示して いるグループが継続して表示されるように なり 交互表示は行なわれなくなります 交 互表示に...

Page 240: ... を超えた場 合 下3桁のみが表示されます 例えば 実際の消費量が1235kcalであれば 235kcalと表示されます 下側のグループは次の値を表示します D 心拍数 最初の数値は1分当たりの心拍 数 HR を表します この値は心拍数モニ ター ハンドセンサーまたはトランスミッ ター で測定されます 数値表示の左にあ るハート 型のランプは心拍を検出すると 点灯します ランプが消灯している場合は 心拍が検出されていません E 時間 中央の数値はエクササイズ開始 からの経過時間 または終了までの残り 時間を分と秒で表したものです 長いト レーニング中に表示可能な最大値 99分 59秒 を超えた場合 時間と分で表示され るようになります 例えば 1時間34分であ れば 1H 34と表示されます F 速度 最後の数値はエクササイズのス ピード RPM を表します 3 11項 01417052 ...

Page 241: ...のディスプレイは負荷レ ベルを表示します 点灯する各コラムの高さ が負荷レベルを示し 負荷レベルインディ ケーターとも対応しています マシンには12 段階の負荷レベルがあり 幅18 高さ8の LEDディスプレイに右表にしたがって表示さ れます エクササイズ時間が予め設定されている場 合 4つの機能キーで選択するトレーニング など その時間がデ ィスプレイ上の18本のコ ラムに等分されます エクササイズ時間を設 定しない場合 簡易モード または クイックス タートによるトレーニングなど は 各コラム が1分に相当します 文字ディスプレイのメッセージはすべて自 動スクロールで表示されます 負荷レベル 点灯するランプの数 1 1 2 2 3 3 4 4 5 5 6 5 7 6 8 6 9 7 10 7 11 8 12 8 14 1 01417054 G ...

Page 242: ...バイモードに入り使用可能な状 態となります ディスプレイには次のような メッセージが交互に表示されます プ プ プ プ プロ ロ ロ ロ ログ グ グ グ グラ ラ ラ ラ ラム ム ム ム ム セ セ セ セ セン ン ン ン ンタ タ タ タ タク ク ク ク ク T G S T G S T G S T G S T G S キ キ キ キ キー ー ー ー ーヲ ヲ ヲ ヲ ヲ イ イ イ イ イレ レ レ レ レテ テ テ テ テク ク ク ク クダ ダ ダ ダ ダサ サ サ サ サイ イ イ イ イ スタンバイモードでは次の機能が使用で きます 心拍数を測定し表示する 技術情報を得るためアクセスコードを読 み取る 3 12項 および キーを使って負荷レベルを 変更する 3 1 マシンの電源投入と切断 構成設定 3 2項 で機能キーを無効にし必 ずTGSキー を使用してエクササイズを...

Page 243: ... A を 0 の方へ押します 電源を切るときは必ず エクササイズが終了 し マシンがスタンバイモードになっていること を確認して ください マシンを長期間ご使用にならない場合は 電 源スイッチをオフにし さらに電源プラグをコ ンセントから抜いてください 電源スイッチはマシンの電源を入 れたり切ったりするのに使用します が 0 オフ になっている時でも電 気回線からマシンを絶縁するわけで はありません マシンを電気回線か ら完全に切り離すには電源プラグを 抜く必要があります 32 A 重要 ...

Page 244: ...と マニュアルおよびCPRモードでの トレーニング中に入力キーを使ってエク ササイズの時間を延長することができま す ハンドセンサーとトランスミッターの 優先順位 トレーニング開始からの1分 間にハンドセンサーとトランスミッターの両 方の信号が検出された場合に どちらの 信号を選択するかを設定します これらの設定を変更するには マシンがスタ ンバイモードになっている状態で ナンバー キー3 1 4を同時に押します 文字ディスプ レイに次のように表示されます PASSWORD 0 ナンバーキーでコード2406 パスワード を入 力し 入力キーを押します デ ィスプレイには選択されている言語が表示 されます JAPANESE JAPANESE JAPANESE JAPANESE JAPANESE 使用言語を選択するには対応する数字 1か ら2 を押します 1 アメリカ英語 2 日本語 または ...

Page 245: ...に入力キーを使ってのエクサ サイズ時間延長を可能にするかどうかを設 定します ENTER TO INCREASE TIME ON ENTER TO INCREASE TIME ON ENTER TO INCREASE TIME ON ENTER TO INCREASE TIME ON ENTER TO INCREASE TIME ON 設定を選択するには対応する数字を押しま す 1 入力キーを無効化 OFFと表示されます 2 入力キーを有効化 ONと表示されます 続いて入力キーを押して確定し記憶させま す 次に ハンドセンサーとトランスミッターの両 方の信号が検出された場合の優先順位を設 定します ト ト ト ト トラ ラ ラ ラ ラン ン ン ン ンス ス ス ス スミ ミ ミ ミ ミッ ッ ッ ッ ッタ タ タ タ ター ー ー ー ー ユ ユ ユ ユ ユウ ウ ウ ウ ウセ セ セ ...

Page 246: ...向に移動し始めます エクササイズ開始から最初の60秒間は 利 用可能な4つの機能のいずれかを選択する こともできます ナンバーディスプレイには現在実行中のエ クササイズに関する値がすべて表示されま す 表示される時間は経過時間です エクササイズ中は次の操作が可能です キーを使って負荷レベルを変更する ストップキーを押してエクササイズを終 了する エ エ エ エ エ ク ク ク ク ク サ サ サ サ サ サ サ サ サ サイ イ イ イ イ ズ ズ ズ ズ ズ 終 終 終 終 終 了 了 了 了 了 時 時 時 時 時 に に に に に 結 結 結 結 結 果 果 果 果 果を を を を を T G S T G S T G S T G S T G S キ キ キ キ キー ー ー ー ー に に に に に 保 保 保 保 保存 存 存 存 存す す す す する る る る るこ こ...

Page 247: ...値が表示されます 発生されたパワー 走行距離 消費カロリー 心拍数 経過時 間 速度 また 次の操作が可能です キーを使って負荷レベルを変更する ストップキーまたはクリアキーを押して エクササイズを終了する エ エ エ エ エク ク ク ク ク サ サ サ サ ササ サ サ サ サイ イ イ イ イ ズ ズ ズ ズ ズ終 終 終 終 終了 了 了 了 了時 時 時 時 時に に に に にT G S T G S T G S T G S T G S キ キ キ キ キー ー ー ー ー を を を を を 挿 挿 挿 挿 挿 入 入 入 入 入し し し し し て て て て て 結 結 結 結 結果 果 果 果 果を を を を を 記 記 記 記 記憶 憶 憶 憶 憶さ さ さ さ さ せ せ せ せ せる る る る るこ こ こ こ こと と と と と が が が が がで で ...

Page 248: ...整しま す マシンがスタンバイ モードになっている 状態で レベル テストキーを押します 年齢と体重を尋ねられます ネ ネ ネ ネ ネン ン ン ン ンレ レ レ レ レイ イ イ イ イハ ハ ハ ハ ハ ナンバーキーで年齢を入力し 例えば29と入 力 入力キーを押します ディスプレイに次のように表示されます タ タ タ タ タイ イ イ イ イジ ジ ジ ジ ジュ ュ ュ ュ ュウ ウ ウ ウ ウハ ハ ハ ハ ハ ナンバーキーで体重を入力し 例えば70と入 力 入力キーを押します この時点でマシンが心拍信号を検出できな い場合 ディスプレイには次のメッセージが 表示されます ト ト ト ト トラ ラ ラ ラ ラン ン ン ン ンス ス ス ス スミ ミ ミ ミ ミッ ッ ッ ッ ッタ タ タ タ ター ー ー ー ー ソ ソ ソ ソ ソウ ウ ウ ウ ウチ チ チ チ チャ ャ ャ ...

Page 249: ... 30秒間 のクールダウンが行なわれます ディスプ レイにはユーザーの理想的な負荷レベルが 表示されます レ レ レ レ レベ ベ ベ ベ ベル ル ル ル ル 6 6 6 6 6 3 6 マニュアルトレーニング マニュアル トレーニングでは トレーニングプ ログラムをカスタマイズすることができます ひとつのエクササイズの最大時間は構成設 定 3 2項 で指定した最大時間となります マシンがスタンバイ モードになっている 状態で マニュアル キーを押します 心拍数モニター ハンドセンサーまたは トラン スミッター を使用している場合 マシンが心 拍信号を検出するとディスプレイに次のよう に表示されます ネ ネ ネ ネ ネン ン ン ン ンレ レ レ レ レイ イ イ イ イハ ハ ハ ハ ハ ナンバーキーで年齢を入力し 例えば30と入 力 入力キーを押します 次に体重を尋ね られます 心拍...

Page 250: ...を一時停止した場合は クイックス タートキーを押すとエクササイズを再開しま す または もう一度ストップキーを押すと エクササイズは終了しマシンはスタンバイ モードに戻ります 次の2つのガイドメッセー ジが表示されます エクササイズの終了間際には 入力キーを 押してエクササイズの残り時間を延長するこ とができます キーを1回押すごとに1分延長 されます ただし入力キーの使用が有効に なっている必要があります 3 2項をご覧 くだ さい エクササイズの終りにクールダウンが行な われます この時点でTGSキー を挿入して 結果を記憶させることができます エクササイズに心拍数モニター ハンドセン サーまたはトランスミッター を3分間以上使 用した場合は 終了時にパフォーマンス指 数 PI 3 10項 がディスプレイ表示されま す P I 6 P I 6 P I 6 P I 6 P I 6 ス ス...

Page 251: ...れているサーキットトレーニングを行な う場合などに大変便利です プリセット プロファイル トレーニングの特徴は ディスプレイに表示されるプロファイルの中か ら選択する点です エクササイズ中 各コラムの高さが負荷レベルの変化を示します 利用できるプロファイルは次の6種類です ディスプレイ上の1コラムは1ステップ すなわちエクササイズ時間の1 18に相当します レベルテストの結果よりも高い負荷レベルでエクササイズを行なうことは避けてく ださい また 心拍数は常に最高心拍数の85 以下に保ってください 2 5 2項 01241027 プロファイル 1 プロファイル 4 プロファイル 2 プロファイル 5 プロファイル 3 プロファイル 6 注意 ...

Page 252: ... ハ ハ ハ レベルテストで得られた負荷レベルをナン バーキーで入力し 例えば7と入力 入力 キーを押します ディスプレイに次のように表示されます ナンバーキーを使ってトレーニング時間を分 単位で入力し 例えば15と入力 入力キーを 押します ブザーが鳴りエクササイズが開始されます デ ィスプレイに表示されるプロファイルのコラ ムの高さは負荷レベルを示しています 設定 されたトレーニング時間に達するまでコラム が順に点灯していきます 点滅しているコラ ムは現在実行中の負荷レベルを示します 負荷レベルインディ ケーターと プリセッ ト プロファイル トレーニングを示す ランプが点灯します いつでも次の操作が可能です そのステップについて キーを使って負荷 レベルを変更する 変更は現在実行中の ステップのみに適用されます ストップキーまたはクリアキーを押して エクササイズを一時停止する ストッ...

Page 253: ... ニ ニ ニ ニン ン ン ン ング グ グ グ グを を を を を 行 行 行 行 行な な な な なう う う う う に に に に には は は は は心 心 心 心 心拍 拍 拍 拍 拍数 数 数 数 数モ モ モ モ モニ ニ ニ ニ ニタ タ タ タ タ ー ー ー ー ー ト ト ト ト ト ラ ラ ラ ラ ラン ン ン ン ンス ス ス ス スミ ミ ミ ミ ミッ ッ ッ ッ ッタ タ タ タ タ ー ー ー ー ー を を を を を 使 使 使 使 使用 用 用 用 用す す す す する る る る る 必 必 必 必 必要 要 要 要 要 が が が が があ あ あ あ あり り り り り ま ま ま ま ま す す す す す マシンがスタンバイモ ードになっている状態 で CPR CPR CPR CPR CPRキーを押します ディスプレイに次のように表...

Page 254: ...拍数を変更 1 刻みで増減 する 入力キーを押してエクササイズの残り時 間を延長する キーを1回押すごとに1分 延長されます いつでも次の操作が可能です ストップキーまたはクリアキーを押して エクササイズを一時停止する ストップキーを2回押してエクササイズ を終了する ストップキーまたはクリアキーを押してエクサ サイズを一時停止した場合は クイックス タートキーを押すとエクササイズを再開しま す または もう一度ストップキーを押すと エクササイズは終了しマシンはスタンバイ モードに戻ります 次の2つのガイドメッセー ジが表示されます ス ス ス ス スト ト ト ト トッ ッ ッ ッ ップ プ プ プ プ シ シ シ シ シュ ュ ュ ュ ュウ ウ ウ ウ ウリ リ リ リ リョ ョ ョ ョ ョ ウ ウ ウ ウ ウ ク ク ク ク クイ イ イ イ イッ ッ ッ ッ ック ク ク ク クス...

Page 255: ...ような メッセージが表示されます ワ ワ ワ ワ ワッ ッ ッ ッ ット ト ト ト ト 110 110 110 110 110 そしてマシンはそのエクササイズを操作パネ ルから選択および設定した場合と全 く同様に 作動し始めます エクササイズ終了時 TGSキー に記憶され たトレーニングプログラムにその他の予定エ クササイズがない場合は 次のメッセージが 表示されます ワ ワ ワ ワ ワー ー ー ー ーク ク ク ク クア ア ア ア アウ ウ ウ ウ ウト ト ト ト ト シ シ シ シ シュ ュ ュ ュ ュウ ウ ウ ウ ウリ リ リ リ リョ ョ ョ ョ ョ ウ ウ ウ ウ ウ 一方 他にも予定エクササイズがある場合 は 次のメッセージが表示されます ジ ジ ジ ジ ジキ キ キ キ キュ ュ ュ ュ ュウ ウ ウ ウ ウリ リ リ リ リョ ョ ョ ョ ョク ク ク ク ク ト...

Page 256: ...ィスプレイにパフォー マンス指数が表示されます P I 56 P I 56 P I 56 P I 56 P I 56 この指数は0から99段階の評価を表します パフォーマンス指数が高いほど あなたの酸 素消費能力は高いということになります パフォーマンス指数の向上は 同じ心拍数で より激しい運動ができるようになったことを意 味します パフォーマンス指数算出には特に考案され た基準を用いているため 異なる年齢グ ループの間でも比較を行なうことができま す ともあれ 同一者について複数のテスト 結果を比較するか または同一の負荷レベ ルと継続時間でトレーニングを行なっている ユーザーの間で 比較を行なうのがよいで しょう パフォーマンス指数 評価 11から20 21から30 31から40 40以上 10以下 やや弱い 普通 良い 非常に優秀 優秀 ...

Page 257: ...ミ ミ ミ ミ ミッ ッ ッ ッ ッタ タ タ タ ター ー ー ー ー ソ ソ ソ ソ ソウ ウ ウ ウ ウチ チ チ チ チャ ャ ャ ャ ャク ク ク ク ク 心拍信号が検出できないまま3分経過すると エクササイズはキャンセルされます いずれのエクササイズでも トランスミッター を使用して開始し途中で心拍信号が検出で きなくなった場合は 同様のメッセージが表 示されます クールダウン 各エクササイズの終りにはクールダウンが 行なわれます ディスプレイには次のように 表示されます ク ク ク ク ク ー ー ー ー ー ル ル ル ル ルダ ダ ダ ダ ダ ウ ウ ウ ウ ウン ン ン ン ン 最高心拍数のモニター 心拍数が理論的最高心拍数の85 を超える と ブザーが鳴り ディスプレイには次のメッ セージが表示されます シ シ シ シ シン ン ン ン ンパ パ パ パ パク ク ク...

Page 258: ...ク ク ク クイ イ イ イ イッ ッ ッ ッ ック ク ク ク クス ス ス ス スタ タ タ タ ター ー ー ー ート ト ト ト ト サ サ サ サ サイ イ イ イ イカ カ カ カ カイ イ イ イ イ クイックスタートキーを押すとエクササイズを 再開します ス ス ス ス スト ト ト ト トッ ッ ッ ッ ップ プ プ プ プ シ シ シ シ シュ ュ ュ ュ ュウ ウ ウ ウ ウリ リ リ リ リョ ョ ョ ョ ョ ウ ウ ウ ウ ウ もう一度ストップキーを押すとエクササイズ は終了します 一時停止してから何もキーを押さないまま1 分経過するとエクササイズは終了します エクササイズの消費カロリーと速度 エクササイズ中 次のようなメッセージが流 れます 2 44 KM 2 44 KM 2 44 KM 2 44 KM 2 44 KM この値は1km走行するのに要した時間を示 ...

Page 259: ...プレイに次のように表示されま す PASSWORD 0 PASSWORD 0 PASSWORD 0 PASSWORD 0 PASSWORD 0 ナンバーキーでコード1508 パスワード を入 力し 入力キーを押します デ ィスプレイには次の メッセージが表示されま す HOURS ON 1512 HOURS ON 1512 HOURS ON 1512 HOURS ON 1512 HOURS ON 1512 この値はマシンの総電源投入時間を示しま す 入力キーを押して次へ進みます HOURS OF USE 342 HOURS OF USE 342 HOURS OF USE 342 HOURS OF USE 342 HOURS OF USE 342 この値はマシンの作動時間数を示します 入力キーを押して次へ進みます この最後のメッセージの後マシンはスタンバ イモードに戻ります ...

Reviews: