background image

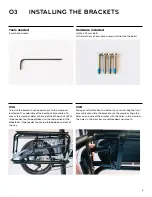
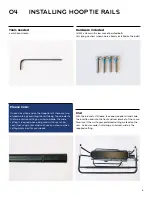
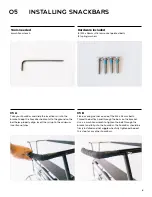
Hardware included

(4) M5 x 28mm ultra low socket pointed bolts
(4) spring washers (shown here already installed on the bolts)

Tools needed

4 mm Allen wrench

04

installing Hooptie rails

04 A

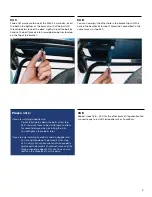
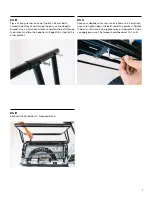
With the brackets still loose, take one Hooptie rail and slide 
the insertion end into the front and rear bracket at the same 
time. Insert the rail to your preferred setting marked on the 
rails - narrow or wide. If installing a child seat, wide is the 
required setting.

6

Please note:

On each insertion end on the Hooptie rails there are two 
etched markings encircling the rail tubing. These indicate 
the two insertion settings: narrow and wide. The wide 
setting is required when being used with a rear child 
seat. If not using a rear child seat, you can choose which 
setting works best for your needs.

Summary of Contents for Hooptie

Page 1: ...Hooptie snackbar MANUAL 2021 ...

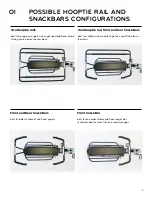
Page 2: ...ls Best for young passengers who might need additional help in staying contained on the rear deck 01 Possible Hooptie rail and SnackBars configurations Front SnackBar Best for one older child or adult passenger Not recommended for more than one rear passenger Front and Rear SnackBars Best for older children or adult passengers 2 ...

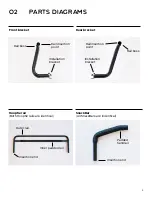
Page 3: ... All SnackBars are indentical Hooptie rail Both Hooptie rails are identical 3 Rail boss Installation bracket Rail insertion point Rail boss Installation bracket Rail insertion point Insertion end Insertion end Outer rail Inner padded rail Padded handrail ...

Page 4: ... bracket onto the crossbar Align the holes on one side of the bracket with the holes in the crossbar The holes in the crossbar are unthreaded and smooth 03 A To install the brackets you need access to the crossbars located on the underside of the RearRack of your bike To access the crossbar detach the top of the Wheelskirts RFA FreeLoader Too Swoop Stoker so the top portion of the WheelSkirt FreeL...

Page 5: ... the other bracket if applicable You are now ready to install the Hooptie rails or SnackBars 01 A Flip down the back panel to access the pannier hooks Please note If you are installing Hooptie rails Do not fully tighten down the bolts after step 03 D You want them to be a little loose to allow for some tolerance when installing the rails You will tighten these bolts later If you are only installin...

Page 6: ...ar bracket at the same time Insert the rail to your preferred setting marked on the rails narrow or wide If installing a child seat wide is the required setting 6 Please note On each insertion end on the Hooptie rails there are two etched markings encircling the rail tubing These indicate the two insertion settings narrow and wide The wide setting is required when being used with a rear child seat...

Page 7: ...y in the brackets when you apply pressure The torque should be about 12 13 nM 04 B Place a spring washer on one of the M5 x 28 mm bolts Thread the bolt by hand through the boss on the Hooptie bracket Use a 4 mm Allen wrench to tighten the bolt through the bracket and into the Hooptie rail Repeat this step for the other bracket 04 D Reattach the WheelSkirts FreeLoader Too ...

Page 8: ...boss on the bracket Use a 4 mm Allen wrench to tighten the bolt through the bracket and fully into the SnackBar The SnackBar should be firmly installed and not wiggle when fully tightened Repeat this step for any other SnackBars 05 A Take your SnackBar and slide the insertion rail into the bracket Keep the SnackBar horizontal to the ground so the bolt holes properly align Insert the rail up to the...

Page 9: ...acing the bar tape The bar tape used on the Hooptie s inner padded rail and the SnackBars is regular bike handlebar tape commonly used on road bike handlebars Replacing the bar tape on the Hooptie rail or SnackBar either because it has become worn or because you want a different color is the same process as rewrapping bike handlebars One standard box of bar tape contains enough tape to rewrap one ...

Page 10: ......

Reviews: