background image

NXRi-6KL, NXRi-10KL USER MANUAL 


UNINTERRUPTIBLE POWER SUPPLY (UPS) 

 
Xtreme Power Conversion® (XPC) Corporation (Rev 2/7/13) 

Page 36 

3.


After the UPS shuts down, turn off the battery breaker and remove the parallel cable and 
share current cable. You can now remove the UPS from the parallel system. 

Method #2 

1.


If the bypass in abnormal, you cannot remove the UPS without interruption. You must 
power down the load and shut down the UPS. 

2.


Enable the Bypass setting in each UPS and then power off the running UPS. All UPS units in 
the parallel system will transfer to Bypass mode. Remove all maintenance bypass covers and 
sent the maintenance switches from “UPS” to “BPS”. Turn off the input breakers and battery 
breakers. 

3.


Remove the desired UPS. 

4.


Turn on the input breaker of the remaining UPS and the system will transfer to Bypass 
mode. 

5.


Set the maintenance switches from “BPS” to “UPS” and re-install the maintenance bypass 
covers. Turn on the remaining UPS and finish the parallel system connections. 

 Warning: (Parallel System Only) 


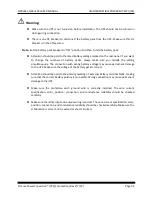
Before turning on the parallel system to activate the inverter, make sure that all UPS 
Maintenance switches are in the same position. 


When parallel system is turned on to operate through the inverter, please do not operate 
the Maintenance switch of any UPS. 

Summary of Contents for NXRi-10KL

Page 1: ...www xpcc com 2013 Xtreme Power Conversion Corporation All rights reserved UNINTERRUPTIBLE POWER SUPPLY UPS NXRi Online High Voltage Rack Models USER INSTALLATION MANUAL ...

Page 2: ...Line Technology 10 Diagnostic Tests 10 SYSTEM CONFIGURATION 11 LED LCD Descriptions 15 RS 232 Standard Interface 16 SNMP Communications Option 16 Remote Emergency Power Off REPO Port 16 HARDWARE INSTALLATION GUIDE 17 Rack mount Installation using 4 post rail kit 18 UPS Installation 21 UPS Installation for Parallel Systems 22 Battery Pack Installation 25 Software Installation 25 OPERATIONS 26 Butto...

Page 3: ... the Batteries 33 Turn off the UPS with Utility Power in AC Mode 33 Turn off the UPS without Utility Power in Battery Mode 33 Muting the Buzzer 33 Operation in Warning Status 33 Operation in Fault Mode 34 Operation of Changing Battery Numbers 34 Parallel Operation 34 Parallel System Connection 34 Add one new unit into the Parallel System 35 Remove one unit from the Parallel System 35 Abbreviations...

Page 4: ...ble Output Settings 42 11 Shutdown Point for Programmable Output 42 12 Hot standby function enable disable 43 13 Battery Voltage Adjustment 43 14 Charger Voltage Adjustment 43 15 Output Voltage Adjustment 43 Operating Mode Status Description 44 Fault Codes 46 Warning Indicators 47 TROUBLESHOOTING 48 STORAGE AND MAINTENANCE 50 Storage 50 Maintenance 51 BATTERIES 52 REPLACING THE BATTERY 52 SPECIFIC...

Page 5: ...NXRi 6KL NXRi 10KL USER MANUAL UNINTERRUPTIBLE POWER SUPPLY UPS Xtreme Power Conversion XPC Corporation Rev 2 7 13 Page 5 ...

Page 6: ...s it provides important information that should be followed during installation and maintenance of the UPS and batteries allowing you to correctly set up your system for the maximum safety and performance Included is information on customer support and service if it is required If you experience a problem with the UPS please refer to the Troubleshooting section in this manual to correct the proble...

Page 7: ... CAUTION Do not dispose of batteries in a fire the battery may explode CAUTION Do not open or mutilate the battery released electrolyte is harmful to the skin and eyes CAUTION A battery can present a risk of electric shock and high short circuit current The following precaution should be observed when working on batteries Remove watches rings or other metal objects Use tools with insulated handles...

Page 8: ...qualified service personnel Before conducting any maintenance repair or shipment first ensure that everything is turned off completely and disconnected For additional safety instructions please use the Safety Manual as a reference Special Symbols The following symbols used on the UPS warn you of precautions RISK OF ELECTRIC SHOCK Please observe the warning that a risk of electric shock is present ...

Page 9: ...ons It also includes information on how to ship store handle and install the equipment Only detailed requirements of the UPS units are described herein and installation must be carried out in accordance with this manual Electrical installation must also carefully follow local legislation and regulations Only qualified personnel should conduct these installations as failure to acknowledge electrica...

Page 10: ...ies for their maximum potential In the event that the power failure lasts longer than the UPS backup time the UPS will shut down avoiding battery damage When the input AC voltage returns the UPS will automatically return online to recharge the batteries As shown in fig 1 block diagram An input filter reduces transients on the incoming utility To maintain full battery charge the AC input power is r...

Page 11: ...o consideration The total demand of the protected system shall dictate the output power rating VA Allow a margin for future expansion or calculation inaccuracies from measured power requirements Backup time required will indicate the battery size needed If the load is less than the UPS nominal power rating then actual backup time is longer The following options are available o Extended Battery Pac...

Page 12: ... NXRi 10KL USER MANUAL UNINTERRUPTIBLE POWER SUPPLY UPS Xtreme Power Conversion XPC Corporation Rev 2 7 13 Page 12 NXRi 6KL UPS REAR VIEW DIAGRAM WITHOUT PARALLEL FUNCTION NXRi 6KL UPS REAR VIEW WIRING DIAGRAM ...

Page 13: ...L NXRi 10KL USER MANUAL UNINTERRUPTIBLE POWER SUPPLY UPS Xtreme Power Conversion XPC Corporation Rev 2 7 13 Page 13 NXRi 10KL UPS REAR VIEW DIAGRAM WITH PARALLEL FUNCTION NXRi 10KL UPS REAR VIEW WIRING DIAGRAM ...

Page 14: ...NXRi 6KL NXRi 10KL USER MANUAL UNINTERRUPTIBLE POWER SUPPLY UPS Xtreme Power Conversion XPC Corporation Rev 2 7 13 Page 14 NXRi EBP20 REAR VIEW DIAGRAM FRONT PANEL ...

Page 15: ...fer to the Operations section of this document Bypass LED Illuminates during UPS Startup Bypass Mode Battery Test and ECO Mode of operation Line LED Illuminates during UPS Startup AC Mode CVCF Mode Battery Test and ECO Mode of operation Battery LED Illuminates during UPS Startup Battery Mode and Battery Test Mode of operation Fault LED Illuminates during UPS Startup and Fault Mode of operation ...

Page 16: ... intelligent network card can be compatible with popular software and hardware found on the web and in operating systems It can support operating systems such as HP Open View IBM Netview SUN Netmanager etc This enables the UPS to provide instant UPS and power information over the network Please contact your reseller for additional details Remote Emergency Power Off REPO Port A customer supplied sw...

Page 17: ...carton Do not store in temperatures outside the range of 15 C to 25 C Ensure that the equipment is fully protected from wet or damp areas and from moist air In order to maintain the batteries the UPS should be recharged every 6 months for at least 8 hours If flammable substances such as gases or fumes are present or if the room is airtight a hazardous situation may exist in which no electrical equ...

Page 18: ...the following when locating the UPS system and battery options Avoid extremes of temperature and humidity Maximum battery life can be attained with a recommended temperature range of 15 C to 25 C Provide protection for the equipment from moisture Space and ventilation requirements must be met Ensure there is 100mm to the front and rear of the UPS and Battery Pack for proper ventilation Ensure that...

Page 19: ...NTERRUPTIBLE POWER SUPPLY UPS Xtreme Power Conversion XPC Corporation Rev 2 7 13 Page 19 Step 1 Use 4 screws to mount right and left rail sliders in front of rack Step 2 Use 4 screws to mount right and left rail sliders in back of rack ...

Page 20: ...OWER SUPPLY UPS Xtreme Power Conversion XPC Corporation Rev 2 7 13 Page 20 Step 3 Place the nuts in the proper location in the rack based upon height of UPS Step 4 Carefully place the UPS on the rail support Step 5 Fix the UPS in position with screws ...

Page 21: ... rated current is less than the UPS maximum input current 2 Switch off the utility circuit breaker before installation 3 Turn off all connected devices before connecting to the UPS 4 Wiring sizes should be installed in accordance with the following table Model Wiring specification AWG INPUT OUTPUT BATTERY GROUND 6KL 10 10 10 10 10KL 8 8 8 8 Note The cable for 6K should be able to withstand over 40...

Page 22: ...xtend the backup time to critical devices by setting shorter backup time for non critical devices Note Please install an output breaker between the output terminal and the load The breaker should be qualified with leakage current protection function if necessary 6 Insert the EPO plug into the EPO slot on the rear panel 7 Put the terminal block cover back onto the rear panel of the UPS and EBP UPS ...

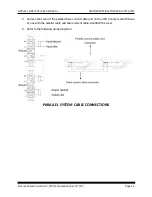
Page 23: ...ersion XPC Corporation Rev 2 7 13 Page 23 5 Remove the cover of the parallel share current cable port on the UPS Connect each UPS one by one with the parallel cable and share current cable Reattach the cover 6 Refer to the following wiring diagrams PARALLEL SYSTEM CABLE CONNECTIONS ...

Page 24: ...re you modify the setting simultaneously The connection with wrong battery voltage may cause permanent damage to the UPS Make sure the voltage of the battery pack is correct Attention should be paid to the polarity marking on external battery terminal block making sure that the correct battery polarity is connected Wrong connection may cause permanent damage to the UPS Make sure the protective ear...

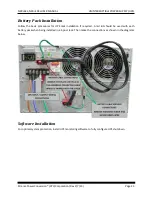
Page 25: ...Installation Follow the basic procedures for UPS rack installation if required A rail kit should be used with each battery pack when being installed in a 4 post rack Then make the connections as shown in the diagrams below Software Installation For optimal system protection install UPS monitoring software to fully configure UPS shutdown ...

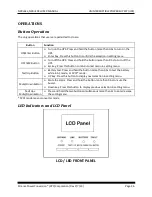
Page 26: ...ore than 0 5s to turn off the UPS Esc key Press this button to return to last menu in setting menu Test Up Button Battery test Press and hold the button more than 0 5s to test the battery while in AC mode or CVCF mode UP key Press this button to display next selection in setting menu Mute Down Button Mute the alarm Press and hold the button more than 0 5s to mute the buzzer Down key Press this but...

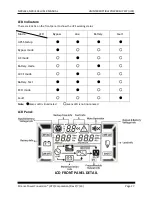
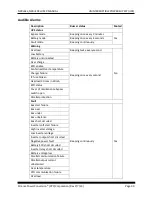
Page 27: ...v 2 7 13 Page 27 LED Indicators There are 4 LEDs on the front panel to show the UPS working status Mode LED Bypass Line Battery Fault UPS Startup Bypass mode AC mode Battery mode CVCF mode Battery Test ECO mode Fault Note means LED is illuminated means LED is not illuminated LCD Panel LCD FRONT PANEL DETAIL ...

Page 28: ...isabled Output Battery voltage information Indicates the output voltage frequency or battery voltage Vac output voltage Vdc battery voltage Hz frequency Load information Indicates the load level by 0 25 26 50 51 75 and 76 100 Indicates overload Indicates the load or the output is short Programmable output information Indicates that the programmable outputs are working Mode operation information In...

Page 29: ...Function Battery information Indicates the Battery capacity by 0 25 26 50 51 75 and 76 100 Indicates the battery is not connected Indicates low battery level and low battery voltage Input Battery voltage information Indicates the input voltage or frequency or battery voltage Vac Input voltage Vdc battery voltage Hz input frequency ...

Page 30: ...d Over charge EPO enable Fan failure Over temperature Charger failure IP fuse broken Overload 3 times in 30min EPO status Cover of maintenance bypass switch open Parallel protection Fault Bus start failure Beeping continuously Yes Bus over Bus under Bus unbalance Bus short circuited Inverter soft start failure High Inverter voltage Low Inverter voltage Inverter output short circuited Negative powe...

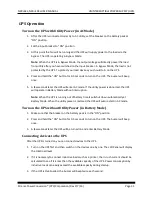
Page 31: ...y power is abnormal the UPS will operate in Battery Mode without interruption Note When the UPS is running out of battery time it will shut down automatically at Battery Mode When the utility power is restored the UPS will auto restart in AC mode Turn on the UPS without Utility Power in Battery Mode 1 Make sure that the breaker on the battery pack is in the ON position 2 Press and hold the ON butt...

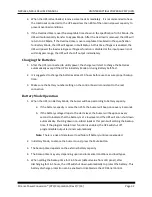
Page 32: ... batteries at least 10 hours before use to assure proper backup time 3 Make sure the battery number setting on the control board is consistent to the real connection Battery Mode Operation 1 When the UPS is in Battery Mode the buzzer will beep according to battery capacity a If the battery capacity is more than 25 the buzzer will beep once every 4 seconds b If the battery voltage drops to the alar...

Page 33: ...erminals even though the UPS inverter has been turned off Note After turning off the UPS please beware that the UPS is operating in Bypass Mode and there is a risk of power loss for connected devices 2 In Bypass Mode output voltage of the UPS is still present In order to shut off the output voltage switch off the input breaker to the UPS A few seconds later there will be no display shown on the Di...

Page 34: ... the UPS If the load cannot be shut down remove the cover from the Maintenance Bypass Switch on the rear panel of the UPS and turn the Maintenance Bypass Switch to BPS position 3 Switch off the input breaker and battery breaker 4 Remove the UPS cover Modify the jumper on the control board to set the battery numbers Disconnect the battery wire for standard model and modify the battery pack carefull...

Page 35: ...urrent cables are connected well If they are all connected well the UPS may have an internal issue Contact your distributor for further assisatance 6 Turn off each UPS in sequence After all of the UPS are transferred to Bypass mode turn on the output breaker for each unit 7 Turn on the UPS in AC mode Parallel system connections and configuration should now be complete Add one new unit into the Par...

Page 36: ...tem will transfer to Bypass mode Remove all maintenance bypass covers and sent the maintenance switches from UPS to BPS Turn off the input breakers and battery breakers 3 Remove the desired UPS 4 Turn on the input breaker of the remaining UPS and the system will transfer to Bypass mode 5 Set the maintenance switches from BPS to UPS and re install the maintenance bypass covers Turn on the remaining...

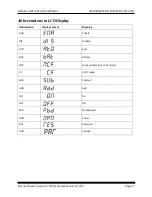
Page 37: ...version XPC Corporation Rev 2 7 13 Page 37 Abbreviations in LCD Display Abbreviation Display content Meaning ENA Enable DIS Disable ATO Auto BAT Battery NCF Normal mode not CVCF mode CF CVCF mode SUB Subtract ADD Add ON On OFF Off FBD Not allowed OPN Allow RES Reserved PAR Parallel ...

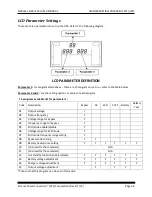
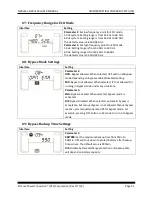
Page 38: ...st for parameter 1 Code Description Bypass AC ECO CVCF Battery Battery Test 01 Output voltage Y 02 Output frequency Y 03 Voltage range for bypass Y 04 Frequency range for bypass Y 05 ECO mode enable disable Y 06 Voltage range for ECO mode Y 07 ECO mode frequency range setting Y 08 Bypass mode setting Y Y 09 Battery backup time setting Y Y Y Y Y Y 10 not used for these models N A 11 not used for th...

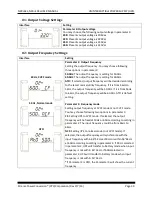
Page 39: ...ormal utility frequency If it is from 46Hz to 54Hz the output frequency will be 50 0Hz If it is from 56Hz to 64Hz the output frequency will be 60 0Hz ATO is default setting Parameter 3 Frequency mode Setting output frequency at CVCF mode or not CVCF mode You may choose following two options in parameter 3 CF Setting UPS to CVCF mode If selected the output frequency will be fixed at 50Hz or 60Hz ac...

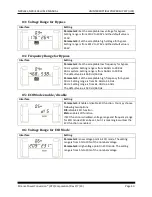
Page 40: ... 0Hz to 59 0Hz The default value is 46 0Hz 56 0Hz Parameter 3 Set the acceptable high frequency for bypass 50 Hz Setting range is from 51 0Hz to 54 0 Hz 60 Hz Setting range is from 61 0Hz to 64 0Hz The default value is 54 0Hz 64 0Hz 05 ECO Mode enable disable Interface Setting Parameter 3 Enable or disable ECO function You may choose following two options DIS disable ECO function ENA enable ECO fu...

Page 41: ...pass allowed When selected UPS will run at Bypass mode depending on bypass enabled disabled setting FBD Bypass not allowed When selected it s not allowed for running in Bypass mode under any situations Parameter 3 ENA Bypass enabled When selected Bypass mode is activated DIS Bypass disabled When selected automatic bypass is acceptable but manual bypass is not allowed Manual bypass means users manu...

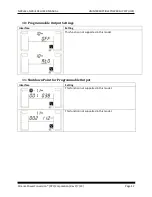
Page 42: ...onversion XPC Corporation Rev 2 7 13 Page 42 10 Programmable Output Settings Interface Setting This function not supported in this model 11 Shutdown Point for Programmable Output Interface Setting This function not supported in this model This function not supported in this model ...

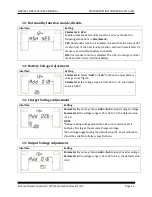
Page 43: ... Voltage Adjustment Interface Setting Parameter 2 Select Add or Sub function to adjust battery voltage to real figure Parameter 3 the voltage range is from 0V to 5 7V the default value is 0 09V 14 Charger Voltage Adjustment Interface Setting Parameter 2 you may choose Add or Sub to adjust charger voltage Parameter 3 the voltage range is from 0V to 7V the default value is 1 1V NOTE Before making vo...

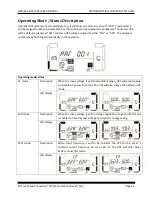
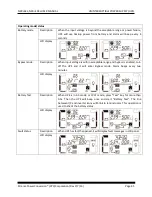
Page 44: ... or 003 The assigned numbers may be changed dynamically in the operation Operating mode status AC mode Description When the input voltage is within acceptable range UPS will provide pure and stable AC power to output The UPS will also charge the battery in AC mode LCD display ECO mode Description When the input voltage is within voltage regulation range and ECO mode is enabled UPS will bypass volt...

Page 45: ...ption When input voltage is within acceptable range and bypass is enabled turn off the UPS and it will enter Bypass mode Alarm beeps every two minutes LCD display Battery Test Description When UPS is in AC mode or CVCF mode press Test key for more than 0 5s Then the UPS will beep once and start Battery Test The line between I P and inverter icons will blink to remind users This operation is used t...

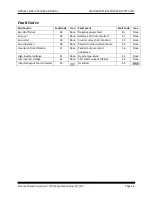
Page 46: ...er fault 1A None Bus over 02 None Battery SCR short circuited 21 None Bus under 03 None Inverter relay short circuited 24 None Bus unbalance 04 None Parallel communication failure 35 None Inverter soft start failure 11 None Parallel output current unbalance 36 None High Inverter voltage 12 None Over temperature 41 None Low Inverter voltage 13 None CPU communication failure 42 None Inverter output ...

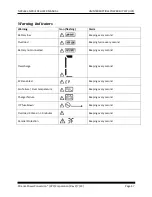
Page 47: ...w Beeping every second Overload Beeping twice every second Battery not connected Beeping every second Overcharge Beeping every second EPO enabled Beeping every second Fan failure Over temperature Beeping every second Charger failure Beeping every second I P fuse blown Beeping every second Overload 3 times in 30 minutes Beeping every second Parallel Protection Beeping every second ...

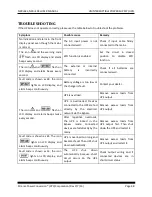
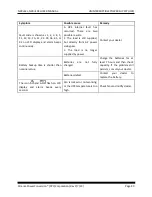
Page 48: ... display and alarm beeps continuously Battery voltage is too low or the charger is fault Contact your dealer The icon and flash on LCD display and alarm beeps twice every second UPS is overload Remove excess loads from UPS output UPS is overloaded Devices connected to the UPS are fed directly by the electrical network via the Bypass Remove excess loads from UPS output After repetitive overloads th...

Page 49: ...load is still supplied but directly from AC power via bypass 2 The load is no longer supplied by power Contact your dealer Battery backup time is shorter than nominal value Batteries are not fully charged Charge the batteries for at least 7 hours and then check capacity If the problem still persists consult your dealer Batteries defect Contact your dealer to replace the battery The icon and flash ...

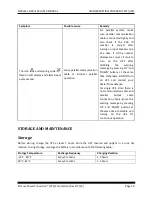
Page 50: ...he UPS after disabling the warning message by pressing UP and DOWN buttons at the same time Otherwise DO NOT turn on UPS and contact your dealer for assistance For single UPS since there is not communication cable and parallel output cable connection simply ignore this warning message by pressing UP and DOWN buttons at the same time to disable and turning on the UPS for continuous operation STORAG...

Page 51: ... well away from the batteries Verify that no voltage between the battery terminals and the ground is present before maintenance or repair In this product the battery circuit is not isolated from the input voltage Hazardous voltages may occur between the battery terminals and the ground Batteries may cause electric shock and have a high short circuit current Please remove all wristwatches rings and...

Page 52: ...open or mutilate the batteries Released electrolyte is harmful to skin and eyes and may be toxic CAUTION Although the battery system voltage is only 12VDC and 24VDC the battery can present a high risk of short circuit current and electrical shock The short circuit current capability of the battery is sufficient to burn wire or tools very rapidly producing molten metal Observe these precautions whe...

Page 53: ...ERY Battery Type EBP20 20 12V 9AH Recharge to 90 3 hours 4 hours Backup Time half full 18 min 7 min 12 min 5 min Charge Current 2A PHYSICAL UPS Dimensions W x D x H 438 x 580 x 133 mm 17 2 x 22 8 x 5 2 in 438 x 668 x 133 mm 17 2 x 26 3 x 5 2 in UPS Unit Weight 17 kg 37 5 lbs 20 kg 44 0 lbs EBP20 Dimensions W x D x H 438 x 668 x 133 mm 17 2 x 26 3 x 5 2 in EBP Unit Weight 63 kg 138 9 lbs Input Outp...

Page 54: ...2 NXRi EBP20 137 56 34 23 WITH 3 NXRi EBP20 230 95 56 39 WITH 4 NXRi EBP20 332 137 81 56 NXRi 10KL WITH 1 NXRi EBP20 29 12 7 5 WITH 2 NXRi EBP20 71 29 17 12 WITH 3 NXRi EBP20 120 49 29 20 WITH 4 NXRi EBP20 173 71 42 29 SHIPPING LIST UPS 1 1 UPS 2 1 User and Installation Manual 3 1 USB cable 4 1 ViewPower CD monitoring software 5 1 Parallel Cable kit NXRi 10KL only SHIPPING LIST EBP20 1 1 EBP 2 1 D...

Page 55: ...he protected equipment including model numbers if possible A technician will ask you for the above information and if possible help solve your problem over the phone In the event that the unit requires factory service the technician will issue you a Return Material Authorization number RMA If you are returning the UPS to Xtreme Power for service please follow these procedures 1 Pack the UPS in its...

Reviews: